Hi everyone!
For this post, I’m doing something very different. I’m building a simulation for an Arduino radar!
DISCLAIMER:
A big shoutout to Robotics India for the amazing ideas and tutorials on Arduino projects. Many of the concepts here were inspired by their work, and we’ve adapted them to fit the flow of this post. We encourage readers to check out Robotics India’s content for even more detailed insights and guidance.
Furthermore, I did not use any form of AI assistance in this project. Thanks!
This is my first time EVER doing something like this. Therefore, I’ve looked online for some ideas, and have come across the holy grail of videos.
Check it out!
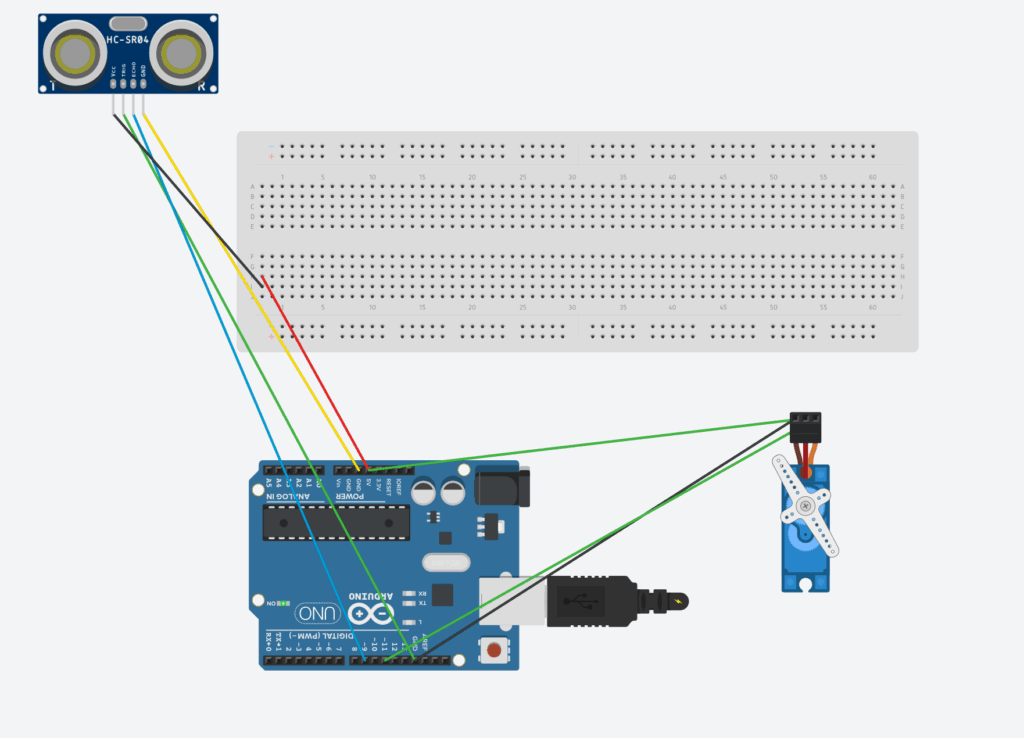
After watching the video, I decided to recreate the project myself, a mini Arduino radar system using an ultrasonic sensor (HC-SR04) and a servo motor.
DISCLAIMER: This code is heavily inspired by a YouTuber, and under no circumstances do I claim it as my own. I have, however, studied how the code works and believe I have a solid understanding of its functionality. My explanation within the code below reflects my own understanding and interpretation.
The basic idea is simple: the servo rotates the ultrasonic sensor back and forth, sending out sound waves to detect objects. The distance readings are then used to simulate a radar sweep, just like what you’d see on an actual radar screen.
Here’s what the setup includes:
- Arduino UNO (the brain of the project)
- HC-SR04 Ultrasonic Sensor (for distance measurement)
- SG90 Micro Servo (to rotate the sensor)
- Breadboard and jumper wires (for connections)
The circuit sends out ultrasonic pulses, measures how long they take to return, and converts that time into distance. Then, the servo moves to a new angle and repeats the process, scanning the area in front of it.
Here is the BOM (parts list), and code below, along with an explanation of how everything works!
| Component | Quantity | Description |
| Arduino UNO | 1 | The “Brain” of he circuit |
| HC-SR04 Ultrasonic Sensor | 1 | Sends and receives sound waves to measure distance. |
| SG90 Micro Servo Motor | 1 | Rotates the ultrasonic sensor to scan different angles. |
| Breadboard | 1 | Makes it easy to connect components without soldering. |
| Male-to-Male Jumper Wires | 1 | For all electrical connections between the components. |
| USB Cable (Type-B) | 8 | Used to upload code and power the Arduino. |
#include <Servo.h>

// --- Pin Definitions ---
const int SERVO_PIN = 11;
const int TRIG_PIN = 8;
const int ECHO_PIN = 9;

// --- Constants for Servo ---
const int MIN_ANGLE = 0;
const int MAX_ANGLE = 180;
const int ANGLE_STEP = 1;
const int SWEEP_DELAY = 15;

// --- Constants for Ultrasonic Sensor ---
const float SOUND_SPEED_FACTOR = 58.2; // duration / 58.2 = cm

Servo myServo;

void setup() {
  pinMode(TRIG_PIN, OUTPUT);
  pinMode(ECHO_PIN, INPUT);
  myServo.attach(SERVO_PIN);
  Serial.begin(9600);
}

void loop() {
  sweepAndMeasure(MIN_ANGLE, MAX_ANGLE, ANGLE_STEP);
  sweepAndMeasure(MAX_ANGLE, MIN_ANGLE, -ANGLE_STEP);
}

void sweepAndMeasure(int startAngle, int endAngle, int step) {
  int angle = startAngle;

  while (true) {
    myServo.write(angle);
    delay(SWEEP_DELAY);

    long distance = calculateDistance();
    printData(angle, distance);

    if (angle == endAngle) break;
    angle += step;
  }
}

long calculateDistance() {
  // Trigger ultrasonic pulse
  digitalWrite(TRIG_PIN, LOW);
  delayMicroseconds(5);
  digitalWrite(TRIG_PIN, HIGH);
  delayMicroseconds(10);
  digitalWrite(TRIG_PIN, LOW);

  // Read echo with timeout (prevents freezing)
  long duration = pulseIn(ECHO_PIN, HIGH, 25000); // 25ms max = ~4 meters

  // If no echo → return -1
  if (duration == 0) return -1;

  long distance = duration / SOUND_SPEED_FACTOR;

  // Filter out unrealistic noise
  if (distance > 400 || distance < 0) return -1;

  return distance;
}

void printData(int angle, long distance) {
  Serial.print(angle);
  Serial.print(",");
  Serial.println(distance);
}
In short, it sweeps a servo back and forth while measuring and logging distances with an ultrasonic sensor.
Here is the link to this project
Here is the demonstration:
https://www.youtube.com/watch?v=OaFm6R9hRnY
Thanks for reading!
Leave a Reply to mcrompton Cancel reply