Code:
Below is my full code, along with a video run-through of it.
### system setup ###
import pygame
# import pygame from Google Colab's storage into this project
import sys
# import "System", which allows interactions with the Python code itself and lets it access other modules such as pygame
import random
pygame.init()
# calls on the pygame module, as it's a function and prepares it to be used (similar to turning on a game console)


### game setup ###
SCREEN_WIDTH = 1000
SCREEN_HEIGHT = 500
# setting up variables for determining the display size.
# programming convention to use all caps for variables that will not change throughout the game
screen = pygame.display.set_mode((SCREEN_WIDTH, SCREEN_HEIGHT))
# pygame function that sets up a display based on given width and height in the parameters
clock = pygame.time.Clock()
# creates a clock in pygame, which will be used to set up the frame rate of the game
SPAWNPIPE = pygame.USEREVENT
# creates a special event, which will be used to create and delete pipes in intervals
pygame.time.set_timer(SPAWNPIPE, 600)
# Spawns a new pipe once every 1200 miliseconds (1.2 seconds)
score = 0
font = pygame.font.Font(None, 50)
# Simple scoring system based on survival time. In the parameters, "none" defines the default font, while "50" defines the font size

### game sprites ###
### bird ###
class Bird(pygame.sprite.Sprite):
    # creates a python class, which is used to define attributes of a sprite. The parameter inherits existing attribute definitions and features from pygame
    def __init__(self):
        # function where all the attributes of the bird sprite will be defined
        super().__init__()
        # call on the above-mentioned function to begin prepare for defining the attributes

        self.image = pygame.Surface((30, 30))
        # Create a blank surface for the circle (bird)
        self.image.fill((142, 184, 250))
        # Make the surface transparent
        pygame.draw.circle(self.image, (255, 255, 255), (15, 15), 15)
        # Draw a white circle with the defined attributes

        # to upload an image as the sprite for the bird
        self.rect = self.image.get_rect(center=(100, SCREEN_HEIGHT / 2))
        # short for rectangle, function that defines the position and size of the bird, can be used as a hitbox
        self.gravity = 0.25
        self.velocity = 0
        # defines the bird's weight and speed (at the start of the game)
    def update(self):
        # function to update the bird's position on the display every frame
        self.velocity += self.gravity
        # as the bird's gravity increases, its speed/velocity will increase with it
        self.rect.y += self.velocity
        # when the velocity is positive, the bird will be falling (negative change in y), and vice versa for negative velocity
        if self.rect.top < 0:
            self.rect.top = 0
            self.velocity = 0
        if self.rect.bottom > SCREEN_HEIGHT:
            self.rect.bottom = SCREEN_HEIGHT
            self.velocity = 0
        # ensures the bird does not fly off the screen. If its y position matches the top or bottom boundaries, the bird's velocity will be set to 0

    def flap(self):
        self.velocity = -4
        # When the bird flaps, the velocity will be set to negative, shooting the bird's y position up against gravity

# Create the bird
bird_group = pygame.sprite.GroupSingle()
# Creates a group that holds one sprite
bird = Bird()
bird_group.add(bird)
# adds the bird to the group


### pipes ###
class Pipe(pygame.sprite.Sprite):
    # similar to creating the bird sprite, with the difference that this sprite needs to ensure random spawn positions
    def __init__(self, x, y, position):
    # defines the x and y locations for the pipe, with the position parameter to determine whether the pipe is on the top or bottom
        super().__init__()
        self.image = pygame.Surface((50, 500))
        # creates a base for the sprite
        self.image.fill((0, 128, 0))
        # creates the pipe with the defined color

        # Determine the pipe's position and orientation
        self.rect = self.image.get_rect(midtop=(x, y))
        # short for rectangle, defines the dimensions and locations of the pipes. Get rect creates a rectangle the same size as the pipe
        if position == 'bottom':
            self.rect = self.image.get_rect(midtop=(x, y))
        # sets the middle-top of the pipe as the official "connecting point", aka the point the x and y locations will apply to
        if position == 'top':
            self.image = pygame.transform.flip(self.image, False, True)
            # Flips the top pipe vertically on the x-axis and creates a new sprite/pipe/rectangle in that new location
            # Ensures the top and bottom pipes are lined up
            self.rect = self.image.get_rect(midbottom=(x, y))
            # Changes the connecting point to the middle-bottom point of the rectangle to mirror the top pipe.

    def update(self):
        self.rect.x -= 6
        # Each frame move the pipe to the left by 3

# Create the pipes
pipe_group = pygame.sprite.Group()

running = True
while running:
    # Creates an infinite loop, as the while function requires a condition to be true to run, and "running" is currently set to true.
    # The code below will be repeated until running becomes false (when the player decides to quit)
    for event in pygame.event.get():
        # the "pygame.event.get" function collects all the user's actions during the loop, which lasts forever because of the while statement
        # used here to check for specific player inputs, but mainly closing the window
        if event.type == pygame.QUIT:
            running = False
        # if the user exits the window, the "running" variable will be set to false, stopping the while loop
        if event.type == pygame.KEYDOWN:
            if event.key == pygame.K_SPACE:
                bird.flap()
        # similar function to the first "event.type", checks if user performs an action.
        # If space bar is clicked, the flap function is called to set the bird's velocity to negative, launching it upwards
        if event.type == SPAWNPIPE:
            pipe_gap = 150
            # the gap between the two pipes that the bird can pass through
            pipe_y_pos = random.randint(150, 350)
            # random y position chosen by the random integer function. this position is the middle of the gap of the top and bottom pipes
            bottom_pipe = Pipe(SCREEN_WIDTH, pipe_y_pos + pipe_gap / 2, 'bottom')
            # the bottom pipe's parameters are defined. The x-axis is fixed, so set to screen width
            # the y-axis is random, thus uses the random integer function as the parameter. because this is the center point of the gap,
            # half of the total pipe gap is added to the y position to push the pipe down, creating a gap for the bird to fly through
            pipe_group.add(bottom_pipe)
            # add pipe to bottom pipe group
            # Create the top pipe
            top_pipe = Pipe(SCREEN_WIDTH, pipe_y_pos - pipe_gap / 2, 'top')
            pipe_group.add(top_pipe)
            # same logic as the bottom pipe, but inverse, and the pipe is added to the top_pipe group

    clock.tick(120)
    # calling on a function that determines the frame rate of a game. It is set to 120 fps for best tested performance
    screen.fill((142, 184, 250))
    # creates a background with a light blue color
    score = pygame.time.get_ticks() // 1000
    # built-in pygame timer. The // is used to divide the ticks by 1000 and provide an integer answer for easier display
    bird_group.draw(screen)
    # This draws the bird on the display
    bird_group.update()
    # Updates the bird on the display each frame
    pipe_group.draw(screen)
    pipe_group.update()
    # same as drawing the bird, displays the pipes on the screen and updates it each frame
    score_text = font.render(str(score), True, (0, 0, 0))
    # Drawing the text on the screen, and the str converts the score (which was an integer because of the "tick" function) to a string for pygame
    # the antialiasing and color defines the text attributes, specifically to make it look more natural and to define its color
    score_rect = score_text.get_rect(center=(SCREEN_WIDTH / 2, 50))
    # Creates a rectangle with the rect function for positioning the score
    screen.blit(score_text, score_rect)
    # overlays the one sprite on top of another, in this case being score on top of the rectangle that contains it
    if pygame.sprite.spritecollide(bird_group.sprite, pipe_group, False):
        running = False
        # built-in pygame function that checks for collision between the bird and the pipe group
        # If the collision happens, running is set to false, stopping the while loop

    pygame.display.flip()
    # A function that changes the front buffer with the back buffer.
    # Games prevent screen flicker by using a "front buffer" for the current display the user sees, and an invisible "back buffer" for drawing the next frame.
    # Once the back buffer is finished, it is moved to the front by the "flip" function, ensuring smooth visuals


pygame.quit()
sys.exit()
# quit pygame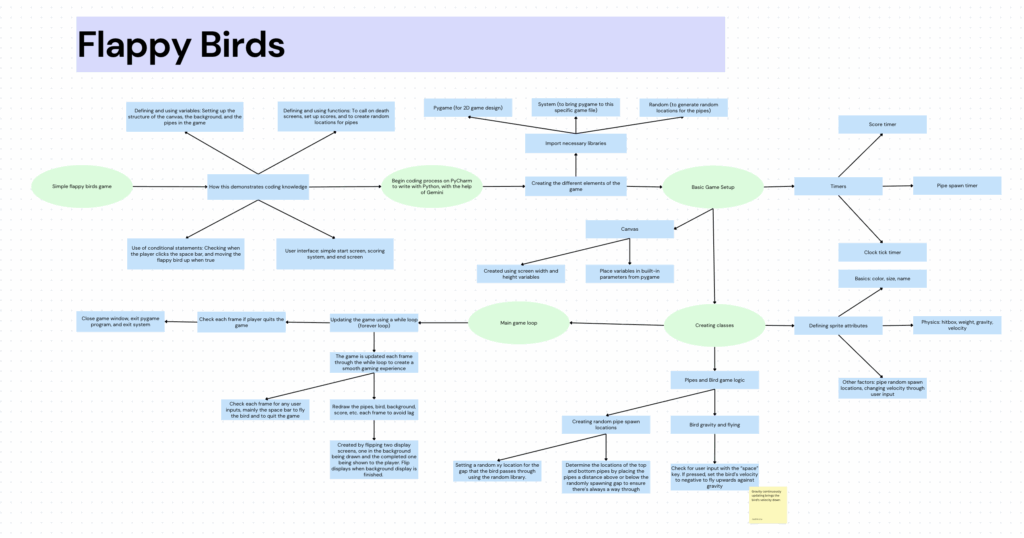
For my Fusion coding project, I created a Flappy Bird game using Python and the PyGame library. I chose this project because it is simple yet effectively demonstrates the required learning objectives, such as conditional statements (e.g., checking for spacebar inputs), the use of functions (e.g., bird physics, pipe generation), and making use of additional python libraries
I chose to create my coding project on PyCharm, as it is a tool specialized for Python coding, which was my chosen language. I first imported the necessary tools to my project, including “PyGame”, whose library included many built-in functions helpful to creating 2D games. Next, I imported “Random” as that would be core to creating pipes at different positions each time for my game. Lastly, importing the system allowed the python code (the file I was working in) to actually interact with the imported modules.
import pygame
import sys
import random
pygame.init()
# Calls on the PyGame library to prepare it for use

(Lines 1-8)
Next, I decided to build the game setup. The main use of this section was to set a few foundations which my game would be built upon. Notably, variables such as Screen_Width & Height determined the size of my canvas. With preset boundaries, these values could later be called on to position new sprites (such as the pipes).
SCREEN_WIDTH = 1000
SCREEN_HEIGHT = 500

(Lines 12-13)
The purposes of other variables, such as “clock”, “SpawnPipe”, “timer”, and “font-size” are self-explanatory. The game development is split into three main sections. Firstly, this “Game Set-up” section establishes the rules and the game environment before the actual gameplay loop begins. In short, it sets up variables that the later sections can call back on.
The next section of my code is the sprite creation. The main purpose of this section is to define how my game will look, which in this case is the flappy bird’s and the pipes’ dimensions and attributes. This section was a little complicated to code, but simple to explain. The first step was to define a sprite, before determining its dimensions and properties, and lastly considering whether it needed additional functions and if so, how it would affect the game logic later on.
self.image = pygame.Surface((30, 30))
       # Create a blank surface for the circle (bird)
       self.image.fill((142, 184, 250))
       # Make the surface transparent
       pygame.draw.circle(self.image, (255, 255, 255), (15, 15), 15)
       # Draw a white circle with the defined attributes
       # to upload an image as the sprite for the bird
       self.rect = self.image.get_rect(center=(100, SCREEN_HEIGHT / 2))
       # short for rectangle, function that defines the position and size of the bird, can be used as a hitbox

(Lines 37-46)
Lines like this, for example, create attributes for “self” (the bird) by setting a foundation, drawing a sprite on top of that, and adding an invisible rectangle beneath it to decide the bird’s position. Other lines such as gravity and velocity affect the physics of the game.
The last part of the code defines the central game logic. The most important line, the “While” loop, creates an infinite loop that ensures the game is updated each frame, so that the game functions smoothly internally and externally.
running = True
while running:
   # Creates an infinite loop, as the while function requires a condition to be true to run, and "running" is currently set to true.
   # The code below will be repeated until running becomes false (when the player decides to quit or loses)
   for event in pygame.event.get():
       # the "pygame.event.get" function collects all the user's actions during the loop, which lasts forever because of the while statement
       # used here to check for specific player inputs, but mainly closing the window
       if event.type == pygame.QUIT:
           running = False

(Lines 108-116)
Lines such as “for event in pygame.event.get():” collect all of the user’s actions while the game is running. Specific actions from this collection, mainly space bar clicks and ending the game, are then checked by codes such as “if event.type == blank”. If the condition is satisfied, then the following function would be performed. Aside from the major game logic, this section also facilitates minor but important parts of the game. For example, setting a background refreshes each frame and determining the fps of the game. The code ends with the functions “pygame.quit()” and “sys.exit()”
Ultimately, by combining setup, sprite design, and game logic, I believe I learned some of the necessary skills to build a complete and functional Flappy Bird game.
Gemini Usage Transcript
Below is the transcript of my AI usage. Although I experienced troubles in making AI provide lessons on how the code worked instead of writing it out for me, I’ve put in my best effort to understand each line. I have written comments in nearly every line of my code, explaining its function and purpose in the context, and I hope this demonstrates my comprehension. Alongside this, I have made edits to the code to alter its attributes as a way to show I understand the logic behind it.
Leave a Reply to A WordPress Commenter Cancel reply