INTRO
For this robotics assignment, I designed and built a motion-activated automatic door using Arduino Uno, PIR motion sensor, and servo motor. The goal of the project was to demonstrate core Arduino skills such as circuit building and coding, while creating a functional robotic device that reacts to human movement. I created and tested the circuit virtually using Tinkercad before attempting real life assembly.
OVERVIEW
The project simulates an automatic door that opens when a person approaches. When the PIR sensor detects motion, it sends a signal to the Arduino, which then activates the servo motor to open the door. After a three-second delay, the servo returns to its original position, closing the door.
CODE
#include <Servo.h>

Servo doorServo;
int pirPin = 2;
int pirState = LOW;

void setup() {
  doorServo.attach(9);
  pinMode(pirPin, INPUT);
  doorServo.write(0);
}

void loop() {
  int motionDetected = digitalRead(pirPin);

  if (motionDetected == HIGH && pirState == LOW) {
    doorServo.write(90);
    pirState = HIGH;
    delay(3000);
    doorServo.write(0);
    pirState = LOW;
  }

  delay(200);
}
CODE BREAKDOWN
#include <Servo.h>

Servo doorServo;
int pirPin = 2;
int pirState = LOW;
This section includes the servo library, which allows the Arduino to control servo motors. It creates a servo object called doorServo for controlling the door. pirPin defines which pin the PIR sensor is connected to, and pirState keeps track of whether motion has been detected, helping to prevent the door from repeatedly opening when motion is continuous.
void setup() {
  doorServo.attach(9);
  pinMode(pirPin, INPUT);
  doorServo.write(0);
}
In the setup() function, the servo is attached to pin 9, which will control the door. The PIR sensor pin is set as an input so the Arduino can read motion detection signals. Finally, doorServo.write(0) ensures the door starts in the closed position when the program begins.
void loop() {
  int motionDetected = digitalRead(pirPin);

  if (motionDetected == HIGH && pirState == LOW) {
    doorServo.write(90);
    pirState = HIGH;
    delay(3000);
    doorServo.write(0);
    pirState = LOW;
  }

  delay(200);
}
The loop() function constantly reads the PIR sensor with digitalRead(pirPin). If motion is detected (motionDetected == HIGH) and the door is not already open (pirState == LOW), the servo rotates to 90° to open the door. The program waits for 3 seconds before closing the door by returning the servo to 0°. The pirState variable prevents repeated triggering while motion continues, and the delay(200) at the end prevents jitter from rapid sensor signals.
BILL OF MATERIALS (BOM)
| Component | Quantity | Function |
|---|---|---|
| Arduino Uno | 1 | Microcontroller board |
| PIR Motion Sensor | 1 | Detects motion (input) |
| Servo Motor | 1 | Controls door movement (output) |
| Jumper Wires | 6 | Electrical connections |
VIRTUAL PROTOTYPE
I used Tinkercad to build the first version of the circuit to ensure both the wiring and code worked properly before physical assembly.
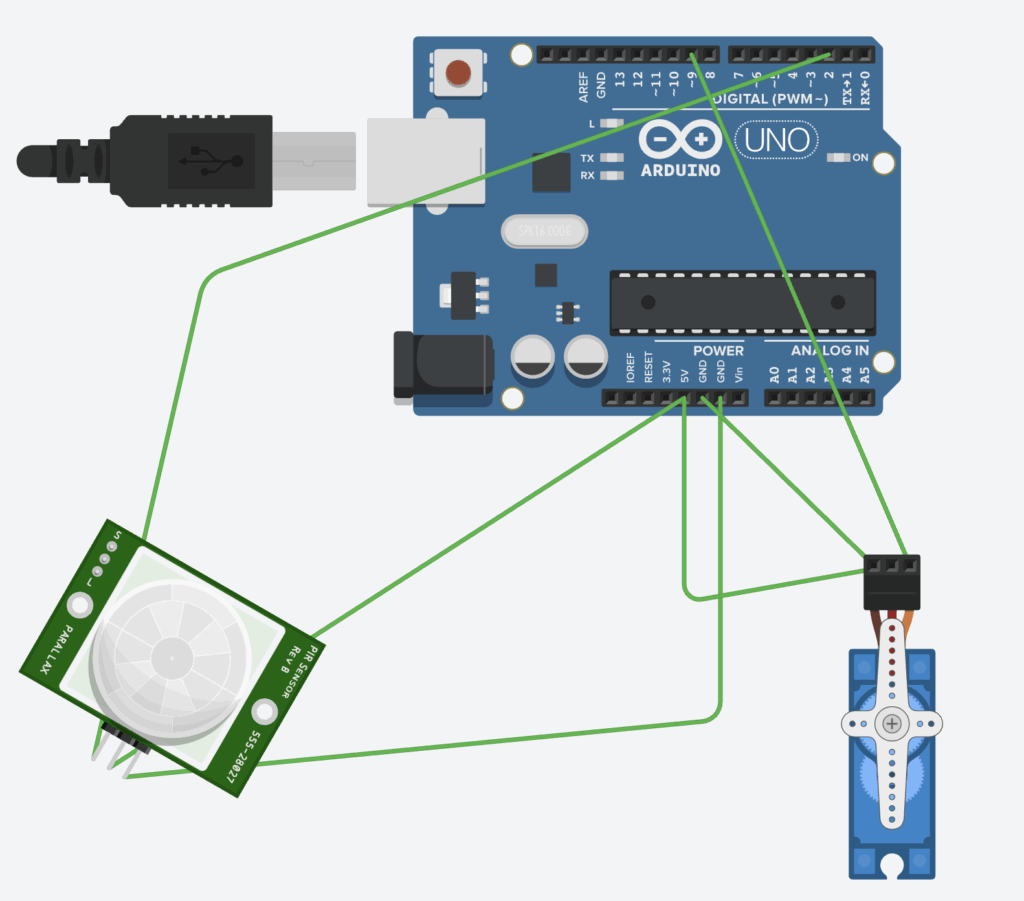
The circuit works as follows:
- The PIR sensor detects motion and outputs a digital HIGH signal on pin 2 when movement is detected.
- The servo motor receives control signals from pin 9 to rotate between the closed (0°) and open (90°) positions.
- The Arduino powers and controls both components.
VIRTUAL DEMONSTRATION
Physical Prototype
I went ahead and built the real-life version of the door with the Arduino, servo, and button. Everything was connected exactly like in the virtual Tinkercad version, but when I tried to upload the code, it just wouldn’t work.
The problem was with my Mac, the Arduino IDE couldn’t detect any ports, so the board didn’t respond. Because of that, I couldn’t test the servo in real life. Even though it’s built and wired correctly, I could only fully test it in Tinkercad.
USE OF AI
I used AI mainly to help with the code and clear up a few things I wasn’t sure about. It gave me quick explanations and helped me fix mistakes faster. Overall, it made the project easier to understand and finish.
SUMMARY
This project was especially useful because it taught me things I hadn’t learned in the robotics courses I took before. I learned how to read sensor input with digitalRead(), control a servo with servo.write(), and manage timing using delay(). Even though I couldn’t upload the code to a real Arduino, running the project in Tinkercad helped me understand how everything works together.
Leave a Reply to mcrompton Cancel reply