This assignment is the last of 3 intro assignments to Fusion, making sure we somewhat know how to make a robot that will move things. The requirements for this project aren’t that complex:
- Circuit Building – planning and building a circuit that allows an arduino board to interact with other components
- Arduino Programming – writing code that will make our device move something.
Now I originally had in mind to make a “trumpet” robot where I could adjust the harmonic series and the valves but I realised it didn’t move anything so I had to scrap it. I also cook very regularly but I mostly use my phone to set timers for things like pasta, baking, etc, which can be a little slow to take my phone out of my pocket while I’m cooking and fiddle around with the app, so I thought this would be something useful to make that also happened to meet the requirements.

Here’s the image of what I’m more or less going for. I knew a tiny bit about robotics so I knew which parts I had to use. I would use a push button to start the timer, a potentiometer to act as a dial, a piezo buzzer to act as the alarm, and a servo to display the time. I ended up asking ChatGPT to tell me where to hook everything up to, because that was something I wasn’t completely sure about.
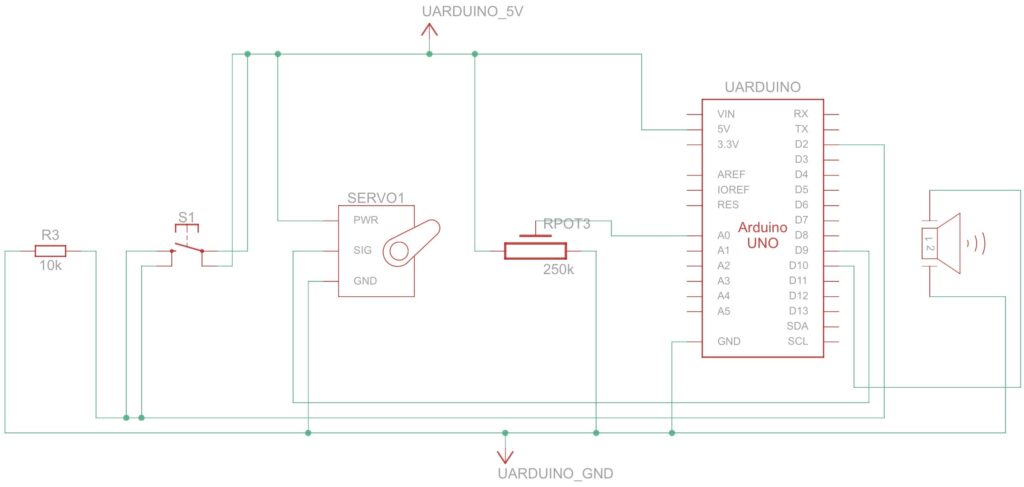
Here is a circuit schematic of the project. I briefly went through the parts of the circuit earlier but for ease of view the whole schematic is here. Before I click the button to start the timer, I adjust the potentiometer that will set the duration of the timer, and after that I will push the button. While the timer is ticking the servo will adjust its rotation to display the time. Once the time is over the piezo buzzer will sound for a brief moment and we can start another timer. Looking in hindsight this schematic is a little bit different from the prototype but I can’t really predict that so this will have to do.
Code Explanation
I don’t have much experience with C++ so I had ChatGPT help me generate some code:
#include <Servo.h>

Servo timerServo;

int buttonPin = 2;
int potPin = A0;
int piezoPin = 10;
int servoPin = 9;

bool running = false;
unsigned long startTime = 0;
unsigned long timerDuration = 0;

void setup() {
  timerServo.attach(servoPin);
  pinMode(buttonPin, INPUT);
  pinMode(piezoPin, OUTPUT);
  Serial.begin(9600);
}

void loop() {
  int buttonState = digitalRead(buttonPin);

  // Set timer using potentiometer
  if (!running) {
    int potValue = analogRead(potPin);
    timerDuration = map(potValue, 0, 1023, 1000, 30000); // 1-10m timer
    int servoAngle = map(potValue, 0, 1023, 0, 180);
    timerServo.write(servoAngle);
  }

  // Start timer when button is pressed
  if (buttonState == HIGH && !running) {
    running = true;
    startTime = millis();
  }

  // Run timer
  if (running) {
    unsigned long elapsed = millis() - startTime;

    if (elapsed < timerDuration) {
      int angle = map(elapsed, 0, timerDuration, 180, 0);
      timerServo.write(angle);
    } else {
      running = false;
      tone(piezoPin, 1000, 1000); // Beep at end
    }
  }
}
I later looked at the code myself just so I could understand what it was doing for my own interest but it worked fine. I’ll briefly go over it here; the first section lets me control the servo and declares where all the parts are. The next part sets up the hardware and variables for the timer, and then the void loop part is the main loop of the code, and if the timer isn’t running currently it just maps the value of the potentiometer(0-1023) to somewhere between 1-30s(adjustable but chose a smaller window for demonstration) and tells the servo to move according to the time. Once the button is pressed the the running variable is set to true and the timer starts. While it is running it calculated the passed time and adjusts the servo, and once the time is over running is set to false which lets the timer run again and the buzzer sounds an alarm telling me the timer’s over.
AI related stuff
I decided to use ChatGPT for most of my AI work just because it was the most accessible to me. I don’t think it would’ve made much of a difference if I used some other AI but it’s just preference. I mostly used it for the coding and figuring out the physical prototype.
Leave a Reply to mcrompton Cancel reply