This is my second mini-assignment out of the 3 Fusion self-paced assignments. My previous post documents my project on CAD, where I made a 3D model of a birdhouse with mechanical drawings and a BOM.
For this particular robotics assignment, I must demonstrate my understanding of these skills through this blog post:
- Circuit Building – planning and building a circuit that allows an Arduino board to interact with other components
- Arduino Programming – writing code that will make your device do something
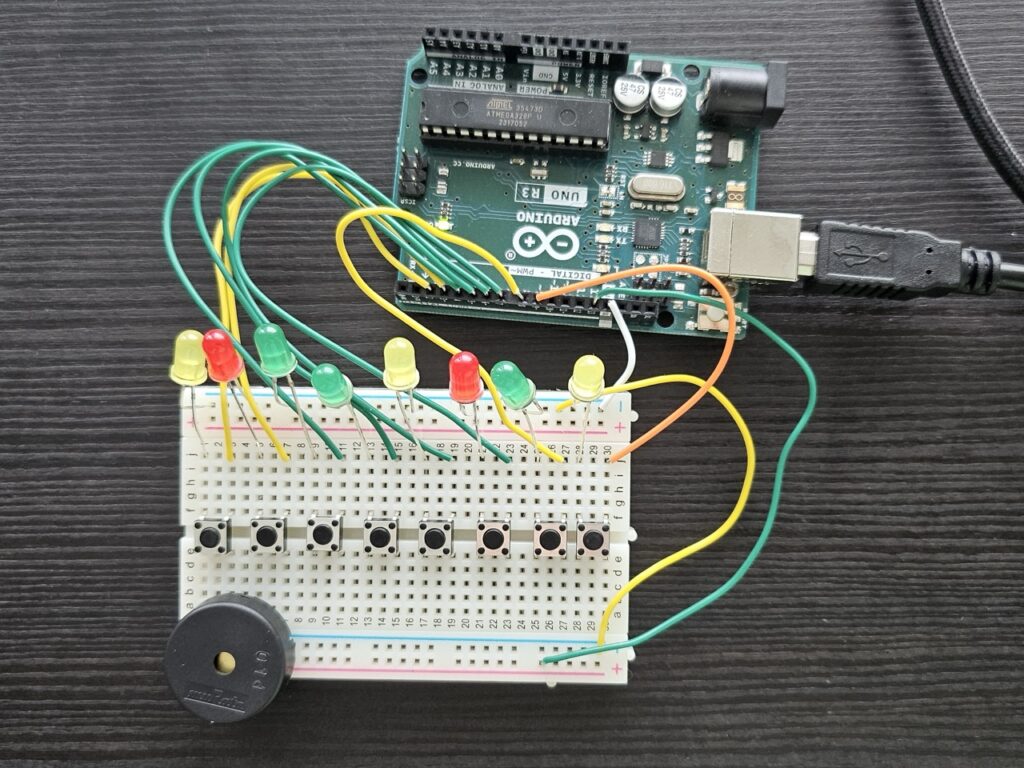
I was provided with an Arduino Starter Kit, and I decided to create a simple keyboard that plays a full octave of notes.
·
You can try out my keyboard and see the complete code through this link:
·
Skill 1: Circuit Building
The first step of my project was building the physical circuit. For me, this was the most straightforward part of the process.
I decided to use push buttons as the keys of the keyboard and also add LEDs connected to each button that would light up when a key was pressed. I also planned to have a single wire connected to the ground pin, 8 other wires for each of the buttons (one for each note of the octave), 8 resistors (one for each button), and one last wire for the buzzer.
After assembling my circuits, I noticed two interesting things.
1. Different coloured LEDs need different amounts of electricity
When testing the first draft of my keyboard, I noticed that some buttons weren’t working. I originally suspected something was wrong with my code, but eventually decided that couldn’t have been the case since the code for my other buttons was written the same way, and they worked properly. So, I determined it had to be a hardware issue. I later noticed that all the malfunctioning buttons were connected to blue LEDs. After replacing all the blue LEDs with differently colored ones, the buttons started working. Because of this, I came to the conclusion that blue LEDs consumed much more electricity than other LEDs.
Later, I noticed that my working LEDs glowed at largely different brightnesses. In fact, the green ones barely turned on. This further confirmed my previous conclusion. This is the ranking I discovered based on how much electricity each color of LEDs uses: Blue > Green > Yellow > Red.
2. Resistors aren’t needed for this circuit
The first iterations of my keyboard had resistors for every button, but those seemed to cause my entire keyboard to stop functioning. Previously, I had thought that push buttons didn’t consume any electricity themselves and that directly connecting a button with an LED to the Arduino would burn the LED out. Through my experimentation, it seems that buttons do require energy and act as a resistor themselves, so I ended up just removing all my previous resistors.
·

·
Skill 2: Arduino Programming
Programming was the most time-consuming and the most difficult part of this project for me. I used various online tutorials and tried to stick to simple code I already knew how to use.
There were many new things and techniques I learned, but here are a few I found to be the most useful and that you should know about.
- int
intis short for integer. It is a basic data type (a piece of data that tells a computer system how to understand a value) in programming that represents a whole number, positive or negative, without any decimal point.- For example:
- int buttonPin = 2; means the variable ‘buttonPin’ is assigned the number 2 (the pin number on the Arduino).
- In Arduino, an int can store values from -32,768 to 32,767, which is almost always enough for things like pin numbers or simple counters. It basically helps keep things organized and assigns a number to everything.
- float
- float is a data type in programming that stands for “floating-point.” It represents numbers that can have decimal points, allowing for more precise values than integers. It’s basically a more specific version of int.
- For example:
- float frequency = 261.63 means the variable ‘frequency’ holds the number 261.63, which could represent the frequency of a musical note.
- In Arduino, a float can store a wide range of values and is useful for calculations involving measurements or decimals. It helps manage numbers that need more precision, like those used in sound frequencies or scientific calculations.
·
The most complicated part of my code is the section that allows the user to play semitones. If you think of a piano keyboard, semitones are the black keys between the white ones. I realized that semitones are just the average frequency of two normal tones, so I decided to create a function to do that.
I decided that the most straightforward way to add this feature was to define the semitone frequencies beforehand and just have the buzzer play that frequency when two buttons were pressed.
For example, take a look at this snippet of the code:
if (digitalRead(buttonPin2) == LOW && digitalRead(buttonPin3) == LOW) {
        tone(buzzerPin, frequencies[1]);
This line checks if ‘buttonPin2’ and ‘buttonPin3’ are both pressed (reading as ‘LOW’). If true, it plays the frequency for ‘C#’, which is the note between ‘C’ and ‘D’. The frequency used is from the ‘frequencies’ array at index ‘1’.
·
Bonus Features
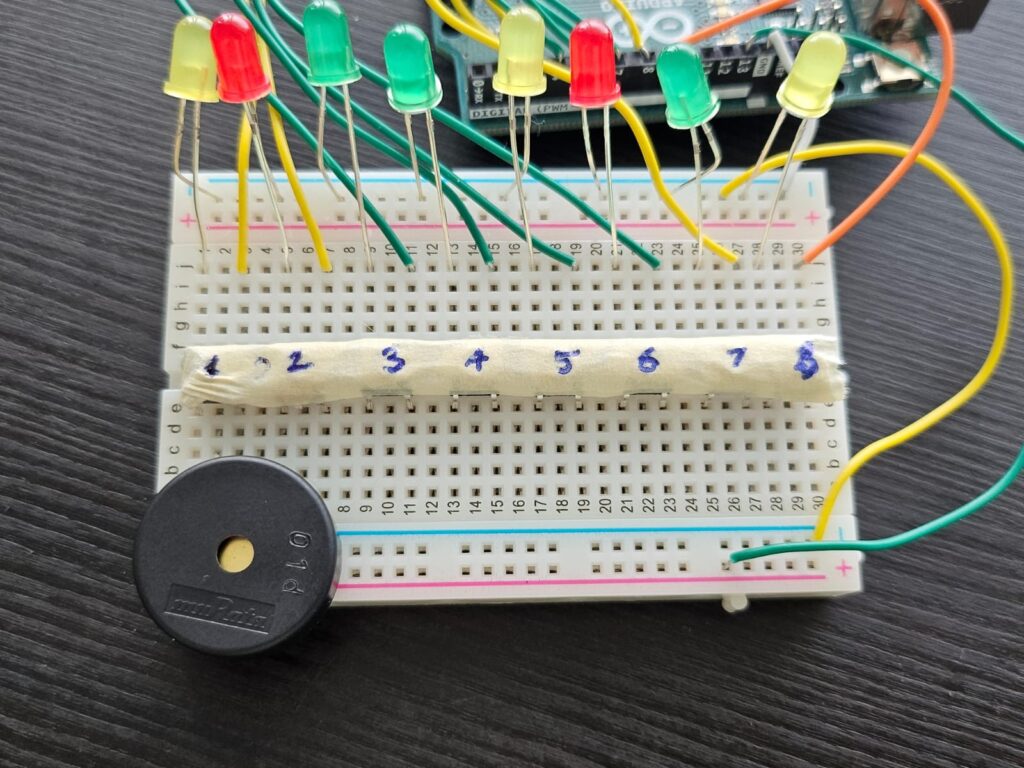
At this point, I had completed creating the fundamental features of a keyboard. However, I wanted my keyboard to be personalized and creative, so I thought of adding a special feature/easter egg to play preset tunes when a specific combination of keys was pressed. I labeled all the buttons with numbers, and I ended up with an easter egg where “O Canada” plays when keys 1, 2, and 7 are pressed down simultaneously. The song is definitely recognizable when played, but some of the frequencies sound funny since I had to manually write out the frequency and duration of every single note. As I improve my knowledge of Arduinos, this is definitely something I want to look back on and perhaps create a more efficient solution for.
I also wrote sheet music for some famous tunes:
1. Twinkle Twinkle Little Star
1 1 5 5 6 6 5
4 4 3 3 2 2 1
5 5 4 4 3 3 2
5 5 4 4 3 3 2
1 1 5 5 6 6 5
4 4 3 3 2 2 1
2. Mary Had a Little Lamb
3 2 1 2 3 3 3
2 2 2 3 5 5
3 2 1 2 3 3 3
3 2 2 3 2 1
3. Ode to Joy
3 3 4 5
5 4 3 2
1 1 2 3
3 2 2
3 3 4 5
5 4 3 2
1 1 2 3
2 1 1
4. Jingle Bells
3 3 3 3 3 3 3
3 5 1 2 3
4 4 4 4 4 3 3 3
3 2 2 3 2 5
5. Happy Birthday
1 1 2 1 4 3
1 1 2 1 5 4
1 1 8 6 4 3 2
6 6 5 4 5 4

·
Demos
The TinkerCad replica of my keyboard isn’t great for demoing some features since TinkerCad doesn’t allow you to press multiple buttons down at once. So, I have recorded some of my project’s key features. You can watch them here:
Chromatic Scale (Playing every note)
https://drive.google.com/file/d/1BL2zDV6yozJN9IC-TYLmPgb3PrmIsBlq/view?usp=sharing
O Canada
https://drive.google.com/file/d/1-pMouuPZQscaXoNydYdLbMY2INTcSyWg/view?usp=sharing
Ode To Joy Playing
https://drive.google.com/file/d/1Zsy4S5iCmAXa2lMbp1wZEuwmQG9tN0Ga/view?usp=sharing
·
Overall, this project has been extremely rewarding, and I have learned many new skills related to coding and circuitry. I believe the code used in this project is redundant in some areas and could be a lot shorter and more efficient if smarter methods were used, so that’s something I wish to come back to improve in the future.
·
Leave a Reply