Project Goals
With the rise in global temperatures and consistent irresponsible use of fire in the wild, wildfires have become more and more common over the past few years. Last year, during the California wildfires, I was shocked to see all the people who lost their homes due to wildfires, which were not able to be detected in time. By the time they were spotted, they were already a threat to communities and were too untamed to put out easily. To help combat this issue, I created a wildfire detection system throughout this project.
The goal of the system is not to stop the start of wildfires, but instead to reduce the response time it takes for responders to address a wildfire. Currently, due to how large forests and areas with wildfire risks are, it’s not realistic to build thousands of fire watch towers or deploy billions of dollars in military drones to help detect wildfires. My project offers a low-cost solution that is easily implementable, making the task of detecting wildfires while they are still small a much easier task.
The final product will use a simple drone with an infrared camera, along with other sensors, that is capable of detecting small fires in the wilderness, communicating with nearby drones, and relaying the GPS coordinates to humans.
–
Project Constraints
My project would be implemented at ground stations near areas with high risk of wildfire or a lack of existing wildfire detecting solutions. Staff of the station would be responsible for charging returned drones, processing data sent back, and making sure the systems are properly maintained.
The time frame of this project was definitely one of the biggest constraints that I had to face, as I had to plan out my time and timeline very well to be able to have a working prototype completed in time to be presented. I had around 2 months to plan, purchase materials, assemble, test, and improve the prototype. This required efficient project management, and I used Notion to help me keep things on track. I explain in detail how I utilized Notion as my project management platform later on in this blog post.
Another large constraint I faced was my own lack of knowledge in electronics. One of the main goals of my project was to allow me to become more well-versed in circuitry, programming, and refining electronic systems. My limited previous knowledge meant that I had to use simpler electronics like Arduinos, compared to more compact and efficient solutions such as custom circuit boards. This was a particularly challenging constraint towards the start of this project, as I had not much knowledge on which components were needed and how to code for them. However, the simplicity of my electronics became a benefit that revealed itself later on, as it allowed my system to be much more flexible. The cheap cost meant that many more could be produced compared to if it was all professionally manufactured, and the increased number means I could control how many of the systems to have in one area depending on the wildfire risk. Additionally, my limited resources, both electronics-wise and knowledge-wise, forced me to be more creative and resourceful in how I built my project. I selected tools and techniques that were just right for this project, not too overcomplicated or too simple. The components used were just enough for the system to work as planned and for me to test for data and improve through iterations. I also adjusted the difficulty of processes and complexity of materials chosen as my skills developed throughout this project and the resources available changed as more tools and parts were acquired.
–
Project Expectations
As mentioned earlier, my project’s goal is to decrease the time between when a wildfire is detected and when responders arrive to address the fire. Because of this goal, my final system will focus largely on the communications and detection aspect of wildfires. This includes a reliable system to relay information about potential wildfires to ground stations quickly, and a consistent way to define wildfires apart from campfires and other thermal sources like animals in the wild.
My final project would not be responsible for the direct addressing of fires, however. It is not planned to be equipped with any extinguishers. Instead, that will be left to human responders or a separate system. My final product is expected to only focus on detecting wildfires in areas where there are currently no viable solutions in place.
Success of this system would mean it is able to detect wildfires in the wild accurately and provide relevant details to humans in an area with no cell coverage, all whilst having low cost (expected to be below $500 CAD).
–
Design Choices
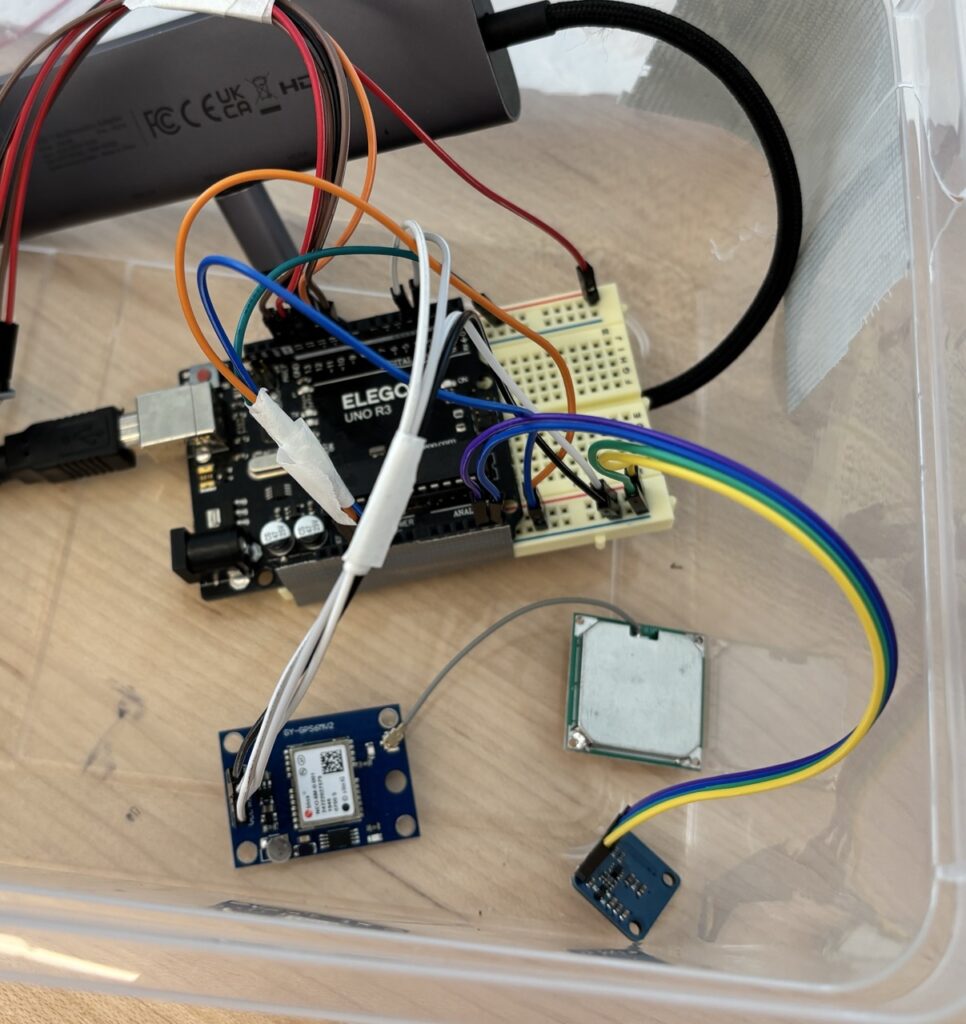
My project is an innovative solution to this problem that simplifies traditional drone systems being used to lower cost and increase usability. It uses an Arduino board alongside different modules. The components are attached to the underside of the Arduino board in order to minimize the footprint of the prototype, as testing on a drone would require light weight and a small amount of space occupied.
Further details on why my project is innovative compared to existing solutions can be found in my introductory blog post, the first of this series for this project. However, as a recap, my project’s significantly reduced costs allow many to be made, which makes it versatile and flexible. It doesn’t have the hard implementation of fire watch towers, the price tag of existing drones, and the unreliability of satellites. It’s versatile in that it’s adjustable—the amount of detection systems in an area can change depending on the wildfire risk or even regulations in that region surrounding devices like these.
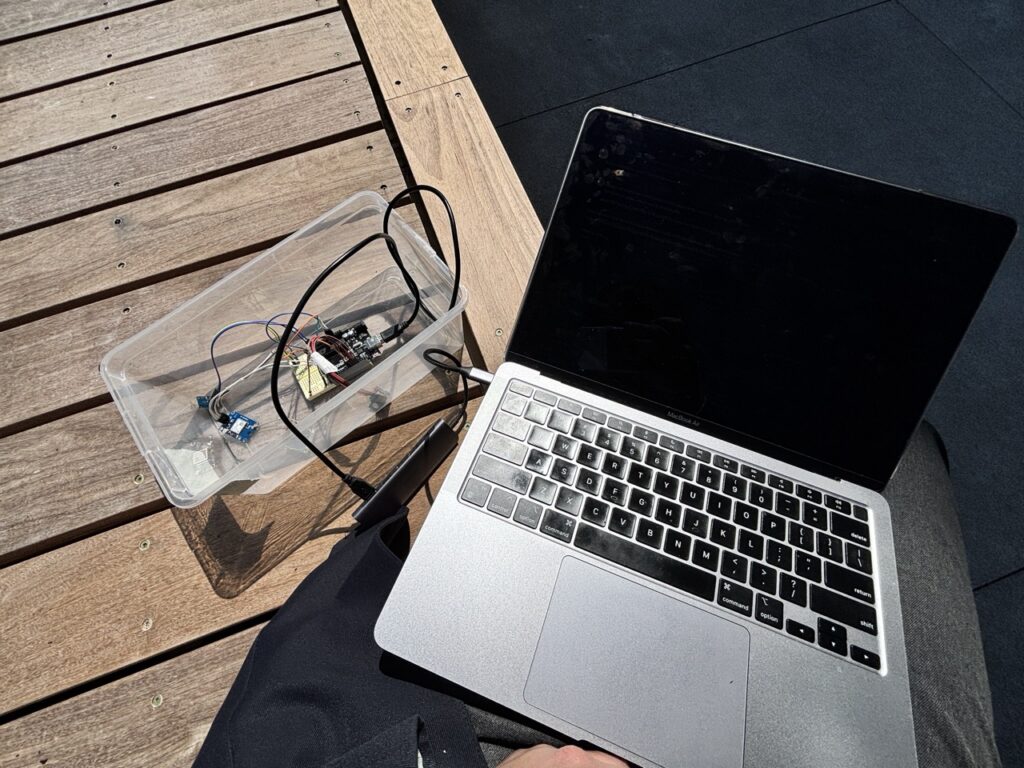
My project didn’t have any CAD models or any advanced hardware or planned circuitry, with most of the system being specialized in the software. Nevertheless, here are some photos from my project that show the several hardware iterations I went through to help me reach my final prototype, each using different software:
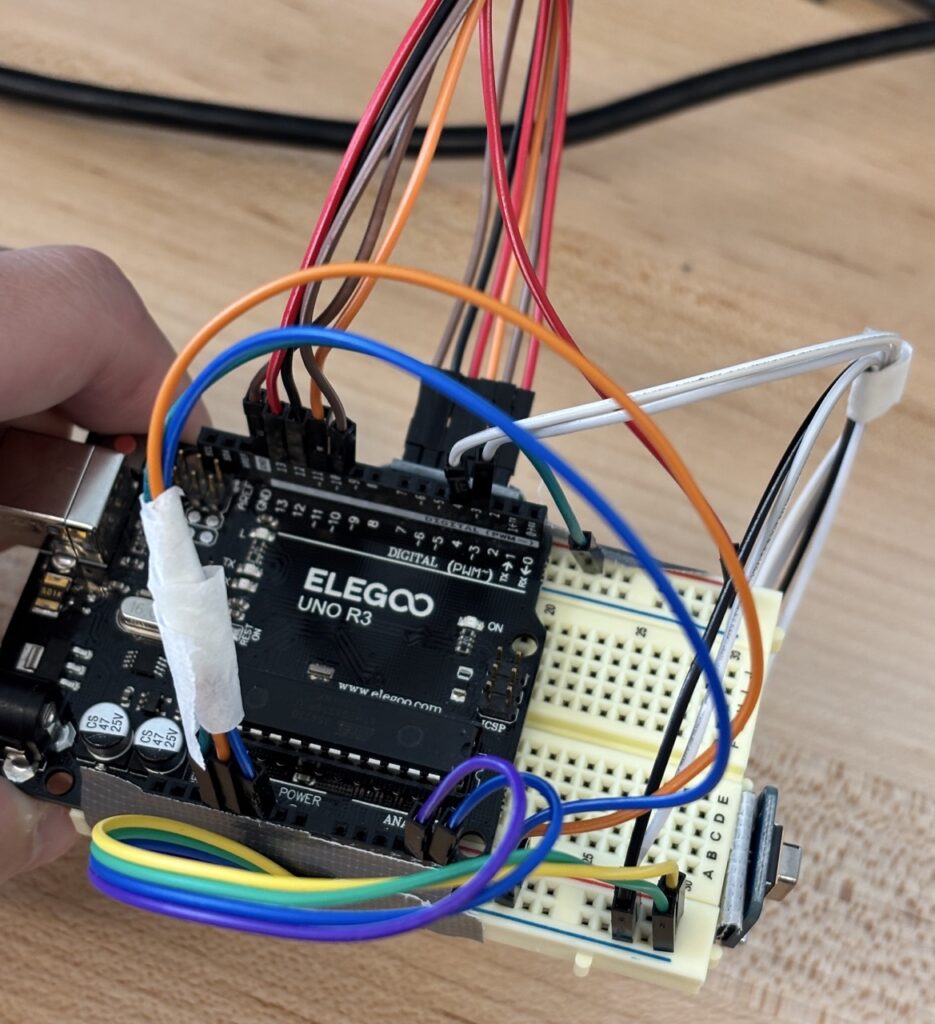
The photo on the left was one of the earlier prototypes of my project. I managed to get the GPS module to work properly and was focusing on making it work alongside the infrared sensor. I brought my system outside so it could connect with satellites for the GPS to work, and I pointed the infrared camera at various hot and cool objects to see its accuracy.
The middle picture shows a more developed prototype. It included all modules of my project, and I managed to get all modules to work together through this prototype. This meant making sure the formatting of information is accurate and easy to read, and that all the components are wired and connected efficiently.
The rightmost photo shows my final prototype (so far). It’s essentially an optimized version of the previously mentioned prototype. It makes use of space much more efficiently, with shorter wires and the modules attached to the Arduino instead of being sprawled out around it. This prototype let me carry my project everywhere to test its real-life accuracy and use, as the previous versions were too bulky for me to use.
Of course, all these iterations required thorough planning before anything was built. No 3D design tools were used for this project, and much of the planning and brainstorming was done through drawings and sketches. Nevertheless, these sketches helped me significantly in being clear about how to build something and improved the speed of my work in class and the efficiency of the materials used, since availability was somewhat constrained.
The simpler prototypes at the start of my project also allowed for data to be collected quicker, without the need for a polished product to be made. This prototyping method let me get more data through the many prototypes that were low cost and low effort to make. Overall, these gradual improvements to the design to improve space efficiency, aesthetics, and reliability came from data acquired through the testing of each iteration. Further details about the testing process are explained below.
–
Project Planning
As mentioned earlier in this blog post, I used Notion as my project planning platform. At the start of this project, before ordering or building anything, I took time to plan out my project thoroughly, with a detailed timeline with dates of when a specific module had to be completed. This helped me a lot later on by making it easy to know if I’m on track or ahead of schedule, which let me use time more efficiently by adjusting how much time to spend on everything.
Furthermore, since these projects never go exactly to the timeline, with some things taking much longer to complete and some even being able to be completed earlier than expected, after every work class, I would log what was accomplished and what had to continue to be done next class. This allowed me to adjust my timeline accordingly if extra time was needed for one thing, or if I had extra time on hand. The progress logs proved to be helpful in helping me remember what had to be done. The log let me resume my work faster at the start of every class because I could see exactly where I left off and have clear next steps of what had to be done next.
This thorough process of documenting my progress, specifically in versions of code that worked, either fully or somewhat, was crucial in making sure my workflow went efficiently. As there are so many different versions of code I make while experimenting to find a layout that works, I had times where I lost a code version that had something functional, and I had to restart my progress to recreate the working component again. These mistakes led me to learn how to organize saved code in a structured and categorized way, which helped me in many different project management aspects, like tracking my project progress in general and documenting how many of a component I have used so far, for cost calculation purposes.
–
Cost Analysis
Perhaps the biggest goal of this project was to build a reliable, working wildfire detection system with a significantly reduced cost compared to existing solutions. Drones that are currently used today to help detect wildfires are extremely expensive, with the most popular model costing around $25,000 USD. My goal was to reduce the cost of my system to under $100 for the detection module only. I certainly accomplished this goal, mainly due to my use of existing electronics and simplifying many parts of the system.

From this table, it’s clear that all of my costs for this system come from its hardware. Using existing and pre-developed components let me significantly reduce costs for this project. Of course, in the future, if many of these systems were to be produced, mass manufacturing and custom components would make more sense, as the cost could be lowered even further if many were made, and space would be utilized more efficiently if one circuit board included all these components instead of using jumper wires.
–
Testing and Validation
Throughout the building process of my project, I have conducted many tests on each iteration. Therefore, I have sufficient evidence to prove that my system works reliably to achieve my project’s goal.

This is an example of the format exactly as outputted by the device onto the microSD card. To test my device, I did so in several steps. To see actual, unedited data collected by my project, see here.
To test the accuracy of the GPS module, I walked around my school’s campus with the system in my hand, and I was able to see the GPS coordinates logged and graph them onto a map, which let me see the path’s accuracy. This also let me feel the weight and portability of the device, all of which are important factors for a drone-bound device.
To test my infrared module, I pointed my project at various objects, from candles to ice cream to concrete warmed up by the sun. Through these various tests, I could compare the outputs from the system to see if abnormal temperatures were being detected consistently.

Both of these tests required the storage of data, which was a perfect opportunity to test my microSD card module. This test was mainly meant to see if the high-temperature detection feature worked normally, and if data formatting was correct and easy to read.
All of these tests and the data and feedback I collected allowed me to improve my project through its iterations, each attempting to fix issues found through the data collected.
–
Code of Ethics
One of the biggest ethical concerns I identified from the very start of my project was how this system could potentially disturb wildlife in the area.
To reduce this risk, the drones can fly at higher altitudes or in airspace that birds in that specific region don’t usually fly in. This flexibility is another strength of my system. Since each drone is smaller and individual, I can control how many are deployed in an area and adjust based on the time of year. For example, during bird migration season or when there’s higher bird activity, drones in that region simply won’t be used.
Another key choice was to use clean energy to power both the drones and the ground stations. Most of the electricity would be generated using nearby rivers, which helps reduce environmental impact while also making the system more self-sustainable.
–
Conclusion
Overall, this project has been a great learning opportunity for me. I learned new skills, like project management, coding, and circuitry. I also improved on existing skills, like hardware designing, presentation skills, and writing reports.
If you would like to see the code used by the final prototype of my project, it can be found here.
to see my project planning document and logs from each class, take a look here.
–
Leave a Reply