The problem I am trying to solve with this prototype is that studying can be inefficient and unorganized, which makes it harder to stay focused and manage time effectively. Because of this, many students struggle to plan their study times, track progress, and stay focused.
Not only am I trying to solve this problem for students who want to study more efficiently, but I am also trying to solve this problem for myself.
My definition statement is: “To improve the effectiveness and efficiency of my studying, I need to develop a comprehensive system that supports both planning and focus. The system should help me stay on task by providing reminders or progress tracking, allowing me to schedule study sessions at optimal times, and adapting to different study methods and preferences. Additionally, it should be flexible enough to accommodate not only my own learning style but also the needs and habits of other users, making it a personalized and collaborative tool for more productive and organized studying.”
Research
Before this project, I had tried multiple times to solve this issue. Whether it was using Google Sheets, a calendar, or Google Docs, none of those strategies really worked for me. A problem I identified during this process was that I’m not very instinctive when it comes to studying. By doing some research online, I find that notifications, physical tracking, and seeing yourself grow are great ways to get the attention of students and keep them on task. I also ran a class survey on a class of 16 students on the topic of “which study methods worked for them, and which ones were less effective.” You can find it here:
My original solution was to develop an app that would solve this problem. However, I realize that there’s not enough time for me to learn how to build an app, build it, code it, and then launch the app. So I shifted my idea to building a program with the same features and functions, using tkinter, a Python library for creating GUIs.
My actual solutions to the problem include:
A Timer/ schedule where the user types out their task, like “Math homework,” and then in how long until they want to start working on that assignment. After the user enters the number of hours and minutes, the program starts a timer counting down that time until it hits 0, where the program then plays a loud notification, and a pop-up window appears telling you to go study.
A List of suggestions to improve your study effectiveness and a list of things that could make that study time less effective. This is a list of the methods that work and don’t work, which I collected from my class during the survey.
A grade tracker that allows the user to see their grade change. While our school has the Canvas gradebook that allows us to see, most schools don’t have that feature. Seeing your growth in real time is a great way to keep students motivated and improve their urge to work hard
From my experience, I’ve learned that when you are constantly studying for an extensive period of time, eventually it really gets ineffective, and your brain just doesn’t soak up the information. So, to help with this, I’ve added a small game that students can play when they are on their break time. The small game is a simple coin flip that students can roll once. It can either increase their study time by 10 minutes or decrease it.
Progress so far
As of right now, it is 2026-03-12. So far, I have already started to create the code. I have completed the list of suggestions of do’s and don’ts, and I have completed the calendar/schedule feature, including the pop-up notification.
Challenges in the future
While I have used tkinter in the past to create a choose-your-own-adventure story game, the functions I used in that process are different from the ones I’m going to use to create this program. As a result, I can see myself consulting A.I. to help me with these features.
Next Steps
The next step I need to do is finish up the program and start testing for bugs and mistakes. I should also go over and refine my ideas to make sure that they are applicable to all students.
A.I. Usage
For this project, yes, I am using A.I need help with the coding. I have chosen to use A.I for the reason I have already explained. While I have experience using tkinter, and some of that experience, I am able to use it here. There are still parts of the code that I am unfamiliar with and need to use A.I. to help me. The transcript is here:
Growing up as a kid, I’ve always had the problem of staying focused and on task when I am studying. Often, what I will do is study for 30-40 minutes and then play games for the next 2 hours. As you could tell, as I got older and my workload got heavier, this became a problem that I would have to solve sometime down the road. So, when I was told we were going to do a personal project for Fusion, I thought to myself, “This is the perfect opportunity for me to try and fix this issue,” and so, that’s how I thought of the idea of my personal project.
Definition Statement
To improve the effectiveness and efficiency of my studying, I need to develop a comprehensive system that supports both planning and focus. The system should help me stay on task by providing reminders or progress tracking, allowing me to schedule study sessions at optimal times, and adapting to different study methods and preferences. Additionally, it should be flexible enough to accommodate not only my own learning style but also the needs and habits of other users, making it a personalized and collaborative tool for more productive and organized studying.
Target Audience
I’m not sure who else specifically this is going to be made for. However, I’m sure there are people out there who have the same problem as I do. For example, I have friends and people I know who will not prepare for a test until the day before it’s going to happen. As a result, they will end up bombing the test and then saying, “Man, I wish I had studied last week”. Thus, the target audience for this project is going to be people who have a low level of self-discipline and have trouble managing their time and staying on task for learning.
Ideas that I had
I think I first had intention to solve this problem when I was entering grade 8, as that’s when the work level really stepped up from grade 7. However, at that time, I didn’t have a lot of the skills that would allow me to formulate a good solution for this problem. The first sort of idea I had when trying to solve this problem was just a simple Google sheet. The idea was that I would just write down what upcoming tests or assignments I needed to study for and finish, and when I was done with something, I would just cross out the task. And this worked! for about 3 days. After this first idea, I tried to use a different solution. I tried writing it out on Google Docs, setting times on Google Calendar, and I even bought an actual calendar to see if it would be better as a physical product. Overall, none of these ideas really lasted and helped me to solve my problem. However, through these ideas, I learned one thing about myself: I am not good at reminding myself what to do. And thus, I’ve come up with an idea that I think will finally, once and for all, solve this problem.
Prototype
Growing up in the generation that we are in, we have so much access to the internet and apps like Facebook, Snapchat, Instagram, etc. Personally, I don’t use any of these apps because I think they are pointless, but I do use an app called Discord. One similarity between Discord and the apps that I brought up is that they make this “ding!” sound whenever you get a message. And people from our generation cannot resist the temptation of checking their phones when they hear that sound. It’s the sense of not missing out on a conversation between friends, it’s like a mouse seeing a block of cheese, it’s irresistible! So, using that idea, the protype i’m going to be making a program that will make a “ding!” sound whenever you need to study succesfully alrerting you and getting your attention.
The reason I am not making an app is that, given the time, I not only currently don’t have the skills to build an app, but I also have very limited time to test the app and see if it works or not. As a result, I’m going to build a more computer simulation program to try to achieve a similar result.
FEATURES OF THIS PROTOTYPE
The program has a calendar system where the user can put down when an assignment or test is due and for how long they need to work on or study for it.
The program will then help the user set a timer at the time they want to study and send a notification to alert the user that it’s time to work.
The program can help keep track of your grades by just having the user write down the grades they got on a test or an assignment. This allows the user to see their growth in real time, and it helps keep them motivated.
To help you stay focused when studying, the program will give you breaks in between study sessions. For example, if you set a study time for 90 minutes, then the program might give you 20 minutes of break time in between.
During that 20 minutes, the Program will give you some suggestions like: Walk around, go outside for some fresh air, eat a snack, don’t scroll on your phone, etc.
Another idea I was thinking of is a rewards system. For example, if you complete your studying task, you can get points, and once you have enough points, you can do a sort of gacha pull for collectibles.
SURVERY
To see some study methods that work/fail from my fellow students, I ran a survey on a total of 16 students here:
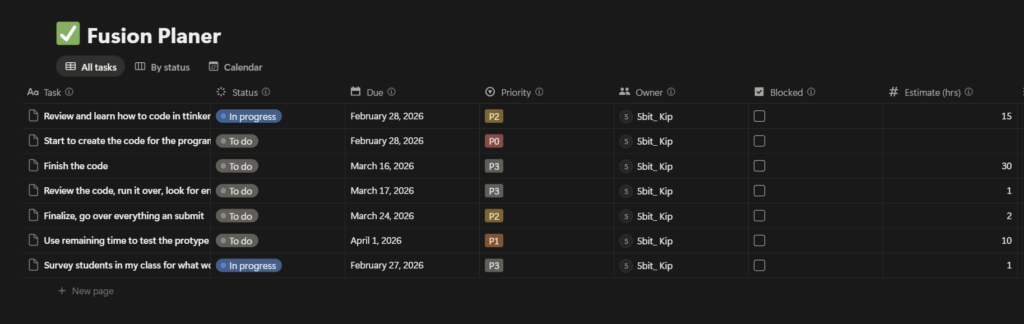
To create this program, we have around 2 months of time before it is due. Im gonna use the website called Notion to make a to-do list with dates that I’m gonna meet to have enough time to finish everything. I will update the status as I work on the project to help me keep track of my progress and stay organized
In this project, the problem we set out to solve was to design a vehicle that would allow 4 human astronauts to travel on an exoplanet known as Teegarden’s Star B. Our definition statement was: “Four human astronauts need a safe and efficient way to travel 10 continuous km across Teegarden’s Star b due to unique atmospheric, gravitational, and geological conditions. We must overcome challenges such as a differing gravitational pull, rocky terrain, and uncertain atmosphere by creating a testing environment that models these conditions.”
This test plays a very important role in our project because it allows us to determine whether the vehicle will actually solve the problem we set out to solve. For our experiment, we used kinetic sand to build up mountains, which represent the rocky terrain of Teegarden’s star B. We also used paper balls to represent boulders.
Method / Procedure
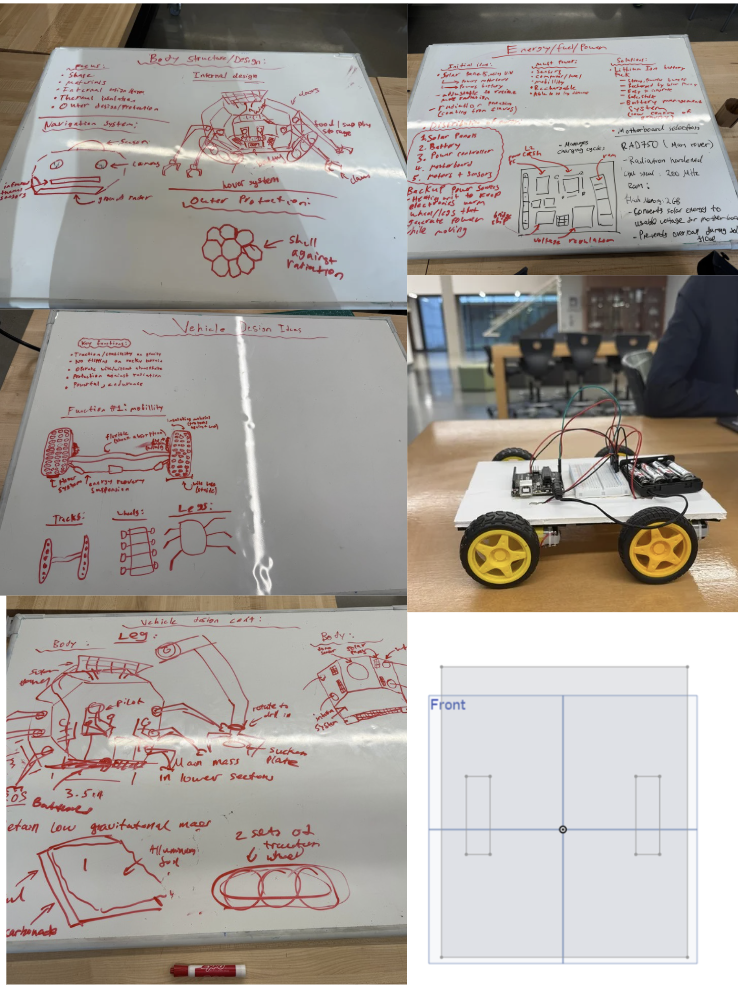
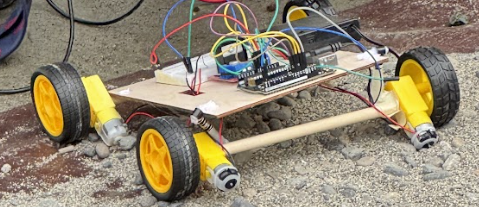
This is a collection of our brainstorming ideas to design our vehicle. The vehicle you see on the right was our prototype, and the image below is the board design we made for our vehicle.
This vehicle was made to address the three major difficulties we identified to travel on Teegarden’s star B: 1. uneven rocky terrain, 2. gravitational condition, 3. UV rays. Unfortunatelly due to the limitations of our classroom testing enviorment, we were really only able to test one of them, which was the uneven rocky terrain, which I shared how we built it earlier.
PROTOTYPING
Prototype 1
(Our circuit)
At the start, we began building our prototype by first cutting out a base, which, at the time, was just a foam board that was measured out with a ruler. When we had our base, we then went on to attach an Arduino Uno and a breadboard to the base. Then, we put together 4 sets of wheels, each one with a motor attached to it, and assembled them on the four corners of the base.
Then, we put 4 AA batteries into a battery holder and connected that to the Arduino Uno, effectively powering the entire vehicle. The last step was to correctly wire the motors to the power source, and we did that by taking 2 male-male wires and attaching them from the 5V and the GND of the Arduino to the VCC power rail and the GND power rail.
Prototype 2
(Intended design)
In preparation for the next test, we decided to switch out our foam board with a wooden board because we thought it would be more stable and could hold more weight, as we wanted to attach the battery pack to the vehicle and make the vehicle controllable by Bluetooth.
As a result of this, we took apart a vehicle, cut out a new wooden base, and still just measured with a ruler. A big goal for our test 2 vehicle was for it to actually be able to climb up something, and to do that, we thought the best solution was to add suspension to our vehicle. And ontop of that, we decided to design a suspension linkage that we thought would also help the car climb.
FAILURES / MISTAKES
I think an overarching mistake we made during this entire project was overcomplicating things and underestimating the difficulty it would be to make all the things we wanted to do come to life. An example of this is trying to add suspension. As mentioned earlier, we wanted to add suspension to our vehicle to help it climb. However, we severely underestimated the difficulty of adding them, which resulted in this make-shift suspension you see here. Not only did this not help our vehicle climb, but it also made the overall structure very weak.
A second mistake we made was not testing our vehicle as we went. After taking appart of first protype we never actually tested if the vehicle would work. This was partially because we didn’t really have the chance to do so, because we tried to make it bluetooth controllabe, which made the car unmovable even if we plugged the battery in. Furthermore, we thought that we hadn’t changed many things in the circuit, and it still functioned the same way, so we assumed there would be no reason for it to malfunction.
Going deeper into a mistake I mentioned, making our vehicle blue-tooth controlablem, this would prove to be one of the biggest mistakes we made, as when test day arrived, we still had not figured out how to connect the HC-05 Bluetooth module to an actual Bluetooth control. Thus, we had no choice but to scrap that idea and instead try to just plug in the motor wires straight into the breadboard. I will talk more about this later.
Testing
During the second test, our vehicle did not perform as we had expected it to. The vehicle would not move, and the test was basically just a flop. Several factors may have caused this failure, the first being not enough power. Using four motors requires a lot of current for all 4 motors to function properly, and the 4 AA batteries might just now have been enough. This was also shown during our data collection of the voltage, where we got fluctuation between 0.7 V and 0.9 V. This could indicate that the electrical system was struggling to consistently supply enough current to the motors. A second issue that could have affected the results was the wiring.
Because we wanted to make the vehicle Bluetooth-controllable, we had to cut off the male pins. This left only the copper wires, which would have been sufficient if we were using the DC motor driver. However, as mentioned earlier, we couldn’t figure out how to connect the HC-05 Bluetooth module to an actual control system. This forced us to attempt connecting the wires directly to the breadboard, similar to what we did during the first test. Unfortunately, this time the copper wires were extremely thin and flexible, and most couldn’t reach deep enough into the breadboard. The main issue with this approach was that not all the wires may have been fully connected or receiving current from the breadboard, likely causing the test to fail.
Data
Trying to get Data from our tests proved to be very difficult. This is because the battery pack hid all the wires, which meant we weren’t able to get the output of electricity.
Furthermore, because of the way our circuit worked
Battery pack -> Arduino -> Breadboard -> Motors
There was no way of getting the current because our circuit does not go back to the battery, making it an open circuit. Because it’s an open circuit, it is impossible to calculate energy efficiency as no current flows, and energy efficiency is not really meaningful here, as it only makes sense when energy is actually being transferred.
Analysis
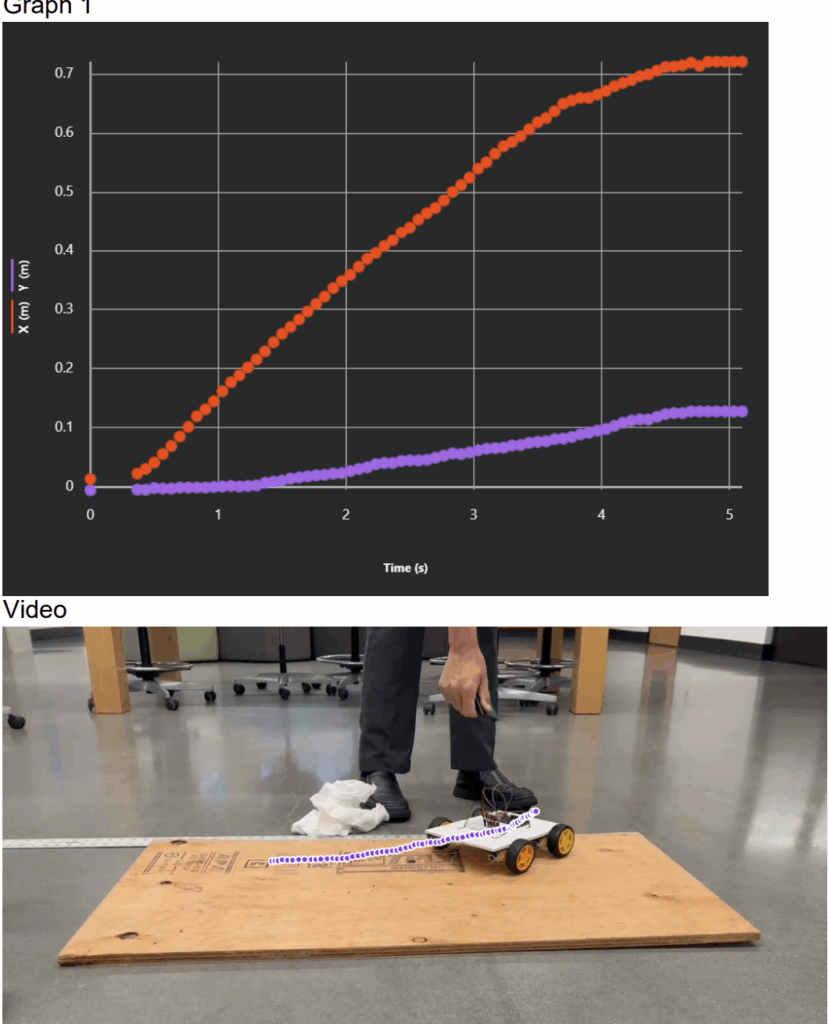
VIDEOS + GRAPH + VIDEO ANLYSIS
ATTEMPTED CALCULATION(hypothetical)
(I’m going to try to calculate an energy efficiency of some sort
In this scenario, the circuit is closed, and there is actually current flowing through the system.)
During the test, the voltage fluctuated between 0.6V and 0.9V. This tells us that the battery system was unable to supply a stable power to the motors.
Current Calculation
Using Ohm’s law and the formula below, we can get the current
We know the voltage of our circuit, which is situated between 0.6 V and 0.9V. We are going to use the average of that, which is 0.75 V. The internal Resistance of the 4 used Alkaline AA batteries is approximately 0.8Ω. By using a resistor of 10Ω, it would give us a total resistance of: 10.8Ω
To find the current, we can use the formula that we stated before. Here, Vbattery represents the voltage of the battery without any load (resistance), which is 6V, as each alkaline AA battery supplies 1.3 V (because they are not new), and we are using 4 of them. Current is: 0.418 A (repeating)
The input power of our circuit is the battery, and to calculate that, we can use the formula:
Where P is the power, V is the voltage, and I is the current.
So our equation to calculate the power input (Pin) of our battery would be:
Using the same equation, we can find the power output (Pout) of our motors, which would be:
We now have both the hypothetical Power input and output of our circuit. Using the energy efficiency forumula we are now able to find the hypothetical energy efficiency of our circuit. The formula for energy efficiency is:
Our calculation would be
In conclusion, the hypothetical energy efficiency of our circuit, if it were a closed circuit and current remained the exact same throughout the system, would have an energy efficiency of 12%, meaning it lost 88% of its energy.
EXPLANATION
As I’ve said before, we can’t calculate any meaningful energy efficiency. Although we attempted to calculate the energy efficiency of the system, a reliable efficiency value cannot be determined. Energy efficiency requires accurate values for both input power from the battery and useful output power delivered to the motors under load.
However, some data that we can analyze is the voltage. In this system, the circuit voltage dropped significantly from the battery’s normal 6V to around 0.6V – 0.9V when the motors were connected. This shows us that there was an extremely large energy loss somewhere, which could be due to the internal resistance of the motors
Because of these limitations, any calculated energy efficiency would most likely be inaccurate. However, the voltage drop clearly demonstrates that a significant portion of the battery’s energy was taken away by the internal resistance rather than converted into useful work by the motors.
The results here can be carried forward when preparing for our hypothetical new home on Teegarden Star B and could help us improve our new home. These results highlight the importance of energy efficiency. Just like in the vehicle, not all energy input is transferred to energy output, and we didn’t have enough energy to power our vehicle. So it’s better to be able to transfer more energy than required.
Conclusion/Evaluation
In conclusion, during this project, we tried to build a vehicle that would fulfill our definition statement. However, looking at the test results, I don’t think the vehicle as it is right now would function well on Teegarden’s Star B. However, from these experiments, we have learned a lot about how to improve our vehicle so that, hypothetically, if we were to go to Teegarden’s Star B, it would function. And the first implication that has to be made would be to increase the amount of energy input we get. It was proven in our experiment that we clearly did not have enough, and if we were to actually build this vehicle life-size, it would not function. A second implication that should be made is adding a way for the vehicle to climb. Teegarden’s star B has a very rocky terrain and requires our vehicle to be able to scale that terrain. Implications such as bigger tires, better tractions, more RPM, and a suspension are all ways to help the vehicle climb. Finally, the last implication that should be made is that the vehicle should be controllable. While we tried to implement this onto our protype but, we were unable to do so. Although this isn’t a big problem on a smaller testing scale, it will be crucial to be able to control the vehicle on Teegarden’s star B. Otherwise, if the vehicle was uncontrollable and could only go in a straight line, it could run into many problems like trying to cross a valley, or going around a mountain, or avoiding a boulder, etc.
Hello this is my fusion blog post for my Planetery Exploration project prep 1
What planet did you choose and why?
We chose the planet Teegarden’s Star B because this exoplanet scored a 0.9 on the ESI scale(Earth simillarity Index). For comparison, other deemed habitable planets like Proxima Centauri b scored 0.87. This exoplanet sits in the habitable zone around a red dwarf star and has an average surface temperature of 28 °C.
What opportunities present themselves on your new home planet?
Teegarden’s Star B sits in the goldilocks zone where liquid water could exist if there is a suitable atmoshphere. As a result, astronomers estimate the chance of water existing on the exoplanet to be 60%.
Teegarden’s Star B has a minimum mass close to earths, this suggest the exoplanet is rocky. This is an exciting oppouruinity because rocky planets have enough gravity to hold on atmosphere which is vital for: retaining heat, protecting surface water from evaporation, and protection from harmful radiation.
What challenges do you foresee?
Teegarden’s star B is a red dwarf. One uncertainty that scientists have not confirmed is weather not it really has an atmosphere. Sceintists estimate the odds of it having an atmoshphere are a mere 3% chance. Thus, if we are going to be living on this planet we would most likely have to construct an atmosophere of our own which is incredibly dificult.
Furthermore, Teegarden’s star B is a red dwarf meaning that there are going to be flares which can release dangerous UV Radiation. The planet is considered to be quiter compared to other red dwarf but the risk is still there.
Teegarden’s Star B also has a very short orbit of about 4.9 earth days. This suggests that the planet is Tidal locked meaning that one side of the planet is alwasy facing towards it’s star. As a result, this max habitabillity more complicated becasue there will be a vast day and night temperature contrast.
What implications might there be for vehicle design?
Teegarden’s Star B has a rocky terrain and gravity similar to Earth. A good implication for vehicle design might be a rocky bogie because it has the ability to traverse through rocky and bumpy environments. Another good implication is the ability to hover for short periods of time. This would allow the vehicle to cross cliffs, deep cracks, or even boulders. And because its gravity is similar to Earth’s, its design can be based on things like planes or helicopters that already exist on Earth, so we don’t need to adjust anything for this implication.
Because Teegarden is a red dwarf, it releases UV radiation, so we need our vehicle to defend against it. We could implement a reflective outer layer of aluminum foil or polished aluminum, which is widely used as a coating for spacecraft. A second layer of polycarbonate could absorb most of the UV. It would also be safer if the vehicle is remote-controllable, as this would reduce the risk of a human being harmed.
How do we know what we know about your planet? Be specific. What research was done? What devices were used? How did those devices collect what data, and what conclusions can be drawn from them? What report speaks specifically to this information?
Scientists first discovered it in 2019 by scientists using the CARMENES spectrograph at the Calar Alto Observatory. CARMENES Spectograph is a powerful instrument that measures the radial velocity of nearby stars. It does this by carefully analyzing changes in the star’s light spectrum. Using this, researchers discovered two planets, one of them being Teegarden’s star b.
The data collected in the research included the star’s motion speed, brightness, and wavelength shifts. This allowed scientists to calculate the planet’s mass, orbital period (4.9 days), and distance from its star
The findings were published in the scientific report:
Zechmeister et al., “The CARMENES search for exoplanets around M dwarfs: Two temperate Earth-mass planets around Teegarden’s Star,” Astronomy & Astrophysics, 2019.
SOURCES
Boukrouche, R., Caballero, R., & Lewis, N. T. (2025, October 24). Near the Runaway: The Climate and Habitability of Teegarden’s Star b. Iopscience. Retrieved November 6, 2025, from https://iopscience.iop.org/article/10.3847/2041-8213/ae122a
Ward, C. (2024, August 22). Where We Would Send The Ark: The Best Exoplanets Within 25 Light-Years. SYFY. Retrieved November 7, 2025, from https://www.syfy.com/syfy-wire/the-best-exoplanets-within-25-light-years
Zechmeister, M., Dreizler, S., & Ribas, I. (2019, July 1). The CARMENES search for exoplanets around M dwarfs. EDP Science. Retrieved November 7, 2025, from https://www.aanda.org/articles/aa/full_html/2019/07/aa35460-19/aa35460-19.html
Hello, for this robotics project, I designed a bomb defusual game using arduino. In the game, the player must defuse the bomb by completing multiple tasks. Currently in the game there are two tasks:
A line of code will display on the LCD screen and the player will have to memorize the code and type it out using the keypad. If they type in the correct code it will display “Code Correct!” on the LCD screen, if not it will display “Code Wrong!” and the bomb will blow up making the player restart.
2. There is a potentiometer on the breadboard. The player will need to turn the potentiometer left or right to adjust the resistance. The code will generate a random number and the player will have to tune the resistance to that number. (Number ranges from 0-1023)
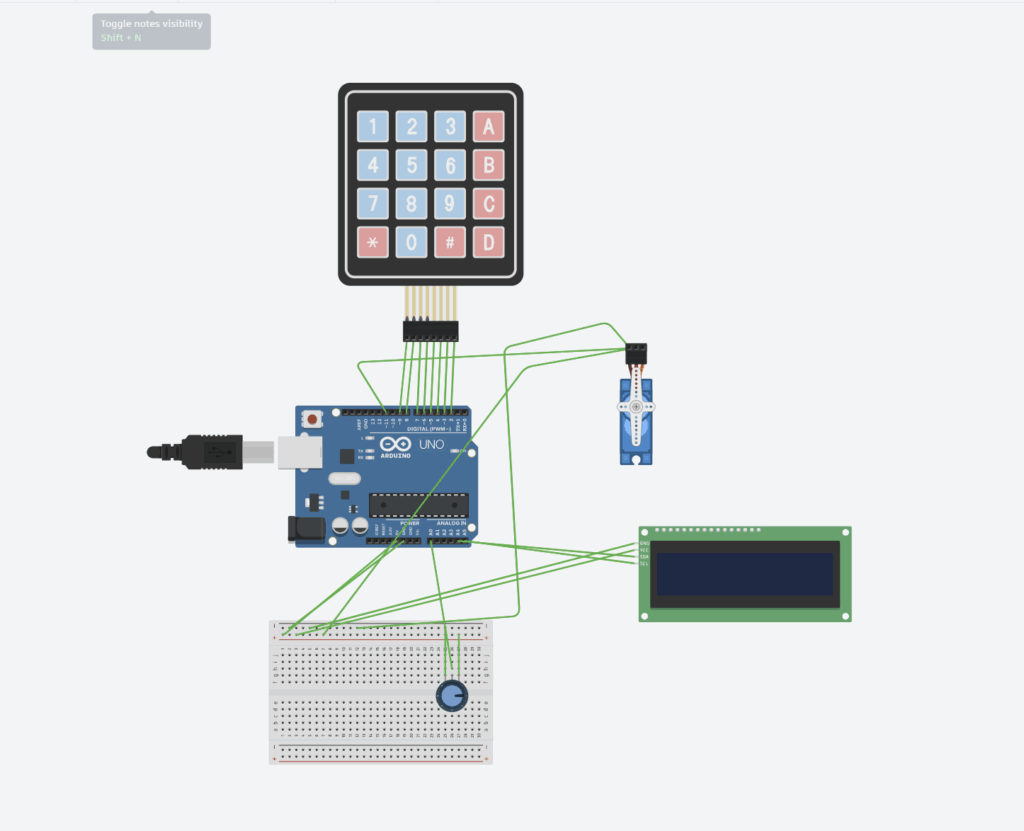
VIRTUAL PROTOTYPE
This virtual prototype was designed using Tinkercad.
Circut Schematic
Arduino Uno
COMPONENT
ARDUINO PINS
LCD (I2C)
SDA –> A4, SCL–> A5
KEYPAD
D2-D9
POTENTIOMETER
A0
POWER
5V, GND –> negative positive rows on breadboard
The Arduino Uno acts like our brain. It reads all of our inputs, runs our code, and controls all the outputs. We can think of the Arduino uno as the logic board for our bomb. In my circut the Arduino does many things. For example it checks:
What number the player enters on tke keypad
2. What voltage is coming from the potentiometer
3. Has the timer run out yet
it also handles:
Generating the random code and targeted values
Displaying messages on the LCD screen
Comparing player code input with correct value
Keypad (4×4)
KEYPAD PIN
ARDUINO PIN
R1
9
R2
8
R3
7
R4
6
C1
5
C2
4
C3
3
C4
2
The keypad has 4 rows and 4 columns. When you press a button on the keypad it connects all 4 rows and columns. The arduino sets all columns pins to a high voltage (5V) and the rows are set to input pins (Input pins have no voltage in).
We can look at the keypad like this:
C1
C2
C3
C4
R1
1
2
3
A
R2
4
5
6
B
R3
7
8
9
C
R4
*
0
#
D
EX. If we press 9 on the keypad it connects C3 with R3. The arduino will scan through set each column to a low voltage like 1V. Because the collums and rows are connected it will also give a small voltage to each row. The arduino will scan through all the rows to check for voltage until it finds a row that has voltage and then it will know what buttons is pressed.
Potentiometer
NAME
FUNCTION
CONNECTION
GND
Ground
GND
WIPER
Signal output
A0
VCC
Power input
5V
The potentiometer gives a resistance value betwen 0-1023 the arduino reads that and generates a random number between that which the user will have to match.
LCD I2C
LCD PIN
ARDUINO PIN
FUNCTION
VCC
5V
Power
GND
GND
Ground
SDA
A4
Data line (Transfer data between LCD and Arduino)
SCL
A5
Serial clock line (a timer for arduino and LCD to transfer information)
The LCD I2C acts as our display screen for our game. It will display the code the player needs to memorize, the potentiometer tuning, and other messages.
MICRO SERVO
SERVO PIN
ARDUINO PIN
FUNCTION
POWER
5V
Power source
GROUND
GND
Ground
SIGNAL
D11
Transfer data between the servo and the arduino
When we suceed in defusing the bomb the servo will move from 0-180 and back like its giving a victory wave. However, when we failt at defusing the bomb the sevo will go from 0-90-0-90 and it will do this 3 times like a head shake saying no.
void failShake() { for (int i = 0; i < 3; i++) { gameServo.write(0); delay(100); gameServo.write(90); delay(100); } } // # SETUP void setup() { lcd.init(); lcd.backlight(); pinMode(buttonPin, INPUT_PULLUP); randomSeed(analogRead(randomPin*micros())); gameServo.attach(servoPin); // Initialize the servo }
// # LOOP void loop() { // — Wait for Game to Start — lcd.clear(); lcd.setCursor(0, 0); lcd.print(“Press to Start”); while (digitalRead(buttonPin) == HIGH);
In my virtual simulation in Tinkercad, it was near impossible to complete the tunning module because Tinkercad only has a certain amount of numbers the potentiometer can tune to. However my code randomly generates any number between 0-1023. As a result the odds of my code genrating a number that was exacly one of the numbers tinkercad has is very low making it very difficult to pass to the third module. However in my real physical prototype the physical potentiometer doesn’t have this limitation as a result I am basically able to tune to any number within 0-1023 making this module possible.
Reflections on use of AI
In my project I the only part where I used AI was for writing my code. This is becaue i’ve alrady been doing robotics with arduino for a good amount of time so I knew wiring was not the biggest problem but coding was.
I followed a process of :
Asking guidance for coding with the help of gemeni
Asking for help to fix erros I had in my code
This worked really well for me. A quick AI explanation of something helped me learn alot quicker then having to search up things online or watching tutorial videos. AI also asked me alot of questions which helped me strenghten my learning.
Here is a transcript of my interaction with gemeni
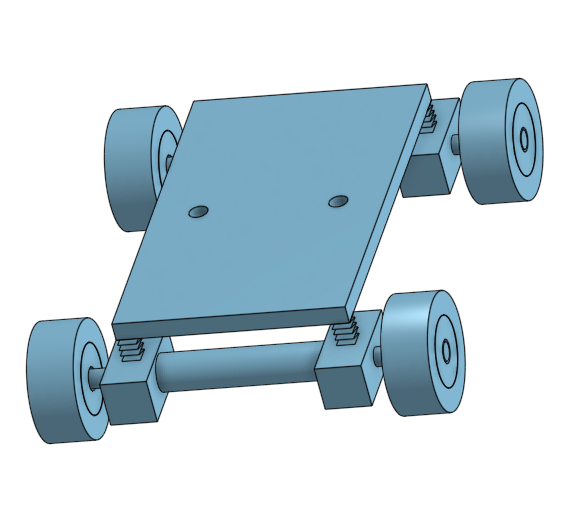
Hello, for this CAD assignment, I designed a skateboard to demonstrate my understanding of several CAD skills including, sketching, extruding, assemby, mechanical drawings, and creating a BOM. Here is my CAD project using Onshape:
I started by sketching the skateboard deck using the sketch tool. I drew a long rectangle and another two rectangles on each side. I used the construction tool to find the centre of my two additional rectangles and drew a line through that to find a middle point. I then created a half circle on that line.
Furthermore, I also sketched out the trucks in a seperate part studio and the wheels aswell.
EXTRUDE
Once my sketches were all complete, I first used to extrude tool to make my deck have curved edges. I was able to do this by slecting the parts that were not within the half circile and removing them with the extreude tool. I then extruded both the wheels and the truck.
ASSEMBLY
Next, I went into the assembly studiom to combine all my parts. I attached the trucks and wheels to the bottom of the deck using align and mate tools. I used the revolute tool to make sure that all my wheels were centered and attached to the truck. Finally this made the skateboard look like a real object that could actually roll.
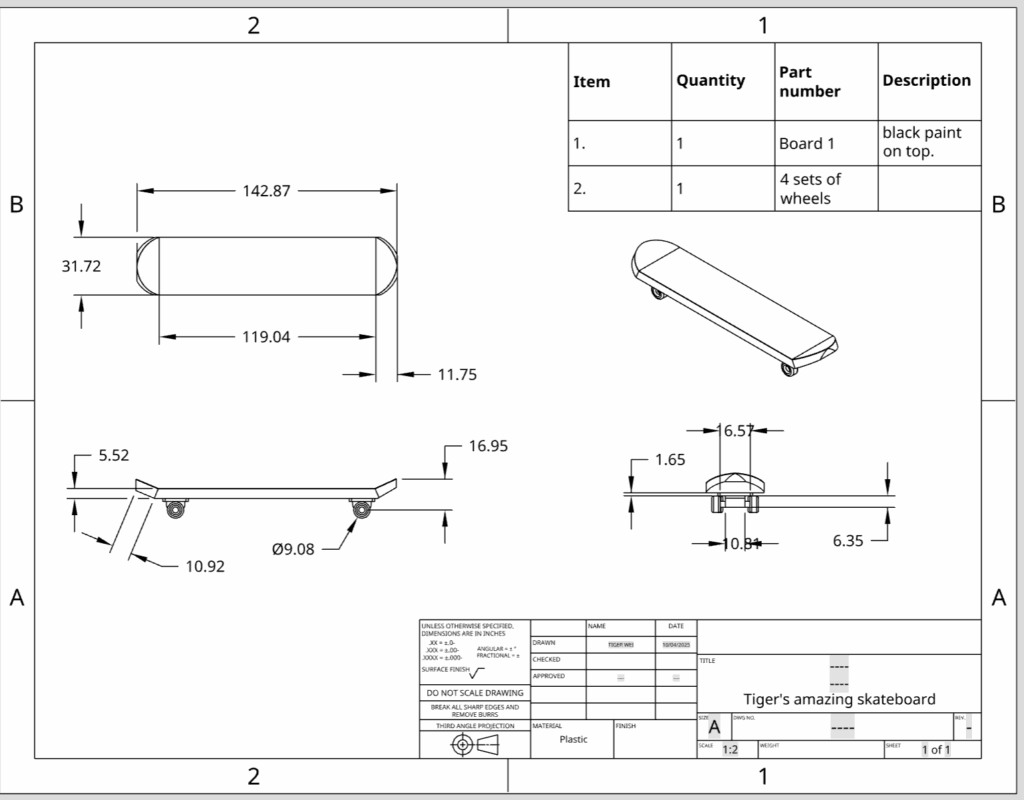
MECHANICAL DRAWINGS
After completing the model, I created a mechanical drawing that includes:
Top view with full board dimensions
Side and front views showing wheel placement and angles
An Isometric view to show how the whole skateboard looks assembled
All relevant dimensions, such as the: deck lenght, deck thickness, wheel width, etc.. are clearly labeled. You can see these in my drawing below.
BILL OF MATERIALS (BOM)
I also included a bill of meaterial in my drawing. The BOM lists all the components used:
ITEM
QUANTITY
PART NUMBER
DESCRIPTION
1
1
Board 1
black paint on top
2
1
4 sets of wheels
This table helps identify what parts are needed to fabricate or 3D print the skateboard. For the wheels you will only need to print it once as it has 4 wheels in the part’s studio. You can also choose to paint the top of you skateboard black to better identity which side is the top or bottom.
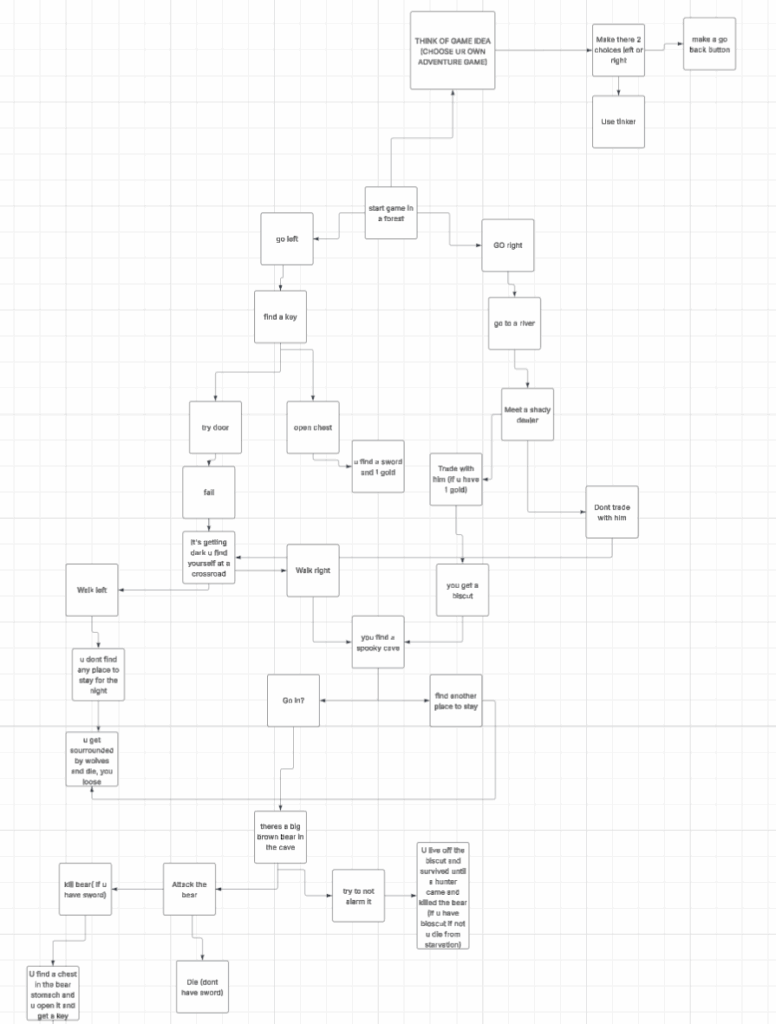
This is my flowchart and my process of ideas on how I wanted to make my game and how the user would “win” the game
Below is the code that I used to create my game. However, you do need to instal a libary called tkinter or else it will not work. For some people they are unable to do that. Thus I have recorded a yotube video that will go over my code and game. Here is the video.
Here is my code
CODE
import tkinter as tk
# Player inventory, accessible by all functions. inventory = { “gold”: 0, “sword”: False, “biscuit”: False, “strange_key”: False }
def clear_screen(): for widget in root.winfo_children(): widget.destroy()
# — Functions for Game Choices —
def fight_the_bear(): clear_screen()
if inventory[“sword”] == True: story_text = “You draw the sharp sword you found in the chest and kill the bear good job”
continue_button = tk.Button(root, text=”Search the Cave”, command=bear_cave_chest) continue_button.pack() else: story_text = “You try fighting the bear with your fists?? wow no surpise you get clapped and died L noob.”
clear_screen() inventory[“strange_key”] = True story_label = tk.Label(root, text=”Deeper in the cave, you find the bear’s treasure chest. Inside is a strange key.”) story_label.pack()
back_button = tk.Button(root, text=”Take key and go back”, command=start_game) back_button.pack()
def hide_from_bear(): clear_screen()
if inventory[“biscuit”] == True: story_text = “you hide and live off the biscut. a hunter comes and saves you, you win!” else: story_text = “You hide but you died of starvation, L noob”
def wolf_attack(): clear_screen() story_label = tk.Label(root, text=”You hear some howls, you get surrounded by wolves and you died L noob.”) story_label.pack() play_again_button = tk.Button(root, text=”Play Again”, command=start_game) play_again_button.pack()
def meet_bear(): clear_screen() story_label = tk.Label(root, text=”You see a big brown bear.”) story_label.pack() fight_button = tk.Button(root, text=”Fight the bear”, command=fight_the_bear) fight_button.pack() hide_button = tk.Button(root, text=”Try to hide”, command=hide_from_bear) hide_button.pack()
def deeper_in_cave(): clear_screen() story_label = tk.Label(root, text=”The cave is damp and you hear a strange noise.”) story_label.pack() continue_button = tk.Button(root, text=”Follow the noise”, command=meet_bear) continue_button.pack()
def go_in_spooky_cave(): clear_screen() story_label = tk.Label(root, text=”You step into the spooky cave…”) story_label.pack() continue_button = tk.Button(root, text=”Continue”, command=deeper_in_cave) continue_button.pack()
def leave_spooky_cave(): clear_screen() story_label = tk.Label(root, text=”You decide not to risk it and leave.”) story_label.pack() continue_button = tk.Button(root, text=”You walk for some time…”, command=wolf_attack) continue_button.pack()
def open_chest(): global inventory clear_screen() inventory[“gold”] += 1 inventory[“sword”] = True story_text = f”You open the chest and find a sharp sword and 1 gold piece!\n(Gold: {inventory[‘gold’]})” story_label = tk.Label(root, text=story_text) story_label.pack() back_button = tk.Button(root, text=”Go Back”, command=start_game) back_button.pack()
def try_door(): clear_screen()
if inventory[“strange_key”] == True: # WINNER: The player has the key story_text = “You place the sdFSDFDF0101 F key sdFsda0101fS in” story_label = tk.Label(root, text=story_text) story_label.pack() story_text = “you’ve escaped the matrix! … or have U?” story_label = tk.Label(root, text=story_text) story_label.pack()
def show_credits(): clear_screen() story_label = tk.Label(root, text=”Game Created By Tiger wei and thanks to gemeni!\n\nThanks for playing.”) story_label.pack()
def go_away(): clear_screen() story_label = tk.Label(root, text=”You walk the other way towards a crossroad.”) story_label.pack() continue_button = tk.Button(root, text=”Continue”, command=find_spooky_cave) continue_button.pack()
def meet_trader(): global inventory clear_screen() if inventory[“gold”] >= 1: story_text = f”The shady trader sees your gold.\n’Care for a biscuit? Just 1 gold piece.’\n(You have: {inventory[‘gold’]} gold)” story_label = tk.Label(root, text=story_text) story_label.pack() live_button = tk.Button(root, text=”Trade with him”, command=live) live_button.pack() away_button = tk.Button(root, text=”No thanks”, command=go_away) away_button.pack() else: story_text = f”The shady trader looks you over, sees you have no gold, and scoffs.\n’Don’t waste my time.’\n(You have: {inventory[‘gold’]} gold)” story_label = tk.Label(root, text=story_text) story_label.pack() back_button = tk.Button(root, text=”Go Back”, command=go_right) back_button.pack()
def go_left(): clear_screen() story_label = tk.Label(root, text=”You walk down a path and find a shiny key.”) story_label.pack() chest_button = tk.Button(root, text=”Open Chest”, command=open_chest) chest_button.pack() door_button = tk.Button(root, text=”Try Door”, command=try_door) door_button.pack() back_button = tk.Button(root, text=”Go Back”, command=start_game) back_button.pack()
def go_right(): clear_screen() story_label = tk.Label(root, text=”You walk towards a river. The water is flowing quickly.”) story_label.pack() trader_button = tk.Button(root, text=”Meet the shady trader”, command=meet_trader) trader_button.pack() away_button = tk.Button(root, text=”Go away from the river”, command=go_away) away_button.pack() back_button = tk.Button(root, text=”Go Back”, command=start_game) back_button.pack()
def start_game(): clear_screen() story_label = tk.Label(root, text=”You wake up in a dark forest. You can go left or right.”) story_label.pack() left_button = tk.Button(root, text=”Go Left”, command=go_left) left_button.pack() right_button = tk.Button(root, text=”Go Right”, command=go_right) right_button.pack()
# — Main Program Setup — root = tk.Tk() root.title(“My Adventure Game”) root.geometry(“400×300”)
Here I will explain what all my code does in a very simple manner so that everyone can understand
Libraries
for this project, you need to install the tinker library for python. If u do not, this code will not work. Here is a link to the library so you can download it
This code creates our inventory and allows for different results in our game. We can set these items to 0 or false
def clear_screen(): for widget in root.winfo_children(): widget.destroy()
This code creates a function that erases the screen after a choice is made and we use this everytime we’ve made a choice in the game
FUNCTIONS
In my game I have alot of functions like
EX.
def fight_the_bear() :
def hide_from_bear() :
def go_left() :
def go_right() :
each of theese functions are like pages in our story. Each of these functions is the pages that allow the player to choose between 2 actions
MAIN REPEATED CODE
In my game all of the options and text afterwards are all construced by 4 different set of codes
story_label = tk.Label(root, text=)
this code makes the lines of text you see before you click on one of the buttons
X_button.pack()
This code makes our buttons actually function and acts like a hand that flips the page after each choice
Story_text = X
This is the code that displays a longer line of text after you have clicked on one of the buttons and made your choice
X_Button = tk.Button(root, text=””z, command =Y)
This is one of teh msot important part’s of our code. This code creates the buttons for our game. X has to be part of one of our functions so that it can connect back to it. Z is the text that will be displayed on the button (EX. Go left). Y is the next function or scene we want to go to after we click on this button (EX. We click on go left Go Left => Open Chest) we would put Open_Chest where Y is and it would lead us to that scene.
More EX.
continue_button = tk.Button(root, text=”Follow the noise”, command=meet_bear)
This will display a continue button and move us to the scene where we meet the bear