ROBOTICS
Introduction:
In this project, we were tasked to create a device that demonstrates circuit building and Arduino programming.
Device : Ultrasonic Radar
The device functions like a simplified sonar/radar system. An ultrasonic sensor mounted on a servo sweeps from 0° to 180°, measuring distances and sending that data to a computer. A processing program then visualizes these readings on a digital radar display.
Circuit Schematic : How does it work?
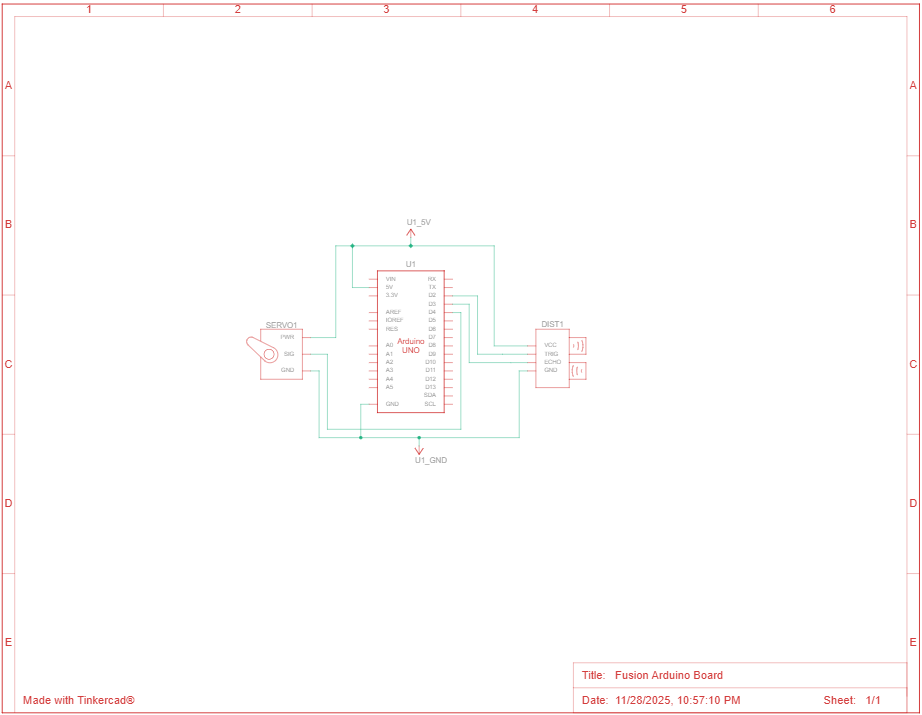
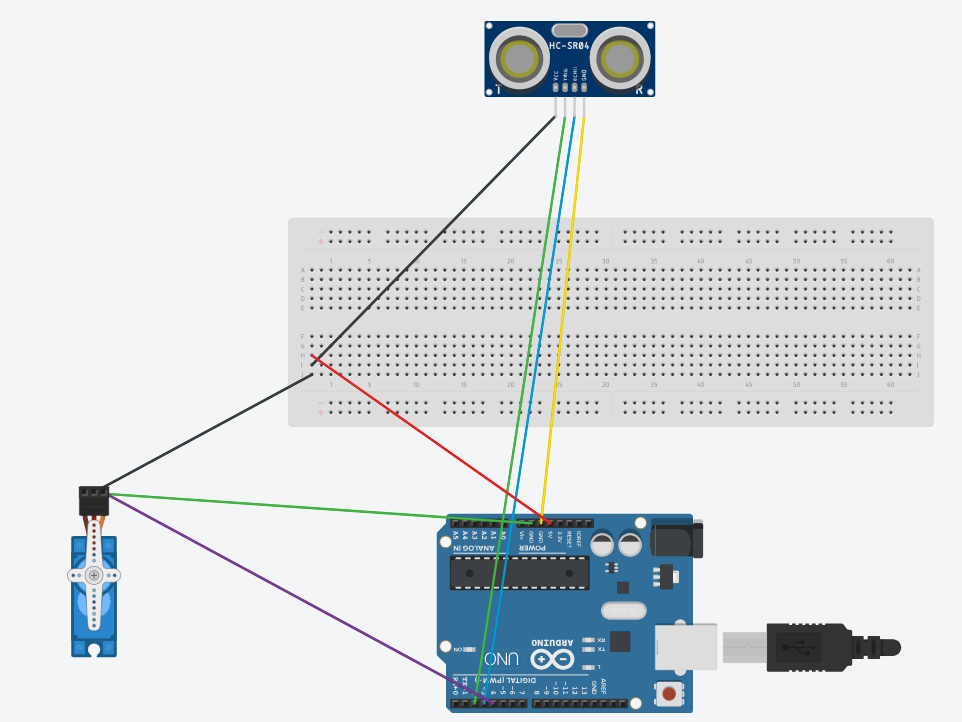
This circuit schematic works by connecting an Arduino to both a servo motor and an HC-SR04 ultrasonic sensor so they can work together to form a scanning radar system. The servo motor is powered by the Arduino’s 5V and GND pins, and its signal wire connects to a digital pin so the Arduino can control its rotation from 0° to 180°. The ultrasonic sensor is also powered by the same 5V and ground rails, while its TRIG and ECHO pins connect to two Arduino digital pins. During operation, the Arduino sends a control pulse to the servo to set the current angle, then sends a short trigger pulse to the HC-SR04. The sensor emits an ultrasonic wave, and when the echo returns, the ECHO pin outputs a pulse whose length corresponds to the distance of the object. The Arduino measures this pulse, calculates the distance, and pairs it with the current servo angle. All components share a common power and ground, allowing the signals to work correctly. This wiring setup lets the Arduino rotate the sensor, measure distance at each angle, and send the data to a computer to be displayed on the radar interface.
BOM (Bill of Materials)
| Quantity | Component |
| 1 | HC-SR04 Ultrasonic Sensor |
| 1 | Arduino Uno Rev3 |
| 1 | SG90 180° Servo Motor |
| 1 | Breadboard |
| 1 | USB Cable |
| 8 | wires |
Code : How does it work?
The code sets up the servo motor, the ultrasonic sensor, and the serial connection. It moves the servo in 1° increments from 0° to 180° and back, using a small delay to control sweep speed. At each angle, it triggers the HC-SR04 by sending a 10-microsecond pulse, then measures the echo return time with pulseIn(), converting that duration into centimeters using the speed-of-sound constant. Each reading is bundled into a simple formatted string such as “angle,distance.” and sent to the computer. The code then receives this stream of values, analyzes it, and stores the most recent angle and distance. It then converts each polar coordinate pair into an (x, y) location relative to the radar center, adjusting the angle so the radar sweeps correctly across a semicircle. It draws the moving green sweep line that follows the servo’s real-time position, plots red points for any detected objects within range, and gradually fades past points. Continuous serial communication ensures the display updates instantly as the servo scans, making a functioning radar.
Code
#include <Servo.h>
Servo radarServo;
const int trigPin = 2;
const int echoPin = 3;
const int servoPin = 4;
long duration;
int distance;
void setup() {
radarServo.attach(servoPin);
pinMode(trigPin, OUTPUT);
pinMode(echoPin, INPUT);
Serial.begin(9600);
}
int getDistance() {
// Trigger the ultrasonic sensor
digitalWrite(trigPin, LOW);
delayMicroseconds(2);
digitalWrite(trigPin, HIGH);
delayMicroseconds(10);
digitalWrite(trigPin, LOW);
// Receive the echo
duration = pulseIn(echoPin, HIGH);
// Convert time to distance (cm)
distance = duration * 0.034 / 2;
return distance;
}
void loop() {
// Sweep 0° → 180°
for (int angle = 0; angle <= 180; angle++) {
radarServo.write(angle);
delay(15);
int d = getDistance();

// Send data to Processing
Serial.print(angle);
Serial.print(",");
Serial.print(d);
Serial.println(".");

delay(20);
}
// Sweep 180° → 0°
for (int angle = 180; angle >= 0; angle–) {
radarServo.write(angle);
delay(15);
int d = getDistance();

Serial.print(angle);
Serial.print(",");
Serial.print(d);
Serial.println(".");

delay(20);
}
}
Visual Representation Of Code
The video shows how when the object is out of the sensor’s range, it will be unable to be detected.
The sensor is placed on top of the servo, which is spinning at a 180 degrees, the radar is then able to sweep around the area in the intended radius.
Ai was not used in this assignment
No physical test was used in this assignment
Leave a Reply to mcrompton Cancel reply