Definition statement
Many laptops experience overheating issues that will reduce the performance of the computer and shorten the lifespan of the hardware. The market lacks an affordable automatic cooling machine for average users.

Who is this project for?
This project is specifically for gamers and students who have a high demand on their laptop’s performance for long periods of time. These people may not have the budget to invest in a liquid cooling system that can automatically control the temperature.
There value and requirements
1: Reliablity
2: Efficient
3: Low cost
Listing out the users’ requirements and needs can help me design a project that is suitable for people to use.

Some of the ideas that I thought of
1: Liquid cooling- it is rather expensive and complicated to achieve
2: High voltage fan-cooling machine- It creates to much noise and contains potential safety issues.
3: Physical heat conduction pad- It is not accessible and inefficient
Through the comparisons between the different ideas I had, I chose to combine the fan-cooling machine and the idea of conduction to create this automatic fan cooling machine with a sensor detecting the temperature and adjusting the spinning speed of the fan. In this case, it balances efficiency, safety, and affordability.
Potential prototype
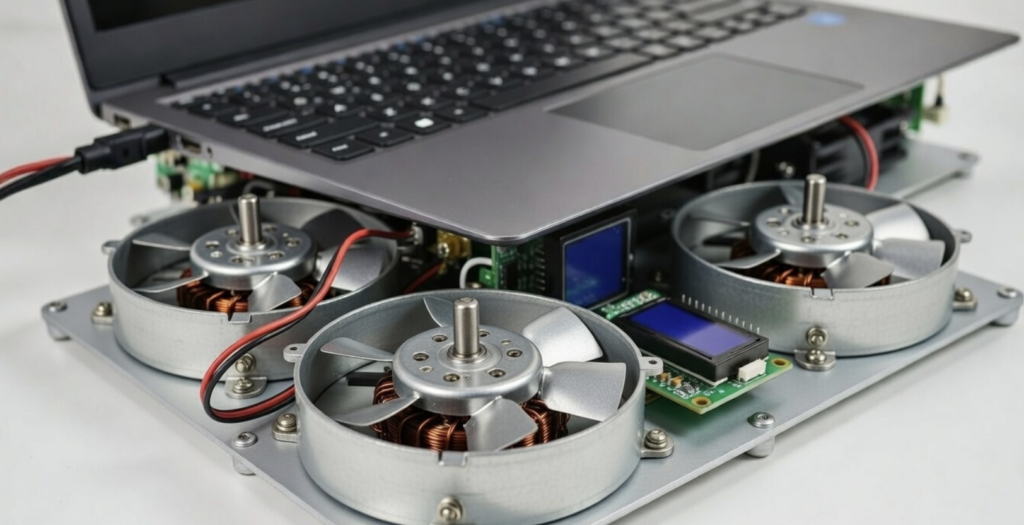
AI generated prototype
Prototype description:
It will be a circuit including 4 motors and a temperature sensor placed near the laptop. Moreover, there will be a high-voltage battery and an Arduino Uno for the control of the system.
How it works:
When the temperature sensor detects that the temperature increased, the fan will adjust automatically to a spin rate to cool the temperature of the laptop down. On the other hand, if the sensor detects that the temperature decreased to a normal range, then the system will decrease the spin rate of the fan to save energy and reduce noise.
BOM (for now)
1x Arduino UNO to process data and control the outputs
1x Temperature sensor to detect the temperature
1x DC motors as the cooling fans
1x Breadboard for wiring
Wires
CAD for the designing of the pad
Power source eg. Battery
3D printed body part of the system
Step-by-Step
1: Research
In this part, I will be researching other similar projects in the market and learn about how it works. Moreover, I will have an overview of what problems I might encounter and start learning how to solve them
2: Designing, Building the circuit
Designing and building the circuit will be the most essential part of this project. It includes writing code, connecting all the parts, and testing the accuracy.
3: Programming
This is a rather short period to figure out how to automatically control the spinning rate of the fan based on the temperature detected and program.
4: Cad
In this period, I will be creating the body part of the system based on the physical measurements of the assembled circuit, and finally printing it out
5: Final Assembly
I will be assembling all the parts of the circuit and body and put them together.
6: Testing
In this testing part, I will use my gaming laptop to operate a program that requires a strong GPU that will warm up the hardwares
Reflection:
Based on the planned process, it should be done by the start of May and be ready for the test. Moreover, I would have a notion page ready for the tracking of my progress throughout the whole process, from brainstorming to testing.
Leave a Reply to lawrencel Cancel reply