For a reminder of what my goal is with this project, see HERE.
Since my last update, I have been researching more about how lasers work, in order to determine the best type to use for this project. I have put in an order for a mobile laser grid, which I will take apart and examine to learn more about how it works.
Not much has happened since the last update in terms of physical progress, as my laser grid has only just arrived; however, I will be explaining my plan going forward.
I will be disassembling this laser and using the pieces to build my own. To do so, I will need to research how lasers function and examine the construction of the one that I ordered. During this time, I will be designing and 3d printing a case and attachment mechanism to secure the laser to a ski helmet.
From now until the deadline of this project, the majority of my time will likely be used to design the case and determine how to attach it to a helmet; although it should not take so much time that the deadline becomes a major worry for me.
My next update will be of the events of the year-end trip to the University of Victoria with fellow Fusion students. At this time, I will also be detailing my progress since this post, and I hope it goes well.
“A problem many people have faced when taking part in activities such as skiing or snowboarding is a lack of visibility. Sometimes, lighting makes the snow surface appear flat, while at other times, clouds or fog interfere with the visibility of the snow. This can prevent the rider from determining sudden changes in terrain, potentially leading to injury or death.”
To expand further on the issue, many skiers and snowboarders are unable to notice when there is a bump or pit in the snow ahead of them. This is due to visibility issues such as lighting or weather conditions, which can cause the snow to appear as a smooth and flat surface of white, while the actual terrain of the snow is much less favourable. This can cause them to hit these seemingly insignificant obstacles at high speeds, potentially resulting in harm.
I aim to design a device that helps skiers and snowboarders see the snow in front of them. My main idea to accomplish this was to build a laser that is able to attach to one’s helmet and project a grid onto the snow. This prototype will have to be tested to measure its usefulness, which I will take on myself once it is complete.
Depending on the size of the grid, this would show many details that the naked eye cannot see in the snow, such as the texture of the snow and where there might be bumps or small pits. This can help skiers and snowboarders avoid interruptions or crashes while riding, which may be caused by hitting these disturbed patches of snow.
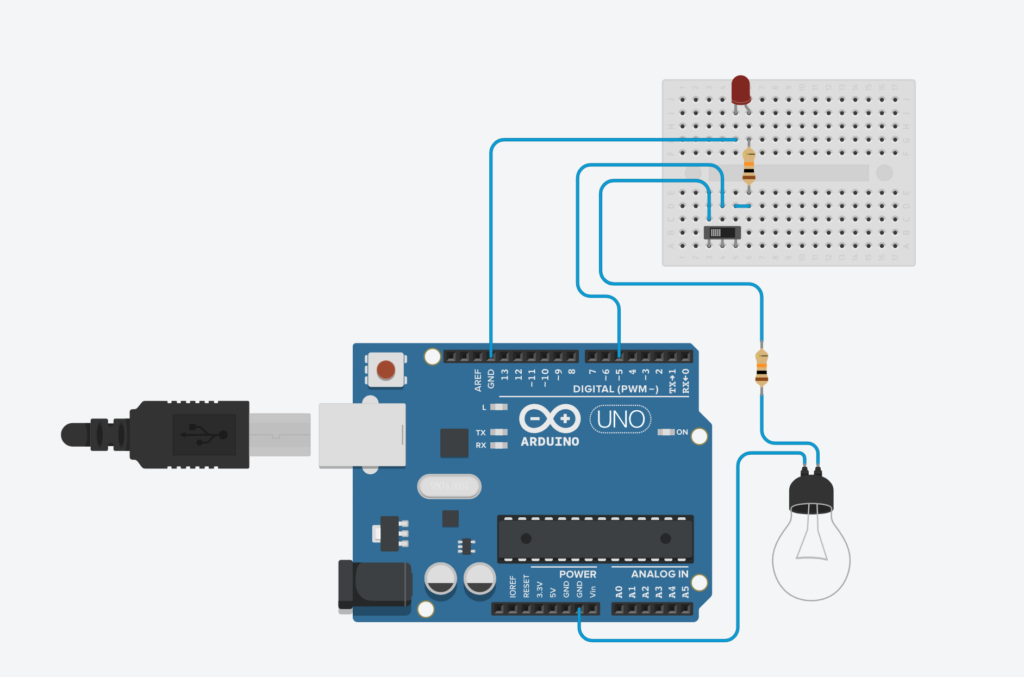
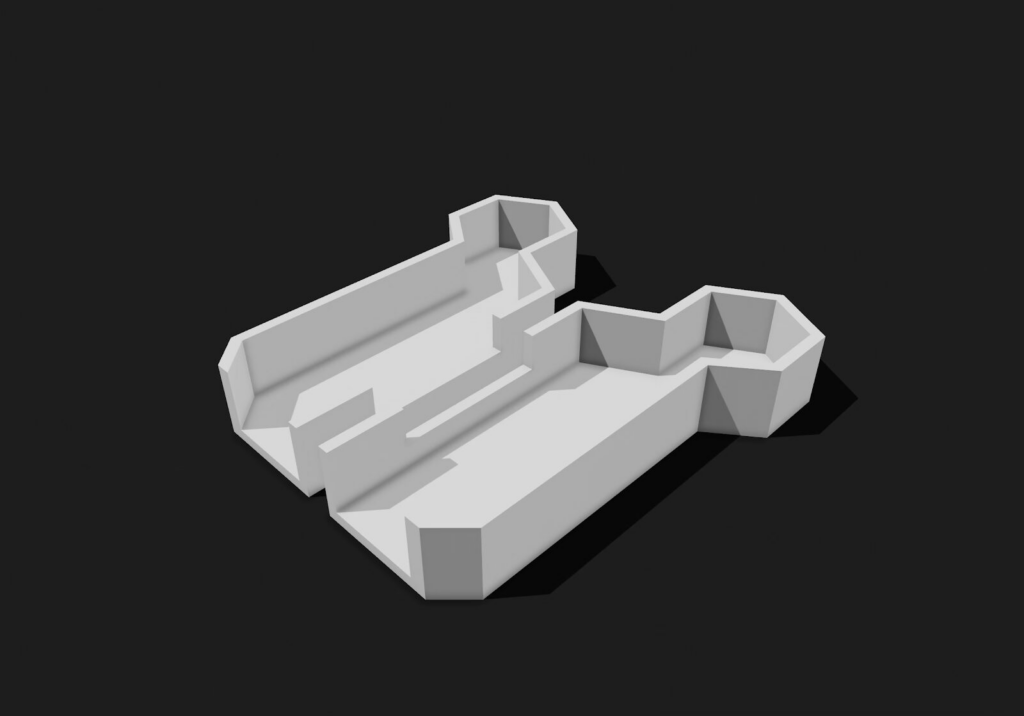
Since my last post, I have designed a circuit for the laser in CAD software (see below for a picture of the circuit and the code to run it) and have begun constructing a physical model. Once this circuit is complete, the next step will be to design a case, which will hold it and be attached to the helmet or goggle strap.
// C++ code
//
void setup()
{
  pinMode(5, OUTPUT);
}

void loop()
{
  delay(3000); // Wait for 3000 millisecond(s)
  digitalWrite(5, HIGH);
  delay(600000); // Wait for 600000 millisecond(s)
  digitalWrite(5, LOW);
}
This case will have to be able to securely hold the circuit without it being damaged when jostled or sustaining impacts, as these things will likely happen often while it is in use. In addition to this, the case must be lightweight, air-tight, and adjustable. This is so it will protect the circuit from snow or moisture entering it, be able to change the angle to fit with people’s heights and sight lines, and more, while not interfering with the balance of the rider.
I will continue working on this project in the meantime and will provide another update in about a month. If you have any questions about my project, please leave a reply in the comments.
As of yet, no Artificial Intelligence has been utilized in this project; it is all my own work.
A problem many people have faced when taking part in activities such as skiing or snowboarding is a lack of visibility. Sometimes, lighting makes the snow surface appear flat, while at other times, clouds or fog interfere with the visibility of the snow. This can prevent the rider from determining changes in terrain, potentially leading to injury or death.
The kind of people that this solution would be for includes skiers and snowboarders, as mentioned in my definition statement, but it could also be used by other types of people. As my solution may end up being some form of way to place an overlay on the terrain, other groups of people who would use this may also be interested.
I took some time to brainstorm potential solutions to this issue and came up with several good ideas. These include a laser grid projector, drones that shine spotlights ahead of riders, and an AR function for goggles that shows an outline of the terrain. Below, I have provided further descriptions of each of my ideas.Laser Grid: A small laser that attaches to the top or side of the helmet. This laser would project a wide rectangular grid on the ground, allowing you to determine the shape of the terrain by observing the changes in the grid.
Prototype: A small circuit with a laser that projects a grid onto a surface in front of it. The grid projected by the laser would be accomplished by cutting the shape into an object placed in front of the laser in order to control the direction and form it into the desired shape.
Spotlight Drones: A drone or fleet of drones that would project spotlights on the ground. This solution is more meant to dissipate fog or clouds when high in the mountains; however, it could also be combined with the above laser grid idea to project a grid on the ground from above. Combining ideas like this would make the grid cover a larger area, although the accuracy may be impaired by the grid increasing in size.
Prototype: A prototype of this idea that I would be able to construct within the time limit for this project would consist of a circuit that produces a large spotlight pointing in a desired direction, which could be linked to a separate device or application.
AR Goggles: This idea consists of two different components, a pair of goggles and a live 3D model of the mountain, complete with buildings, rocks, and signs. With a live-updating 3D model linked to AR goggles, a skier would be able to see an outline of everything in front of them, even through fog, clouds, or deceiving lighting.
Prototype: A prototype of this idea that I would be able to construct within the time limit for this project would consist of a simple 3D model of an area or room, as well as an application or screen that shows an Augmented Reality outline of the 3D model according to where you are in the area.
In order to accomplish any of these prototypes, I need to create a step-by-step plan of how to design and create them. My initial plan is to focus on one prototype idea, specifically the laser grid. Below, you can find the plan I have created to build this device.
Step 1: Obtain or create a small circuit that produces a low-power laser beam.
Step 2: Figure out a method to control the direction of the light and focus it into a grid pattern.
Step 3: Create a way of attaching it to a ski helmet or shoulder strap.
Step 4: Perform tests and observe how effectively the grid appears on various surfaces and objects.
When designing a vehicle suitable for Titan, the critical problems we must consider are its ability to accommodate 4 people and its machinery under extreme temperatures of -180°C, hold sufficient energy to travel distances of 10km at a time, be able to produce oxygen, and have sufficient traction to grip Titan’s unique surface of ice, dunes and pebbles alongside combating the lower gravity similar to the moon.
Creating the Vehicle
To begin the design process for our vehicle, I was tasked with making a sketch, which was then further visualized with 3d modelling software. After a long period of working on the vehicle, we have managed to create a version that we can use to test. We went through a number of iterations, each with its own flaws.
When creating our first design, a human error during printing caused an important hole to be missing from the bottom of the design, as you can see in the images below. However, we believed we could salvage this body and attempt to continue building without this hole. It ended up failing due to the new positioning of the wheels not allowing them to touch the ground, since they were designed to fit in the old position.
At this point, we decided to restart and create a completely different design. After another member of the group and I worked step by step on the chassis, where the motors and wheels would go, we then laser-cut walls for the vehicle before attaching them with hot glue.
The main tests that we are performing on our vehicle design for Titan are the efficiency of the battery and motors, as well as the traction the wheels have on the ground.
Testing & Data Collection
For our testing, we first tested our vehicle’s capabilities by having it drive over a patch of kinetic sand I had spread on a wooden plank. This test wasn’t even a challenge for our vehicle, as it easily passed over the kinetic sand, even continuing off the plank and up the short hill to the grass of the field next to where we were testing.
You can see footage of the tests below. To help support our project and do my group a favour, subscribe to the channel.
Thanks to a video analysis tool that I used to measure distance travelled frame by frame (at ≈60 frames per second), I calculated the vehicle’s average speed at 0.28 m/s (10.84 inches per second) while crossing the kinetic sand.
The second part of our testing was measuring the efficiency of the battery and motors. We measured the battery voltage at 7.34 V. Next, we measured the current of the vehicle’s resistance as 14.05 Ohms. Using this, we calculated the circuit’s current using the formula , resulting in a Current of 0.52 Amps.
After doing this testing, I worked out the input energy from the battery as being the Voltage, or 7.34 V, times the Current (0.52 Amps) and the output energy as being the speed the vehicle moved at, or 30 in/s.
Data Analysis
Our vehicle successfully crossed a patch of kinetic sand around 30 in. long at an average speed of close to 10.8 in/s, or 0.28 m/s. This means it crossed this sand in around 2.8 seconds.
No, I didn’t mistakenly just multiply 0.28 m/s by 10 to get seconds; I just used the in/s speed of 10.8 and divided 30 by this, which coincidentally resulted in 2.8 seconds.
The efficiency of the vehicle’s circuit and motors is measured as output divided by input, which gets converted to a percentage. Thanks to our testing, we have worked out that our vehicle has a total input value of 7.34 Volts multiplied by 0.52 Amps. This means the overall input energy is 3.82.
Our output energy for this vehicle is the kinetic energy () when it moves. The formula for kinetic energy that we are using is , or when we input the values for mass and velocity. This results in a total of 19.86 Joules.
With both the input and output values calculated, we now divide the input by the output, , which means our vehicle is 19.2% efficient.
Conclusion
All in all, this project was a success for our group, especially after our poor start with our first design. Based on the efficiency of this vehicle and the speed at which it moved, I’d conclude that if we want the vehicle to be able to travel far enough on Titan as is required, we would need to dramatically increase the voltage of the battery relative to the scale of the vehicle, as EVs typically are around 77% efficient. While gas vehicles are 16-25% efficient, which we are within, this vehicle uses electricity, so we’d want it to at least be on par with commonly used electric vehicles when starting off on our mission.
If I were to scale our vehicle to life-size, what would be used for a mission to Titan, then we would need to see if it is able to travel 10 km per day based on the efficiency. With a target distance of 10 km at the current efficiency, our vehicle would complete this journey in 2800 seconds, or just over 45 minutes. With the speed and distance being scaled up, our input energy would also need to increase. With our battery Voltage being 7.34 V, to scale it with the speed, we need to multiply this by 10,000. This means our new necessary voltage is 73,400 V.
This is several times higher than what many common EVs use, but if we manage to increase our efficiency to near 100%, this reduces the necessary voltage to around 14,800. With such a high voltage, with the same efficiency or not, our vehicle would need to have a large amount of extremely powerful batteries, most likely the same or similar as powerful electric vehicles like the Porsche Taycan.
This would impact our design’s weight, and perhaps even the interior volume, depending on how much of the vehicle should be accessible to passengers.
As far as how I believe this vehicle may be improved in further iterations, I’d say that, in addition to increasing the voltage as I mentioned earlier, adjusting the positioning and size of the wheels would allow greater stability, which is something I noticed our vehicle lacking somewhat during the testing.
AI Transparency Statement
All text on this page is human generated. Formulas with and without values are the work of https://editor.codecogs.com/.
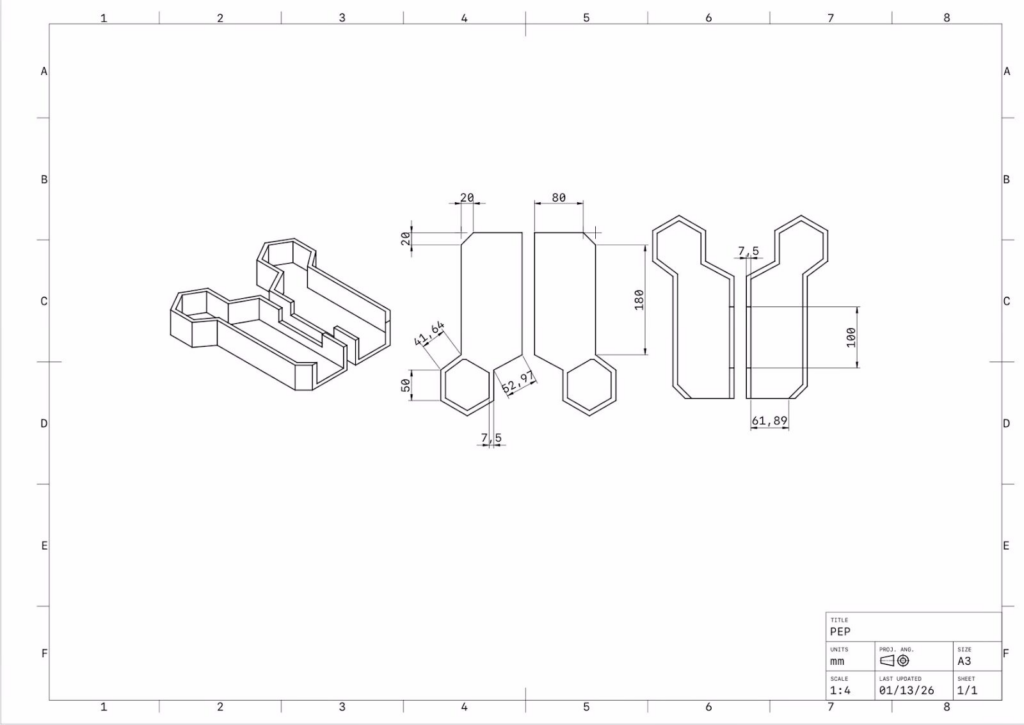
This is the first part of the Planetary Exploration Project (PEP) we have begun to work on. This section of the project involves choosing a planet or celestial body that we could hypothetically live on, and identifying opportunities or challenges we might face there.
My group decided to choose Titan, one of Saturn’s moons, for this project. Titan is quite unique, as it is the only known moon in our solar system with a substantial atmosphere. It is also the only celestial body besides Earth that is known to have liquids on its surface, having clouds, seas, rivers, and lakes, made of hydrocarbons like methane and ethane.
Living on Titan could provide some excellent research opportunities, as it would not only provide an excellent outpost to research Saturn, but the methane in Titan’s primarily nitrogen atmosphere is somewhat mysterious to scientists. Sunlight continually breaks down the methane, but it has not deplenished itself over time, like you might have expected.
Instead, the methane in Titan’s atmosphere seems to be replenishing itself to counteract the sunlight breaking it down, and the exact cause is currently unknown, although a few theories are being discussed. If we were living on Titan, we would be able to research this strange replenishing methane in the atmosphere.
Some of the main challenges we would face on Titan include the lack of oxygen in the air, and the lack of easily accessible liquid water on the surface, since the only surface liquids on Titan are hydrocarbons, which I mentioned earlier. While Titan does have a liquid water ocean underground, it is approximately 55-80 km below the icy surface, meaning that short trips to refill water supplies might not be possible without digging out a tunnel and having machines or devices pumping water up to the surface.
However, we did realize that there is a way to get breathable oxygen, through electrolysis of the ice covering Titan’s surface. If we manage to electrolyze the ice around where we would live to get oxygen, this would provide us with a way to have breathable oxygen. Thinking ahead about this, we could build some sort of sealed area on the surface that we live inside and fill with oxygen.
Electrolysis could also provide us with a source of fuel, which could be used for traversing Titan, or anything else that we want to do while living there. Being able to have a source of fuel would allow us to have heat in our buildings, and provide electricity for any devices or power systems we may have.
If we are going to live on Titan, we need to consider how we would traverse its surface, and what issues or implications there might be for building vehicles. The first thing that comes to my mind is how there is no oxygen currently in Titan’s atmosphere, which I mentioned earlier, so any vehicles would either need oxygen tanks for passengers, or a sealed seating area that can be filled with collected oxygen.
Another implication I thought we might come across is that since Titan’s surface is solid ice up until about 55-80 km down, we would have to consider how to create a vehicle that would be able to function on this ice. Meaning that if we had a vehicle with wheels, we would need to make it able to traverse on an icy surface without slipping. This would be most likely accomplished through making the wheels larger or covering them in spikes, similar to winter tires you might see cars using during winters.
Most of the information gathered about Titan comes from probes and spacecrafts sent close to Saturn’s orbit, such as the Voyager expeditions, but some data has also been gathered by the Hubble Telescope. According to NASA’s page on exploration of Titan, the following were sent on missions to Titan in order to observe it: Pioneer 11, Voyager 1, Voyager 2, and the Cassini spacecraft with Huygens probe.
I did not use AI in any part of this project, but the sources I did use are below in APA format.
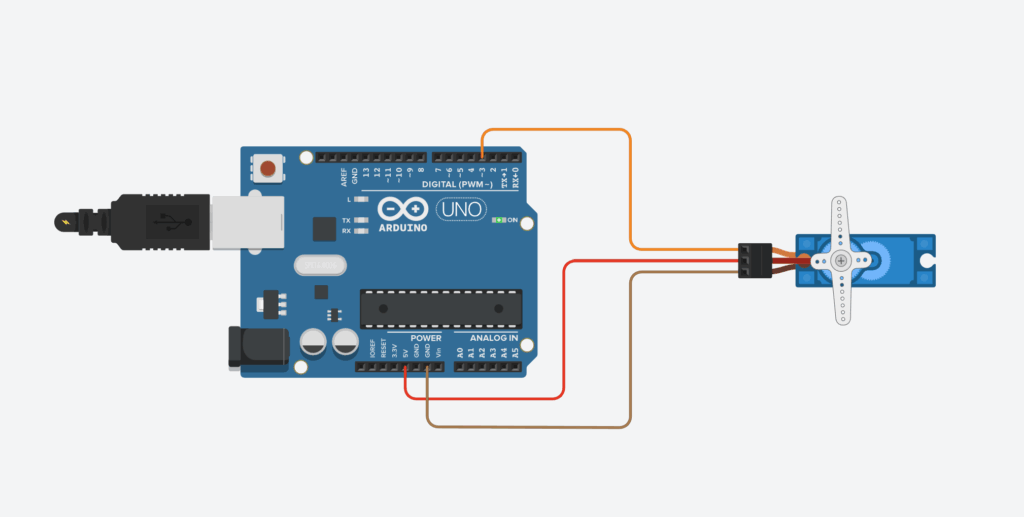
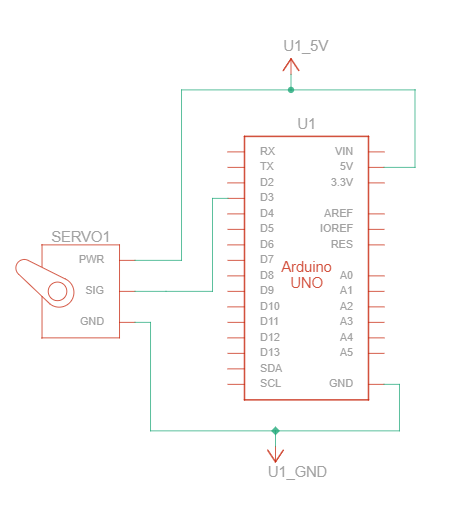
For this project, we had to build something with Arduino. We used Arduino UNOs to create a project that made something physically move, so something like a buzzer wouldn’t be accepted. For this project, I did not employ the use of AI.
Since I do not have very much experience with Arduino, I decided to do a simple project, just having a mini servo hooked up to the Arduino UNO on TinkerCAD, and coded it to spin slowly, switching directions every now and then.
This circuit works by having three different cables between the Arduino UNO and the mini servo. The first tells the servo it’s supposed to spin, and the second supplies it with power. Finally, the last cable taken the ground current and sends it back to the Arduino once it has gone through the servo first.
For this circuit, you need two different parts, as well as 3 or more cables. The two parts you require for this circuit are an Arduino UNO and a positional micro servo.
Once you have all these parts, and you’ve put them together to form the circuit, you’ll need to upload the code to the Arduino UNO. Now, if you’re building this circuit physically, you’ll need a few pieces of software as well as a connector cable that links your computer to the Arduino. However, if you’re creating this circuit in TinkerCAD or some other virtual software, you only need the actual code.
The code for this simple circuit is below, and is comprised of two main parts: The setup, where you establish all connected devices, and the loop, which is the actual code the Arduino is running.
#include <Servo.h>

int i = 0;

int j = 0;

int k = 0;

Servo servo_3;

void setup()
{
  servo_3.attach(3);

}

void loop()
{
  for (i = 0; i <= 120; i+= 1) {
    servo_3.write(i);
    delay(50);
  }
  for (k = 120; k >= 0; k-= 1) {
    servo_3.write(k);
    delay(50);
  }
}
If you want to see an example of this circuit running, here is a recording of it in TinkerCAD.
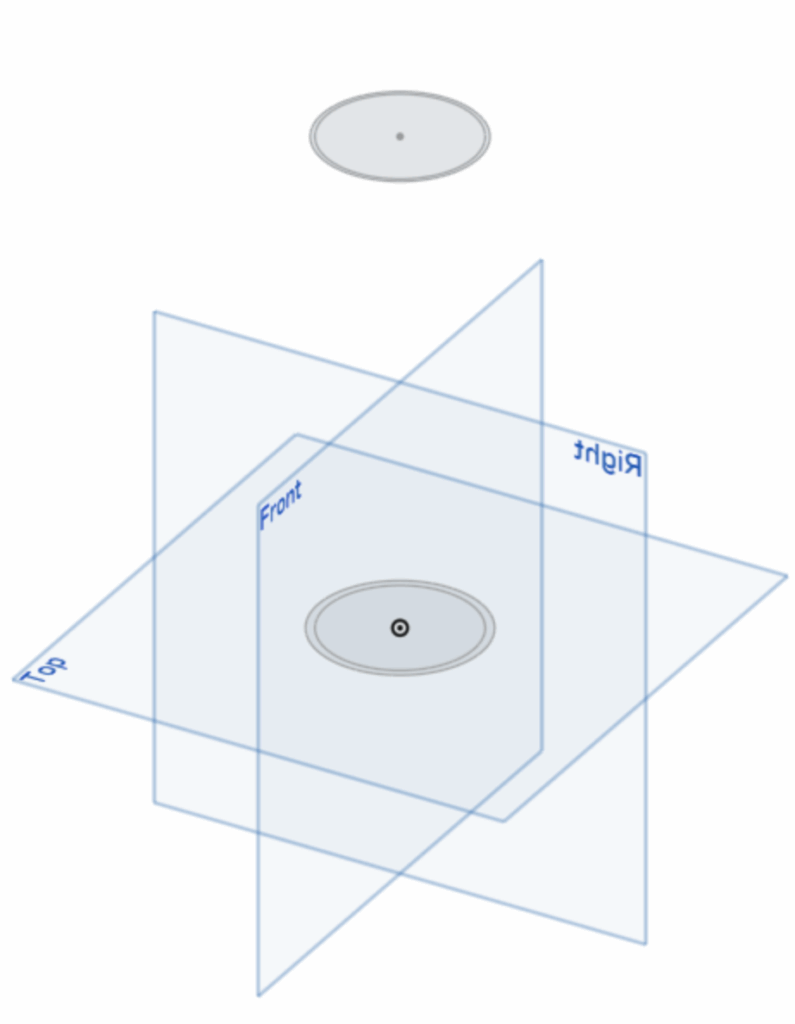
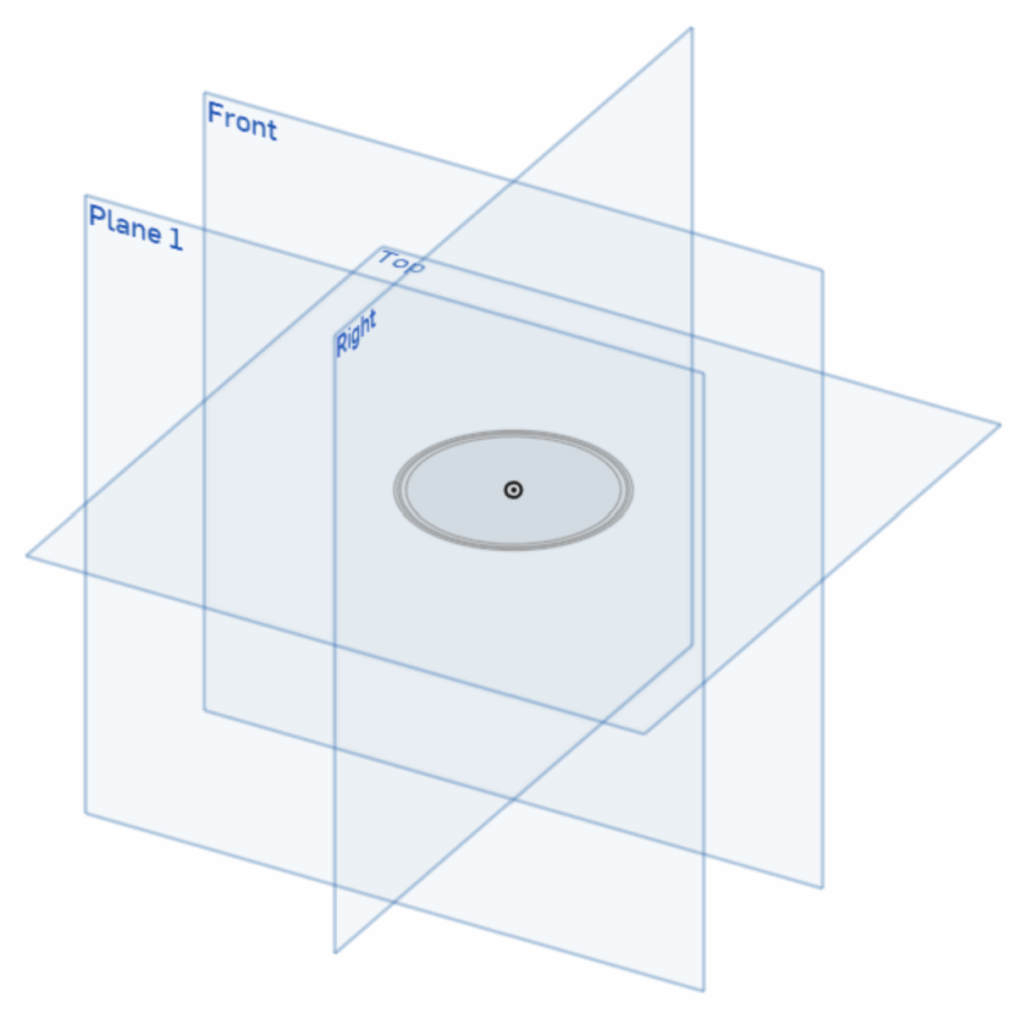
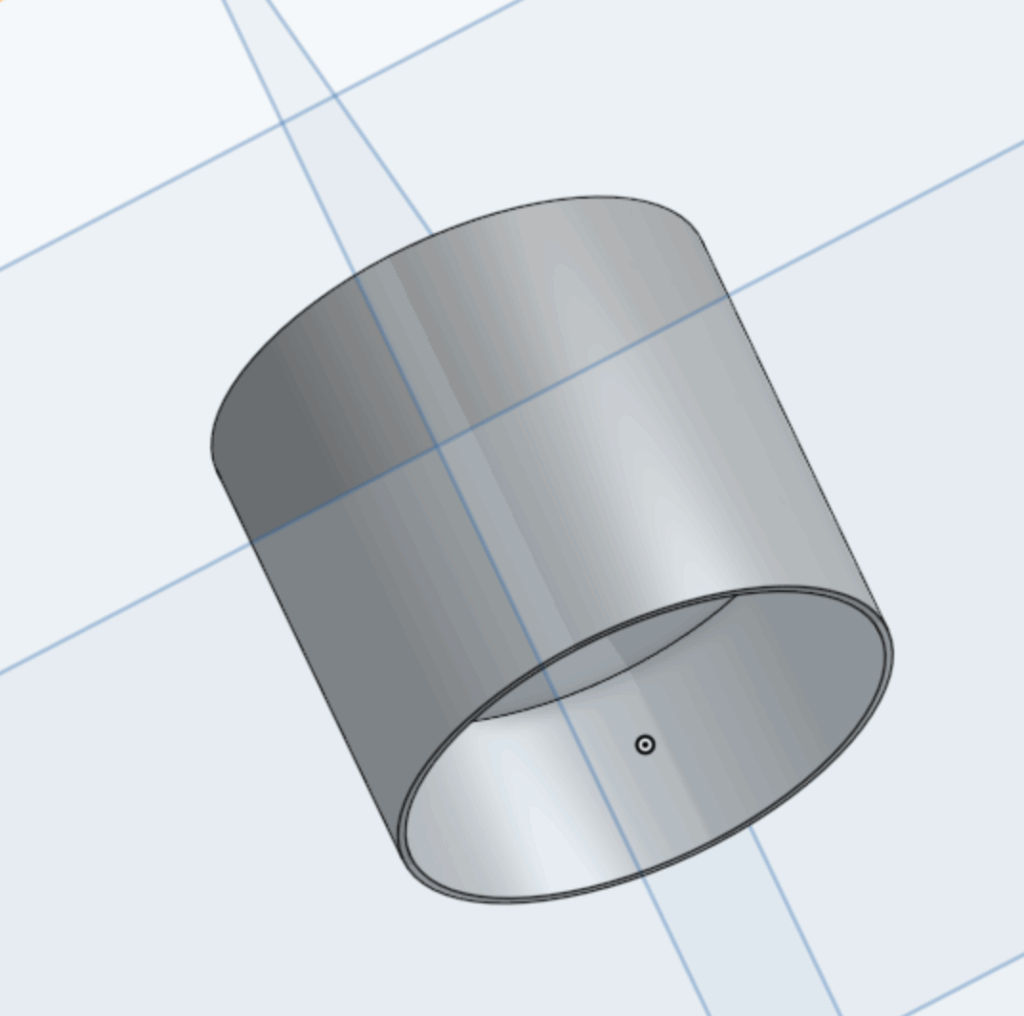
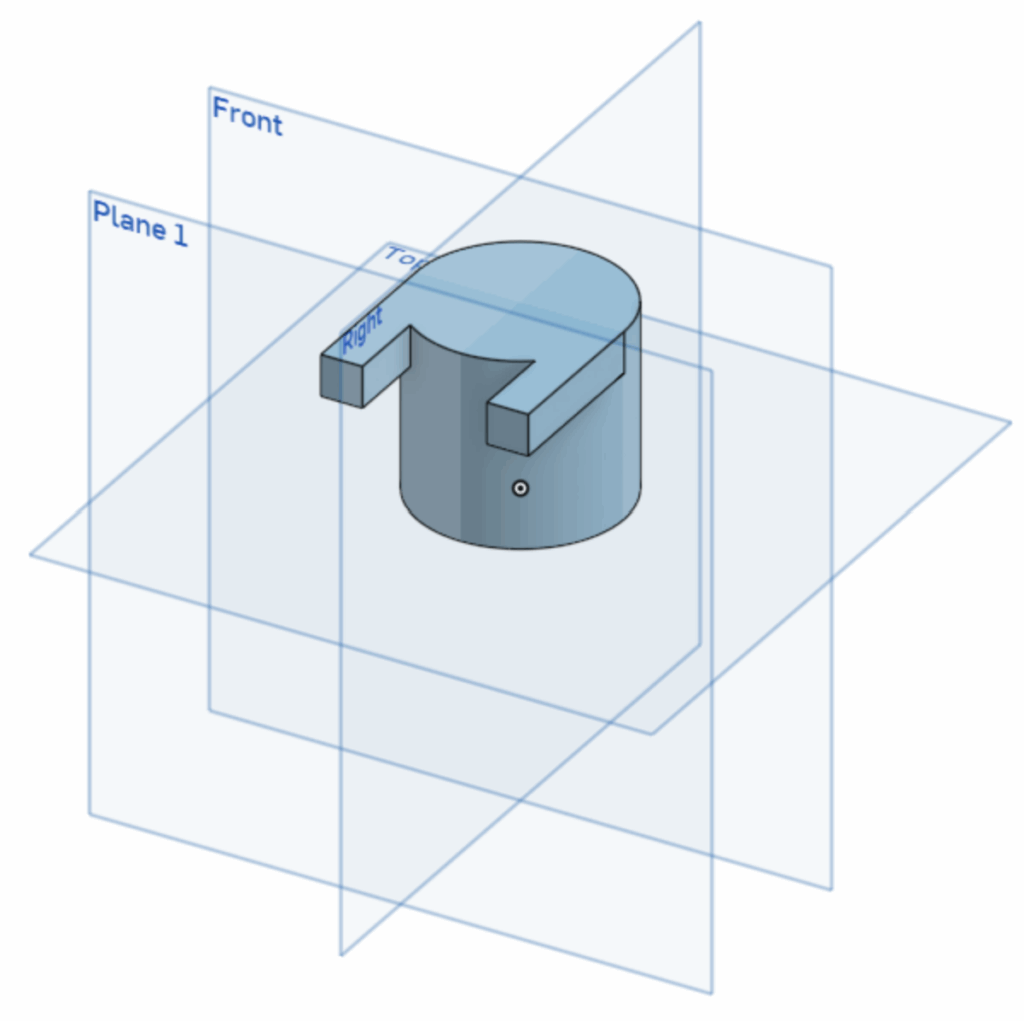
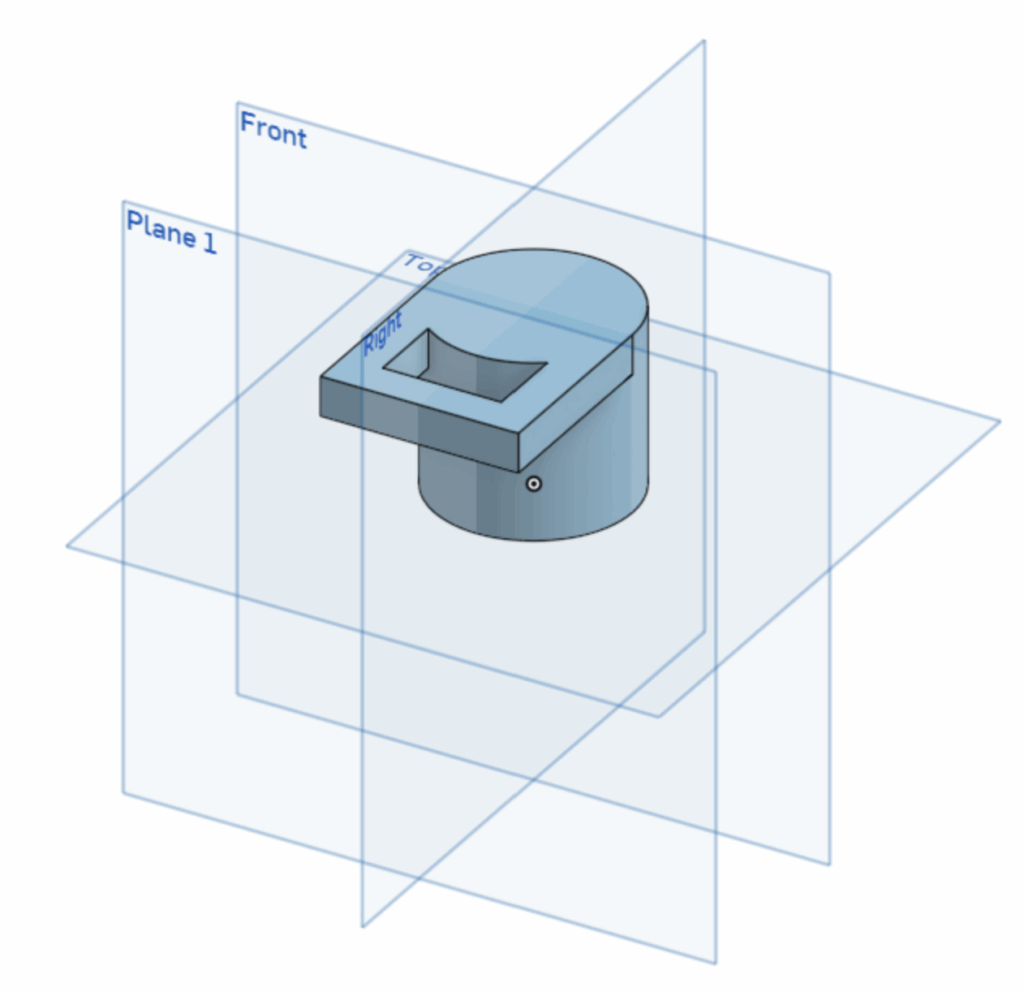
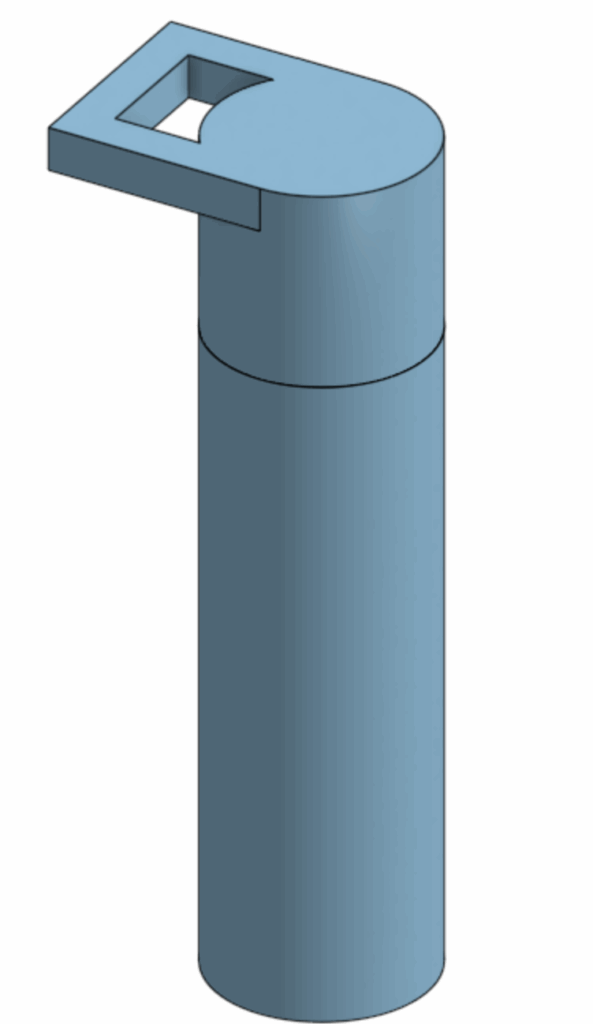
For this project, we had to design something using OnShape, so I decided to create a simple water bottle. For this project, I did not use AI to help me.
This water bottle is a simple hollow cylinder with a more complex lid. The lid is designed to fit on top of the cylinder in a way that prevents it from falling off to the side as well as preventing spillage while attached.
One of the first things I did for this assignment was to sketch out the radius of the cylinder, as well as the inner circle that is going to be hollow. Above that, where the end of the cylinder would be, I added a small ring for the lid to fit around.The next step for the cylinder was to extrude it. First, I extruded the ring that formed the cylinder and adjusted the depth of the extrusion. Then, I added a base by extruding the inner hollow circle of the cylinder about 1/15th the depth of the original cylinder. Finally, I extruded the small ring at the top by 1/10th of the original cylinder’s length.For the lid, I followed the same steps, creating a sketch, extruding it, and creating more sketches and extrusions as I went along to create a more complex shape.Once both parts were complete, I opened an assembly and placed both parts together. I used a mate connector to see if they fit, and then set up an animated mate that shows how the lid goes on.Once this was done, I created a drawing in OnShape and inserted various angles and views of the two parts into it. I used the measurement tool to show the exact measurements required to recreate the parts.
In this drawing, I added a BOM, or Bill Of Materials. For this, I decided to make both parts out of stainless steel, due to its durability and lack of microplastics.
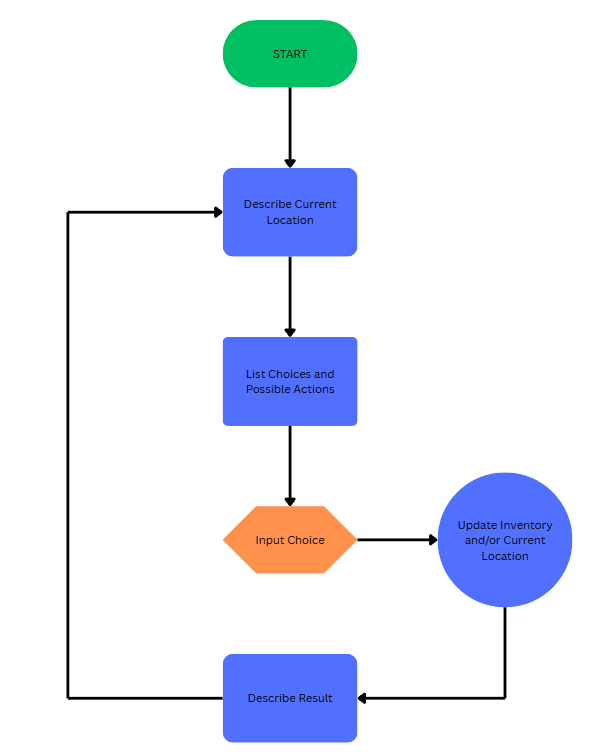
For our first project, we had to build something in Python using our coding skills. For my project, I created a text-based adventure game. That means that it is essentially a video game that is played by reading the sentences on the screen, and inputting some text to decide your actions.
The code is split into two main parts, which work together to create the game. For a simple explanation of how the code operates, view this flowchart: The first section is made up of a lot of text, which is used to describe the locations to the computer, including things like what it should say when the player arrives there, the directions the player is able to travel from where they are and where they lead, and any items the player can pick up in that location. This information is used in the next section, which is the main loop.
locations = {
    "forest": {
        "description": "You are in a large, expansive forest. As you walk, you can hear the sounds of animals that live here.",
        "options": {
            "north": "lake",
            "west": "village"
        }
    },
    "village": {
        "description": {
            "default": "You arrive at a quiet village, populated by the locals of this land. Leaning against a nearby fence is a cluster of unlit torches.",
            "torch": "At the village, a person approaches you. 'Hello there. I lost my ring over by the lake. If you find it, could you bring it back to me? I'll reward you greatly.'",
            "ring": "At the village, a person approaches you. 'Ah, I see you have my ring. If you return it to me, I will give you this treasure map.'",
            "quest_ring": "Returning to the village, you walk around for a bit. You see various people going about their jobs, and chatting with other locals."
            },
        "options": {
            "east": "forest",
            "north": "mountain"
        },
        "item": "torch"
    },
    "lake": {
        "description": {
            "default": "You come upon a serene lake. You notice a ring sitting by the shore.",
            "ring": "You come upon a serene lake."
            },
        "options": {
            "south": "forest",
            "west": "mountain",
            "east": "river"
            },
        "item": "ring"
    },
    "mountain": {
        "description": "The ground begins to slope upward, and as the trees start to open up, you see that you are on located partway up a large mountain.",
        "options": {
            "south": "village",
            "east": "lake",
            "up": "mountain_peak"
        }
    },
    "mountain_peak": {
        "description": "You continue to climb up the mountain, and the ground begins to flatten out beneath your feet. Looking out towards the horizon, you see the wide expanse of land spread out before you.",
        "options": {
            "down": "mountain"
        }
    },
    "river": {
        "description": "As you follow the river, you see a school of fish struggling to swim through a small section of rapids.",
        "options": {
            "west": "lake",
            "east": "cave_mouth"
        }
    },
    "cave_mouth": {
        "description": "Still following the river, you come across large boulders forming a cave mouth on the south side of the river.",
        "options": {
            "west": "river",
            "in": "cave"
        }
    },
    "cave": {
        "description": {
            "default": "Inside the cave, it is almost impossible to see. You stumble forward in darkness.",
            "torch": "You light your torch and enter the cave. Looking around, it is difficult to see, but you can make out the shape of the cave wall by the light of your torch."
            },
        "options": {
            "out": "cave_mouth"
        }
    }
}
The second section makes up the core loop that runs the actual game. This loop includes printing the description of the location the player is in, listing the directions the player can travel, and asking what the player would like to do. If the location includes it, this section of the code also tells the player if there is an item that is nearby that they can pick up, then ask if they want to grab it.
inventory = []

current_location = "forest"


# Functions for code

def lake_ring():
    print(locations["lake"]["description"]["default"])
    if "ring" not in inventory:
        take_ring = input("Do you want to pick up the ring? (y/n) ").lower()
        if take_ring == "y":
            inventory.append("ring")
            print("you picked up: ring")

def village_ring():
    print(locations["village"]["description"]["ring"])
    return_item = input("Do you give the ring back? (y/n) ").lower()
    if return_item == "y":
        inventory.append("treasure_map")
        inventory.append("quest_ring")
        inventory.remove("ring")
        print("You handed over the ring.")
        print("You received the treasure map.")
        if "torch" not in inventory:
            print("Leaning against a nearby fence is a cluster of unlit torches.")
            take = input("Do you want to pick up the torch? (y/n) ").lower()
            if take == "y":
                inventory.append("torch")
                print("you picked up:")
                print(item)

def ask_direction():
    global current_location
    print("You can go: ", ", ".join(locations[current_location]["options"].keys()))
    choice = input("Which direction do you want to go?: ").lower()
    if choice in locations[current_location]["options"]:
        current_location = locations[current_location]["options"][choice]
        print()
    else:
        print("You can't go that way. That direction either doesn't exist, or is still in development.")


while True:
    if "item" in locations[current_location]:
        item = locations[current_location]["item"]

# dealing with locations having multiple descriptions
    if current_location == "cave":
        if "torch" in inventory:
            print(locations["cave"]["description"]["torch"])
        else:
            print(locations["cave"]["description"]["default"])
    else:
        if current_location == "village":
            if "ring" in inventory:
                village_ring()
            if "torch" in inventory:
                if "quest_ring" in inventory:
                    print(locations["village"]["description"]["quest_ring"])
                else:
                    print(locations["village"]["description"]["torch"])
            else:
               print(locations["village"]["description"]["default"])
               if "torch" not in inventory:
                    print("Leaning against a nearby fence is a cluster of unlit torches.")
                    take_torch = input("Do you want to pick up the torch? (y/n) ").lower()
                    if take_torch == "y":
                        inventory.append("torch")
                        print("you picked up: torch")
        else:
            if current_location == "lake":
                if "ring" in inventory or "quest_ring" in inventory:
                    print(locations["lake"]["description"]["ring"])
                else:
                    lake_ring()
            else:
                print(locations[current_location]["description"])
    ask_direction()
If you want to try it for yourself, the complete code is found here. I used CodeHS to run this code, but other programs will work, too.
locations = {
    "forest": {
        "description": "You are in a large, expansive forest. As you walk, you can hear the sounds of animals that live here.",
        "options": {
            "north": "lake",
            "west": "village"
        }
    },
    "village": {
        "description": {
            "default": "You arrive at a quiet village, populated by the locals of this land. Leaning against a nearby fence is a cluster of unlit torches.",
            "torch": "At the village, a person approaches you. 'Hello there. I lost my ring over by the lake. If you find it, could you bring it back to me? I'll reward you greatly.'",
            "ring": "At the village, a person approaches you. 'Ah, I see you have my ring. If you return it to me, I will give you this treasure map.'",
            "quest_ring": "Returning to the village, you walk around for a bit. You see various people going about their jobs, and chatting with other locals."
            },
        "options": {
            "east": "forest",
            "north": "mountain"
        },
        "item": "torch"
    },
    "lake": {
        "description": {
            "default": "You come upon a serene lake. You notice a ring sitting by the shore.",
            "ring": "You come upon a serene lake."
            },
        "options": {
            "south": "forest",
            "west": "mountain",
            "east": "river"
            },
        "item": "ring"
    },
    "mountain": {
        "description": "The ground begins to slope upward, and as the trees start to open up, you see that you are on located partway up a large mountain.",
        "options": {
            "south": "village",
            "east": "lake",
            "up": "mountain_peak"
        }
    },
    "mountain_peak": {
        "description": "You continue to climb up the mountain, and the ground begins to flatten out beneath your feet. Looking out towards the horizon, you see the wide expanse of land spread out before you.",
        "options": {
            "down": "mountain"
        }
    },
    "river": {
        "description": "As you follow the river, you see a school of fish struggling to swim through a small section of rapids.",
        "options": {
            "west": "lake",
            "east": "cave_mouth"
        }
    },
    "cave_mouth": {
        "description": "Still following the river, you come across large boulders forming a cave mouth on the south side of the river.",
        "options": {
            "west": "river",
            "in": "cave"
        }
    },
    "cave": {
        "description": {
            "default": "Inside the cave, it is almost impossible to see. You stumble forward in darkness.",
            "torch": "You light your torch and enter the cave. Looking around, it is difficult to see, but you can make out the shape of the cave wall by the light of your torch."
            },
        "options": {
            "out": "cave_mouth"
        }
    }
}

print("Welcome to my text-based adventure game! In this game, you are given a description of where you are and what you can do. You are also given a list of locations you can go to from your current location, given to you as directions. When given directions that you can travel in, you have to type in your chosen direction, only including the name of that direction as given to you. Have fun!")
print()

inventory = []

current_location = "forest"


# Functions for code

def lake_ring():
    print(locations["lake"]["description"]["default"])
    if "ring" not in inventory:
        take_ring = input("Do you want to pick up the ring? (y/n) ").lower()
        if take_ring == "y":
            inventory.append("ring")
            print("you picked up: ring")

def village_ring():
    print(locations["village"]["description"]["ring"])
    return_item = input("Do you give the ring back? (y/n) ").lower()
    if return_item == "y":
        inventory.append("treasure_map")
        inventory.append("quest_ring")
        inventory.remove("ring")
        print("You handed over the ring.")
        print("You received the treasure map.")
        if "torch" not in inventory:
            print("Leaning against a nearby fence is a cluster of unlit torches.")
            take = input("Do you want to pick up the torch? (y/n) ").lower()
            if take == "y":
                inventory.append("torch")
                print("you picked up:")
                print(item)

def ask_direction():
    global current_location
    print("You can go: ", ", ".join(locations[current_location]["options"].keys()))
    choice = input("Which direction do you want to go?: ").lower()
    if choice in locations[current_location]["options"]:
        current_location = locations[current_location]["options"][choice]
        print()
    else:
        print("You can't go that way. That direction either doesn't exist, or is still in development.")


while True:
    if "item" in locations[current_location]:
        item = locations[current_location]["item"]

# dealing with locations having multiple descriptions
    if current_location == "cave":
        if "torch" in inventory:
            print(locations["cave"]["description"]["torch"])
        else:
            print(locations["cave"]["description"]["default"])
    else:
        if current_location == "village":
            if "ring" in inventory:
                village_ring()
            if "torch" in inventory:
                if "quest_ring" in inventory:
                    print(locations["village"]["description"]["quest_ring"])
                else:
                    print(locations["village"]["description"]["torch"])
            else:
               print(locations["village"]["description"]["default"])
               if "torch" not in inventory:
                    print("Leaning against a nearby fence is a cluster of unlit torches.")
                    take_torch = input("Do you want to pick up the torch? (y/n) ").lower()
                    if take_torch == "y":
                        inventory.append("torch")
                        print("you picked up: torch")
        else:
            if current_location == "lake":
                if "ring" in inventory or "quest_ring" in inventory:
                    print(locations["lake"]["description"]["ring"])
                else:
                    lake_ring()
            else:
                print(locations[current_location]["description"])
    ask_direction()
AI was utilized in the creation of this project. To see how I incorporated AI into creating this project, click this link to see the full transcript.