For this project, I built an Arduino robot that detects the proximity of an object. This robot uses sensors to understand its surroundings and gives an output. Even though there is no movement, it is still a robot because it senses its environment and acts upon it.
I built a proximity-sensing robot. It uses an ultrasonic sensor to measure how close an object is to the sensor. With this it will light up one of three LED lights.
- Green if object is in a safe distance
- Yellow if object is getting close
- Red if object is too close
At the same time it will turn a servo to a specific direction, representing an very oversimplified way of a car backing into a parking spot.
My idea is inspired by how parking sensors warn the driver how close they are to something when parking.
Virtual Prototype
Below is a video of my virtual prototype.
The circuit uses:
- A 4-pin ultrasonic sensor to measure distance through sound waves
- An Arduino Uno which is the brain behind the whole mechanism
- LEDs of three colours to represent distance
When the object comes closer, the Arduino calculates the distance of it by the difference between the time the sound wave is sent and when the echo is received. Then it lights up the specific LED based on the distance and turn the Servo to a specific direction.
Bill of Materials
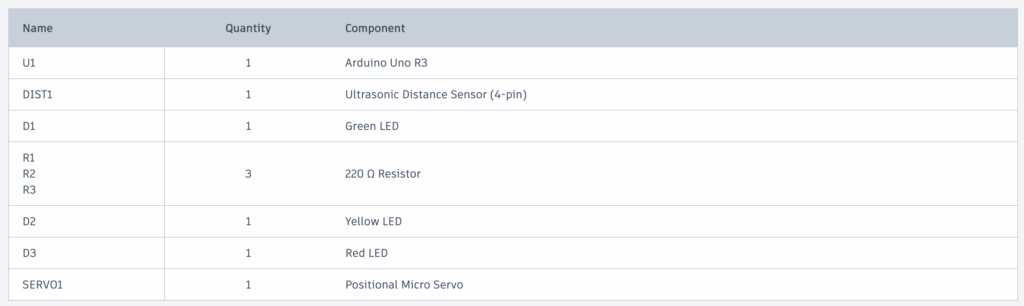
- Arduino Uno R3 x1
- Ultrasonic Distance Sensor (4-pin) x1
- 220 Ω Resistor x3
- Green LED x1
- Yellow LED x1
- Red LED x1
- Positional Micro Servo x1
Code – how does the code work?
I learned how to code using Arduino from ChatGPT. I structured my code by starting with setting the wires, then using the Ultrasonic Sensor, and then lighting up the LEDs.

In this code snippet, the ultrasonic sensor is first set to low, then after 2 microseconds, it is set to high, then set back to low after 10 microseconds.

Here, pulseIn() measures how long it takes for the sound to travel to the object and back. 30000UL adds a timeout to make sure no errors occur. If duration==0 just restarts the code immediately if no object is detected.

This line is interesting because it turns time into distance. Sound travels at about 0.0343 cm per microsecond. It is divided by 2 because the sound goes to the object and then back.
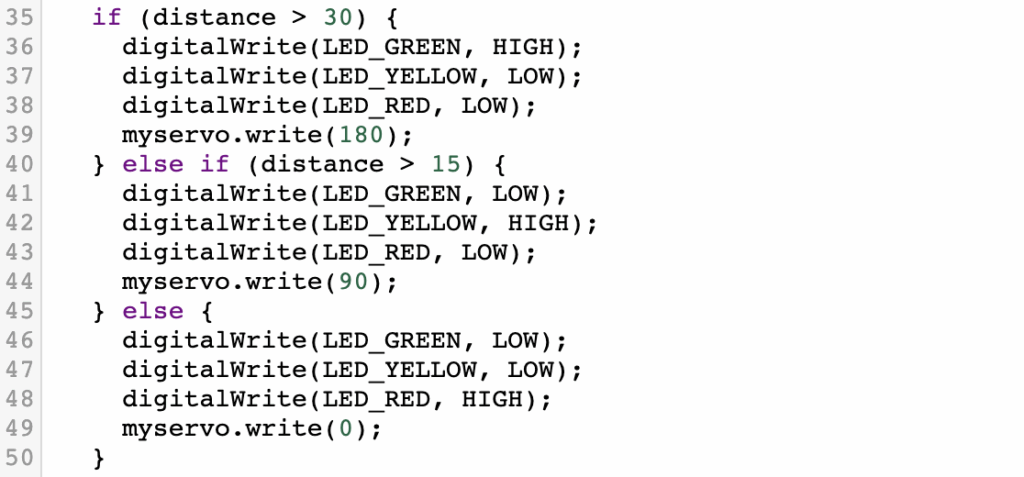
This final code snippet tells the Arduino when to turn on which LED.
- Green if distance over 30cm
- Yellow if distance over 15cm
- Red if distance is less than that
- It also will turn the Servo to a rotation based on the distance to the object.
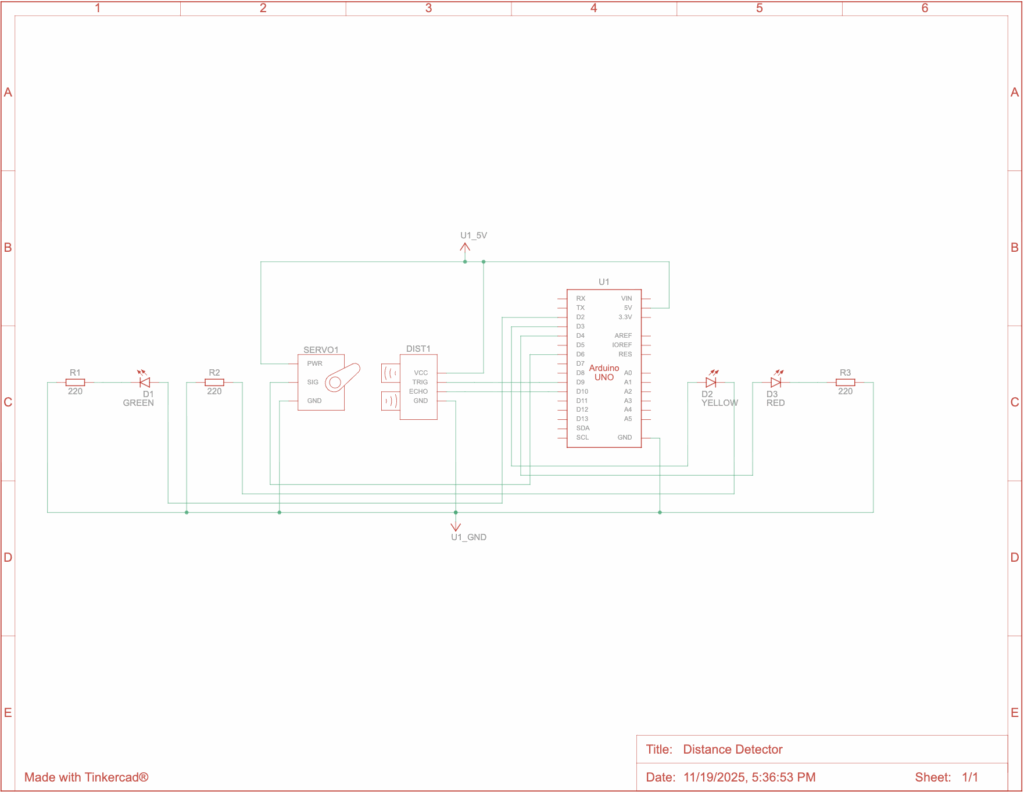
Physical Prototype
Unfortunately, due to the time constraint on this project, I did not make it to actually building the physical prototype.
Below is the circuit diagram.
Reflection
This was a fun project to do and it taught me a lot. I had never built anything with Arduino, but I’ve heard a lot about them. I used to do robotics in my old school for the VEX V5 Robotics Competition and that taught me a lot of the basic skills for robotics, which were helpful for this project and gave me a leg up in the beginning. However, this was much more realistic and complicated. In VEX, I found it much simpler because they had pieces to build the robots and very comprehensive coding. This was a much newer experience and made me learn a lot more.
When I was working on this project, the biggest problem I had was actually building the physical prototype. I originally thought I would have enough time, but when I didn’t, that presented a problem where I realized it would make my grade worse on the project, but I didn’t see anything to do. The other problem was that I wanted to include the whole car so it can back up. This was way too much work, so I simplified it to just including a microservo spinning to certain directions depending on the distance to the object to simulate the wheels of a car spinning.
AI Use & Transcripts
I used ChatGPT when I was building this project. It was useful to help me find a good idea for the project and to teach me how to code with Arduinos, which was new to me.
https://chatgpt.com/share/690cdb07-a204-8004-bded-d07880577438
https://chatgpt.com/share/690cdb8a-574c-8004-8c76-560ebe2d8a90
Leave a Reply