Hello, for this robotics project, I designed a bomb defusual game using arduino. In the game, the player must defuse the bomb by completing multiple tasks. Currently in the game there are two tasks:
- A line of code will display on the LCD screen and the player will have to memorize the code and type it out using the keypad. If they type in the correct code it will display “Code Correct!” on the LCD screen, if not it will display “Code Wrong!” and the bomb will blow up making the player restart.
2. There is a potentiometer on the breadboard. The player will need to turn the potentiometer left or right to adjust the resistance. The code will generate a random number and the player will have to tune the resistance to that number. (Number ranges from 0-1023)
VIRTUAL PROTOTYPE
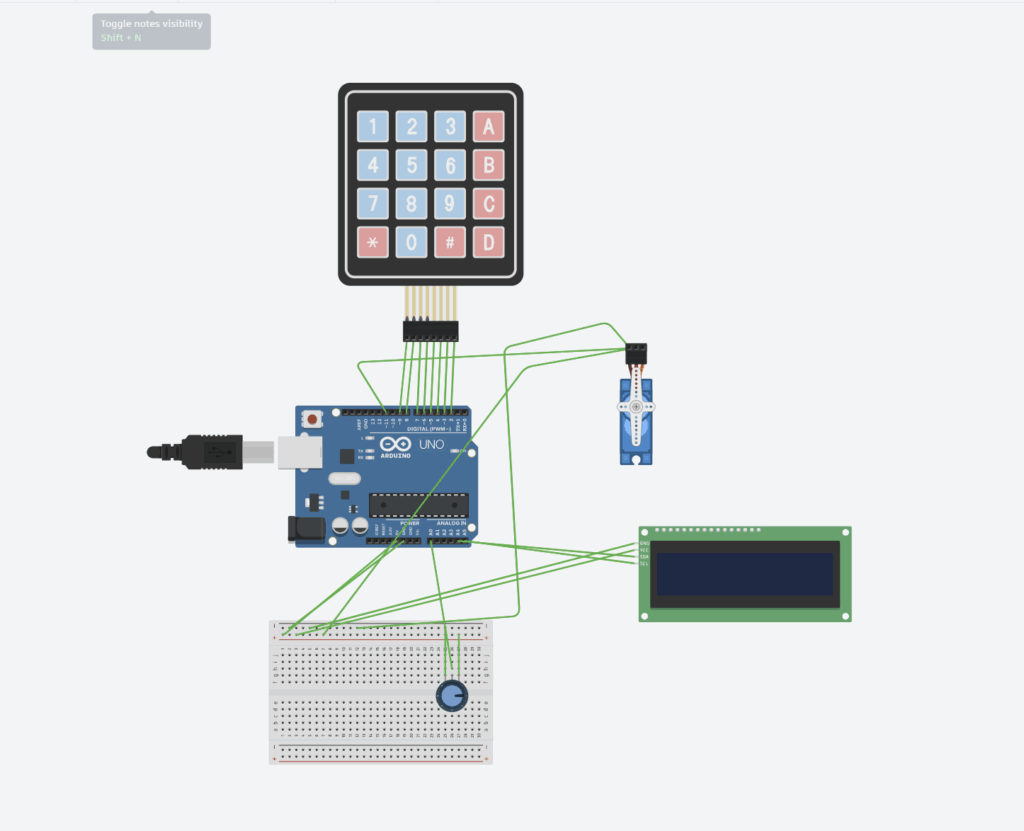
This virtual prototype was designed using Tinkercad.
Circut Schematic
Arduino Uno
| COMPONENT | ARDUINO PINS |
| LCD (I2C) | SDA –> A4, SCL–> A5 |
| KEYPAD | D2-D9 |
| POTENTIOMETER | A0 |
| POWER | 5V, GND –> negative positive rows on breadboard |
The Arduino Uno acts like our brain. It reads all of our inputs, runs our code, and controls all the outputs. We can think of the Arduino uno as the logic board for our bomb. In my circut the Arduino does many things. For example it checks:
- What number the player enters on tke keypad
2. What voltage is coming from the potentiometer
3. Has the timer run out yet
it also handles:
- Generating the random code and targeted values
- Displaying messages on the LCD screen
- Comparing player code input with correct value
Keypad (4×4)
| KEYPAD PIN | ARDUINO PIN |
| R1 | 9 |
| R2 | 8 |
| R3 | 7 |
| R4 | 6 |
| C1 | 5 |
| C2 | 4 |
| C3 | 3 |
| C4 | 2 |
The keypad has 4 rows and 4 columns. When you press a button on the keypad it connects all 4 rows and columns. The arduino sets all columns pins to a high voltage (5V) and the rows are set to input pins (Input pins have no voltage in).
We can look at the keypad like this:
| C1 | C2 | C3 | C4 | |
| R1 | 1 | 2 | 3 | A |
| R2 | 4 | 5 | 6 | B |
| R3 | 7 | 8 | 9 | C |
| R4 | * | 0 | # | D |
EX. If we press 9 on the keypad it connects C3 with R3. The arduino will scan through set each column to a low voltage like 1V. Because the collums and rows are connected it will also give a small voltage to each row. The arduino will scan through all the rows to check for voltage until it finds a row that has voltage and then it will know what buttons is pressed.
Potentiometer
| NAME | FUNCTION | CONNECTION |
| GND | Ground | GND |
| WIPER | Signal output | A0 |
| VCC | Power input | 5V |
The potentiometer gives a resistance value betwen 0-1023 the arduino reads that and generates a random number between that which the user will have to match.
LCD I2C
| LCD PIN | ARDUINO PIN | FUNCTION |
| VCC | 5V | Power |
| GND | GND | Ground |
| SDA | A4 | Data line (Transfer data between LCD and Arduino) |
| SCL | A5 | Serial clock line (a timer for arduino and LCD to transfer information) |
The LCD I2C acts as our display screen for our game. It will display the code the player needs to memorize, the potentiometer tuning, and other messages.
MICRO SERVO
| SERVO PIN | ARDUINO PIN | FUNCTION |
| POWER | 5V | Power source |
| GROUND | GND | Ground |
| SIGNAL | D11 | Transfer data between the servo and the arduino |
When we suceed in defusing the bomb the servo will move from 0-180 and back like its giving a victory wave. However, when we failt at defusing the bomb the sevo will go from 0-90-0-90 and it will do this 3 times like a head shake saying no.
Bill of Materials (BOM)
| COMPONENET | AMOUNT |
| Arduino Uno | 1 |
| LCD I2C | 1 |
| Keypad 4×4 | 1 |
| Potentiometer | 1 |
| Jumper Wires | 17 |
| Breadboard | 1 |
CODE
HERE
// — 1. Include Libraries —
include
include
include // For servo motor
// — 2. Hardware & Pin Definitions —
// — Keypad Setup —
const byte ROWS = 4;
const byte COLS = 4;
char keys[ROWS][COLS] = {
{‘1’, ‘2’, ‘3’, ‘A’},
{‘4’, ‘5’, ‘6’, ‘B’},
{‘7’, ‘8’, ‘9’, ‘C’},
{‘*’, ‘0’, ‘#’, ‘D’}
};
byte rowPins[ROWS] = {9, 8, 7, 6};
byte colPins[COLS] = {5, 4, 3, 2};
Keypad customKeypad = Keypad(makeKeymap(keys), rowPins, colPins, ROWS, COLS);
// — LCD Setup —
LiquidCrystal_I2C lcd = LiquidCrystal_I2C(0x27, 16, 2);
// — Servo Setup —
const int servoPin = 11;
Servo gameServo;
// — Component Pin Setup —
const int potPin = A0;
const int buttonPin = 10;
const int randomPin = A1;
// Keys array for Task 3
char allKeys[16] = {
‘1’, ‘2’, ‘3’, ‘A’, ‘4’, ‘5’, ‘6’, ‘B’,
‘7’, ‘8’, ‘9’, ‘C’, ‘*’, ‘0’, ‘#’, ‘D’
};
// — Functons for Servo Movement —
void celebrateWin() {
for (int pos = 0; pos <= 180; pos += 5) { gameServo.write(pos); delay(15); } for (int pos = 180; pos >= 0; pos -= 5) {
gameServo.write(pos);
delay(15);
}
}
void failShake() {
for (int i = 0; i < 3; i++) {
gameServo.write(0);
delay(100);
gameServo.write(90);
delay(100);
}
}
// # SETUP
void setup() {
lcd.init();
lcd.backlight();
pinMode(buttonPin, INPUT_PULLUP);
randomSeed(analogRead(randomPin*micros()));
gameServo.attach(servoPin); // Initialize the servo
}
// # LOOP
void loop() {
// — Wait for Game to Start —
lcd.clear();
lcd.setCursor(0, 0);
lcd.print(“Press to Start”);
while (digitalRead(buttonPin) == HIGH);
lcd.clear();
lcd.setCursor(0, 0);
lcd.print(“Game Started!”);
delay(1000);
// — Task 1: Code Defusal —
String secretCode = “”;
for (int i = 0; i < 4; i++) {
secretCode = secretCode + allKeys[random(0, 16)];
}
lcd.clear();
lcd.setCursor(0, 0);
lcd.print(“Memorize Code:”);
lcd.setCursor(0, 1);
lcd.print(secretCode);
delay(3000);
lcd.clear();
lcd.setCursor(0, 0);
lcd.print(“Enter Code:”);
lcd.setCursor(0, 1);
String playerGuess = “”;
for (int i = 0; i < 4; i++) {
char key;
do {
key = customKeypad.getKey();
} while (key == NO_KEY);
playerGuess = playerGuess + key;
lcd.print(key);
}
delay(500);
if (playerGuess == secretCode) {
lcd.clear();
lcd.setCursor(0, 0);
lcd.print(“Code Correct!”);
delay(2000);
// — 3. Task 2: Potentiometer Tune —
int potTarget = random(0, 1024); // New random target (0-1023)
lcd.clear();
lcd.setCursor(0, 0);
lcd.print(“Target: “);
lcd.print(potTarget);
lcd.setCursor(0, 1);
lcd.print(“Current: “);
int currentValue = analogRead(potPin);
// Loop as long as the value is NOT the target
while (currentValue != potTarget) {
lcd.setCursor(9, 1); // Go to “Current: [ ]”
lcd.print(” “); // Clear old number with 4 spaces
lcd.setCursor(9, 1); // Go back
lcd.print(currentValue); // Print new number
currentValue = analogRead(potPin); // Read again
delay(50); // Small delay to prevent screen flicker
}
// — TASK 2 SUCCEEDED —
// (The loop ended, so they must have hit the target)
lcd.clear();
lcd.setCursor(0, 0);
lcd.print(“Module Complete!”);
delay(2000);
// — 4. Task 3: 5-Char Memorize —
String secretWord = “”;
for (int i = 0; i < 5; i++) {
// Pick a random index (0-15) from our allKeys array
secretWord = secretWord + allKeys[random(0, 16)];
}
lcd.clear();
lcd.setCursor(0, 0);
lcd.print(“Memorize This:”);
lcd.setCursor(0, 1);
lcd.print(secretWord);
delay(5000); // Player has 5 seconds
lcd.clear();
lcd.setCursor(0, 0);
lcd.print(“Enter Code:”);
lcd.setCursor(0, 1);
String playerWordGuess = “”;
for (int i = 0; i < 5; i++) {
char key;
do {
key = customKeypad.getKey();
} while (key == NO_KEY);
playerWordGuess = playerWordGuess + key;
lcd.print(key);
}
delay(500);
// — CHECK TASK 3 (FINAL CHECK) —
if (playerWordGuess == secretWord) {
// — GAME WON —
lcd.clear();
lcd.setCursor(0, 0);
lcd.print(“BOMB DEFUSED!”);
lcd.setCursor(0, 1);
lcd.print(“>> YOU WIN! <<“);
while (true); // Freeze on win screen
} else {
// — TASK 3 FAILED —
lcd.clear();
lcd.setCursor(0, 0);
lcd.print(“Code FAILED!”);
lcd.setCursor(0, 1);
lcd.print(“Restarting…”);
delay(2000);
} else {
lcd.clear();
lcd.setCursor(0, 0);
lcd.print(“Code FAILED!”);
lcd.setCursor(0, 1);
lcd.print(“Restarting…”);
failShake(); // Servo fail
delay(2000);
}
}
EXPLANATION VIDEO
Demonstration of Physical Prototype
In my virtual simulation in Tinkercad, it was near impossible to complete the tunning module because Tinkercad only has a certain amount of numbers the potentiometer can tune to. However my code randomly generates any number between 0-1023. As a result the odds of my code genrating a number that was exacly one of the numbers tinkercad has is very low making it very difficult to pass to the third module. However in my real physical prototype the physical potentiometer doesn’t have this limitation as a result I am basically able to tune to any number within 0-1023 making this module possible.
Reflections on use of AI
In my project I the only part where I used AI was for writing my code. This is becaue i’ve alrady been doing robotics with arduino for a good amount of time so I knew wiring was not the biggest problem but coding was.
I followed a process of :
Asking guidance for coding with the help of gemeni
Asking for help to fix erros I had in my code
This worked really well for me. A quick AI explanation of something helped me learn alot quicker then having to search up things online or watching tutorial videos. AI also asked me alot of questions which helped me strenghten my learning.
Here is a transcript of my interaction with gemeni
Leave a Reply