I’ve made substantial progress since my last blog post. I currently have a physical prototype of “BoxBox”, and I must say I am quite pleased with how it turned out. However, I have also thought of a different method of using music to help individuals.
Problem (Definition Statement): People should be able to practice/learn music while staying engaged and motivated, building discipline and healthy habits. They should be able to develop skills for a respective instrument if consistent practice is imminent. A user using this product should be someone who is interested in music but lacks the motivation and time to learn/practice.
Research: I’ve noticed/learned that people tend to participate in productive activity with the presence of an adult/older figure near. Additionally, there is an immensely increased percentage of people under age 18 with lower attention span, so I will have to make this tool entertaining and force the individual to practice/study without outside distraction.
Solution: Still quite confident in BoxBox. I know the primary goal of our personal projects is to help others with problems they face, but my secondary goal is to get better at designing via Onshape and using circuits and TinkerCad; building skills that will ultimately help me in the future (whether I choose to pursue something that requires those skills or not).
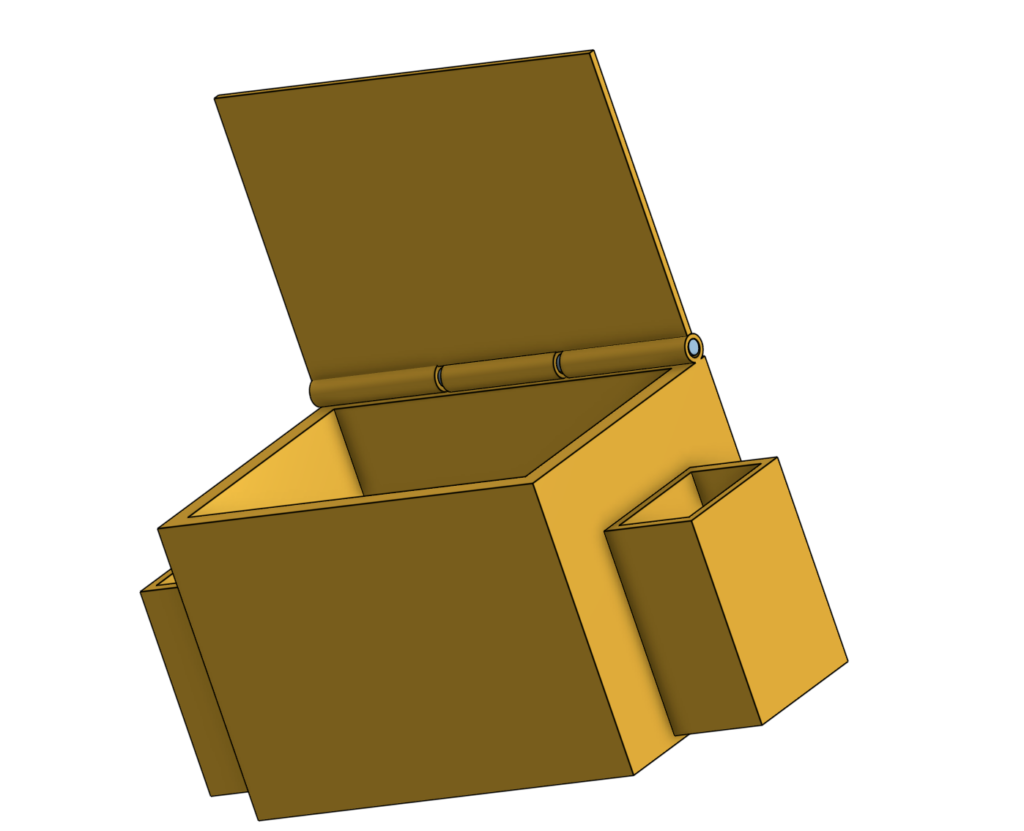
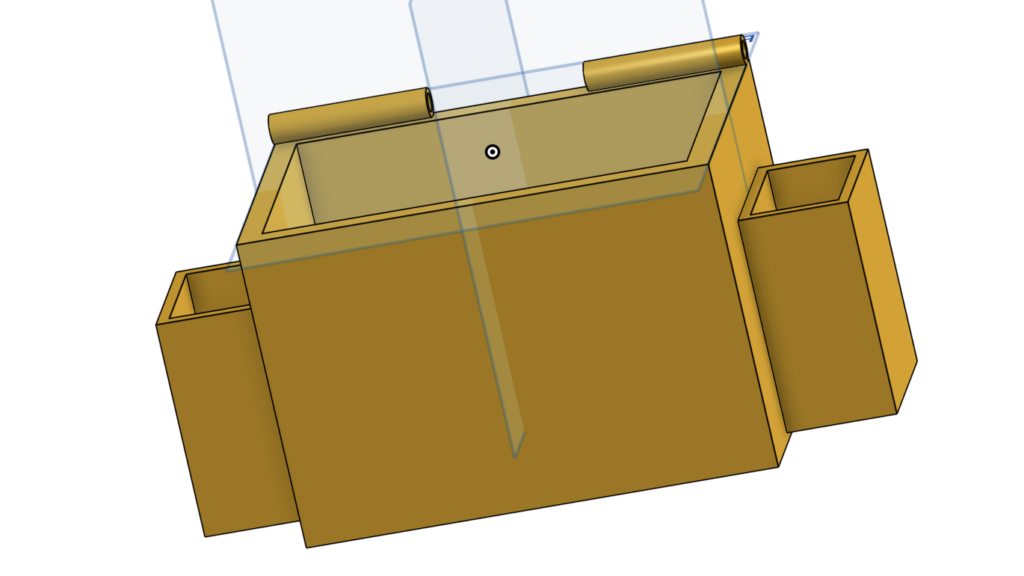
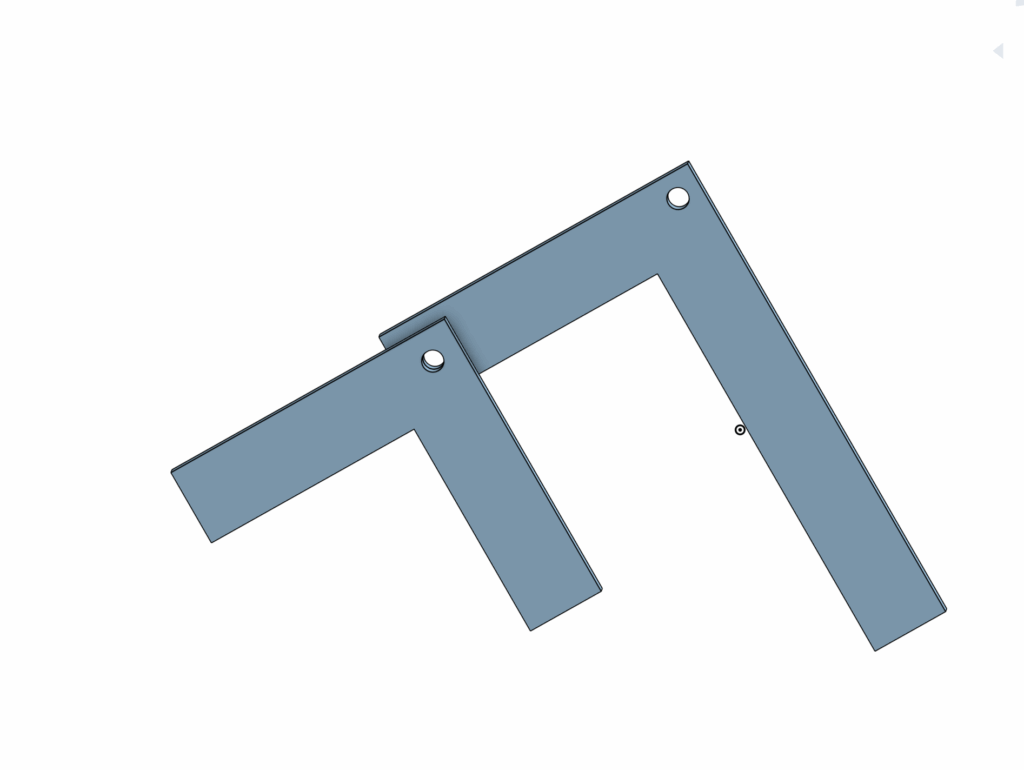
Progress: Built my first physical prototype.
Here are some photos:
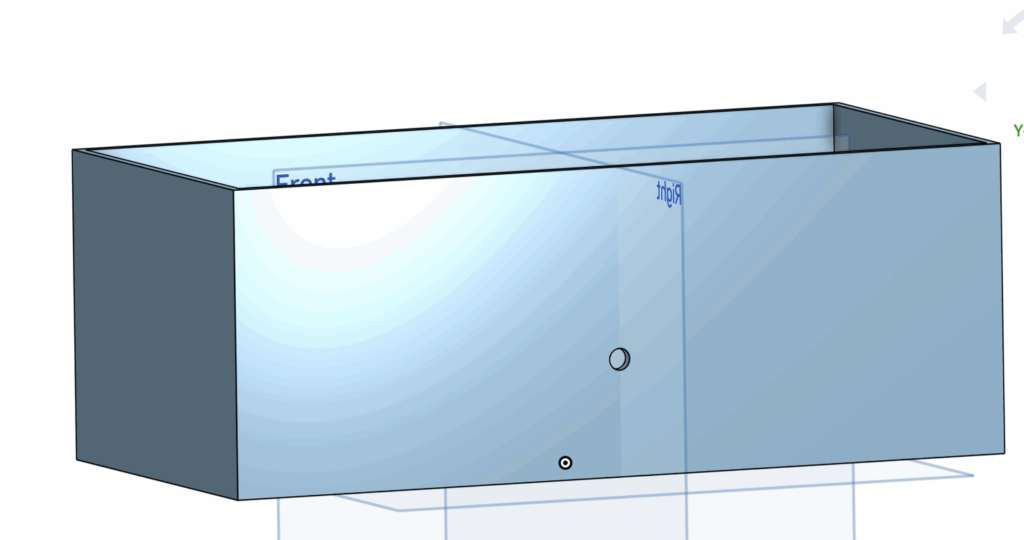
Box
Box
Pros:
Dimensions of the box are perfect (in my opinion)
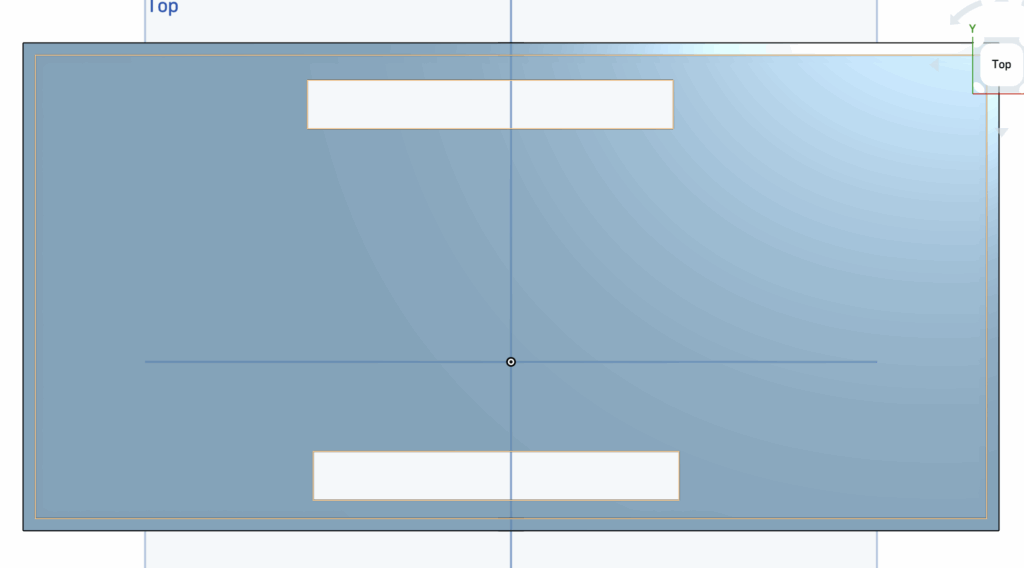
Looks pleasing, outside boxes (for the cards that tell the person how long practice will take and what to practice) are nicely sized and fit.
Cons:
Dimensions of the rod that connects the top of the box to the box itself is too large; will have to adjust.
Challenges: How do I create a circuit that closes the top of the box? This will be a challenge. I am working towards becoming more comfortable with circuits.
Next steps: Adjusting my prototype, learning more about how circuits work and what pieces I will need for my build. I know it is a bit early to be thinking about my persuasion speech at UVic, but I am thinking about how I will execute my speech and how the tool/solution I use will depict my speech.
AI Assistance: Not too much so far. Will definitely consider using AI when getting into circuits.
For this blog post (completed within 1 class), I will be sharing my current plans for my personal project. This will include a definition statement, description of the kind of person that I am solving this problem for, a reflection on multiple ideas that I have to solve this problem, and a description and detailed step-by step plan for creating this prototype.
Definition Statement
This is my current definition statement:
“People should be able to practice/learn music while staying engaged and motivated, building discipline and healthy habits. They should be able to develop skills for a respective instrument if consistent practice is imminent. A user using this product should be someone who is interested in music but lacks the motivation and time to learn/practice.”
The Primary and Secondary Targets/Markets
Primary Market: People who are interested/learning music.
Secondary Market: People who are determined to learn/hone any new skill and/or build healthier habits. Majority of the solutions could apply to other areas of life other than music.
Multiple ideas/solutions
Here are a few ideas of mine:
1. App that allows easy access to practice.
2. Little box called “BoxBox” that helps people build healthy practicing habits and discipline. Practically, the design consists of a box that stays closed shut when its timer (which can set at any time up to 59:59 minutes) is running. When the time is up, the box will open up, revealing any item placed by the user beforehand as a reward for practicing. This could apply for greater things apart from practicing music. Could be a study tool to motivate students to learn or develop a skill.
3. Small fun gadget that attaches to any instrument. Possible design could include some sort of animal/pet that gains experience when listening to a person practice music. Some people like these types of tools to help them stay engaged and determined.
4. Weighted gloves that challenge students; builds endurance for the hands.
5. “Practice Wheel”: A wheel with different practice challenges. An individual spins the wheel and whichever slot the wheel lands on is the practice challenge the individual has to pursue. All practice challenges will vary in difficulty, which makes the spinning part exhilarating and entertaining.
The prototype I chose and its Prototype Design
Out of all the possible solutions, I decided to choose the “BoxBox” because it seems challenging but doable.
A description of a prototype: A fairly wide and short white/black box with a weighted pressure plate that activates when something is placed on top of it. Once activated, the box door (located top of the box) shuts down and stays closed until the timer (set by the user up to 60mins located middle of the box) ends. During this time, the individual in encouraged to practice music or build/develop other skills.
Step plan for creating this Prototype
In terms of how I’m going to create it, I plan to design “BoxBox” on OnShape. I believe that designing this box will require greater skill than I currently possess, but I am up for the challenge. The timer/clock proposed to be attached to the box will most likely be purchased off of amazon and attached to the box from the inside. There will be an opening for the buttons of the timer (to increase or decrease the time set) on the box. I will aim to add smooth fabric in and/or on the box to make it look and feel nicer.
Here is a step by step plan I currently have for the building process (includes approximate timing):
1. Draw a prototype on a piece of paper and label the most important features of the box (February).
2. Create another prototype inspired by the one made on paper on OnShape (February).
3. Create my first “real” prototype consisting of all the necessary functions within the box (March).
4. Test it out and note down any flaws I notice (March).
5. Continue this cycle until confident about the design I have (March-April).
The thing I am most interested to build/design is the latch located on the box. The latch is the thing that will keep the box locked when the item is kept inside and the timer is activated. I wonder how I will build it on OnShape and if I will be required to make any adjustments in the future if things don’t go my way (which they won’t).
Thank you for listening. I am quite excited to start this personal project.
For this project, my group and I designed and created a working rover made specifically for Trappist-1e; its terrain, environment, and atmosphere. In this blog post, we will discuss our process: how we initially decided on the design and purpose of the vehicle.
Additionally, it is worth noting that this project required scientific calculations that will be elaborated on later in this post.
Problem: Trappist-1e is a difficult planet to traverse.
Definition Statement: We need to build a vehicle that can withstand Trappist-1e’s extreme contrasting temperatures, traverse the uneven and rocky terrain, and endure the immense radiation emitted by Trappist-1e’s star. Additionally, the vehicle must be large enough to hold at least four individuals and have a large enough fuel container to travel 10km, unless powered by another source (advanced radiation solar power).
Material List (because why not)
1× 4×AA battery holder (6V total)
4× AA batteries (fresh)
1× SPST switch (slide or toggle) rated at least 1A is ideal
Motors + wiring 6× DC gear motors (yellow TT motors are perfect)
Hookup wire (22–26 AWG is fine)
You can use 2 colors: red for +, black for –
Wire stripper / scissors
Electrical tape or heat shrink or soldering kit (any one method to secure connections)
Small breadboard
Zip ties for cable management
Research stage
Researching is the most important key step before preparing to build anything. Luckily, me and my group conducted a significant amount of research prior to the start of this particular project. If you would like to learn more about Trappist-1e, I did an entire blog post revolved around it and you’re free to check it out.
Brainstorming Stage
This stage required maximum effort from everyone in the group. Over the course of multiple classes, my group mates and I came up with many ideas that could work. Here are a few of our authentic ideas with respective problems that follow:
Radiation Powered Rover:
Using advanced solar power technology, our vehicle will be able to run off of Trappist-1e’s immense amount emitted radiation.
Problems with idea:
There could potentially be an atmosphere nullifying the emitted radiation, ultimately prevented the vehicle from functioning.
Motorcycle with Body
A motorcycle (2 wheels) covered in a body full of advanced solar panels (collecting radiation for power assuming its powered by the radiation). This would allow for a more swift and fun way to traverse Trappist-1e while also required less materials than a larger sized rover.
Problems with idea:
There will most likely be less stability when riding the vehicle. Additionally, although it would take minimal materials to create one motorcycle, creating multiple motorcycles for multiple people would all require more materials than a rover would need.
Brainstorming Stage 2
Traction Wheels:
Traction wheels can be implemented for simple and easy traversal across Trappist-1e’s rocky and uneven terrain. We will use a rocker bogie system to allow additional flexibility.
Problems with idea:
The material of the traction wheels could possibly increase the vehicles conductivity depending on Trappist-1’s (the star of Trappist-1e) impact on Trappist-1e (radioactivity, electromagnetic energy, other aspects).
Nuclear Battery Back at Base:
Whenever the vehicle is resting at our base residing on Trappist-1e, it will charge via a nuclear battery assuming that the advanced radiation solar panel technology doesn’t work.
Problems with idea:
Having a nuclear battery at base could be harmful when considering living conditions. Possibly implementing a separate charging station could be better for health standards.
Our decision
We as a group decided to stick with the traction wheels and advanced solar technology while scrapping the nuclear battery and motorcycle idea.
Here is a description of the vehicle we hoped to create (we wouldn’t actually implement the radiation powered solar panels into our physical vehicle design; the audience is meant to assume that it is there):
A six-wheeled, radiation-powered electric vehicle designed to travel 10km without refuelling on the planet Trappist 1-e. This exoplanet faces challenges like a dim red dwarf, dust-filled air, rocky terrain, temperature extremes. Additionally, there are possible radiation bursts from its star, which we will use to our advantage in order to power the vehicle.
Radiation-charged energy system: This vehicle relies on advanced solar power technology to collect radiation and convert it into usable energy.
Rocker Bogie System: a six-wheeled rocker bogie system which helps traverse uneven and rocky terrain. Wide and high grip wheels: Thick and wide tires with deep treads, but still compatible with suspensions.
Creating Stage
This stage took the longest amount of time. We all acknowledged our different strengths and weaknesses, working on aspects of the vehicle we were more comfortable/stronger with.
Out of CAD and circuits, I was more comfortable doing CAD. I did a significant amount of work on the vehicle itself using OnShape (CAD), creating the rocker bogie system parts and screws. I thought I did quite well, considering my minimal experience with CAD. I had low expectations for myself and was surprisingly pleased with how the design for our rocker bogie system turned out.
Implementing the rocker bogie system into our vehicle design was essential considering the terrain we would be facing on Trappist-1e would require stability and balance. Our design was a more simplistic version of a rocker bogie system while still maintaining the same function as a regular system.
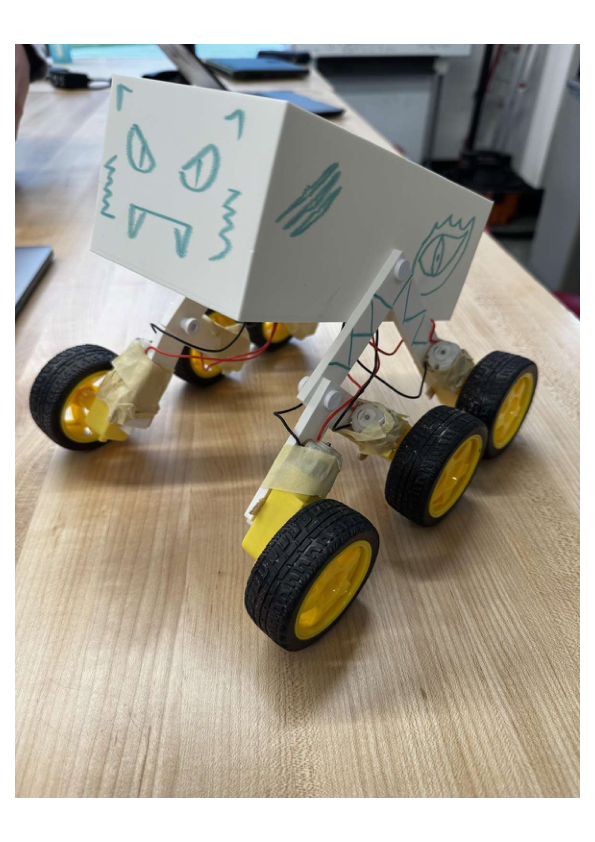
The body of our vehicle was going to be a box with small rectangular holes at the bottom of the sides to allow wires (from the motors attached to the wheels) to attach to the circuit located within the box. I’m sorry if that bit sounded a bit complicated, but thats the most simple way I can explain it. However, there are images of the vehicle and the separate parts in the stage down below.
Creating Stage CAD: Images and Explanations
ROCKER BOGIE SYSTEM: The image above is the rocker bogie system. The smaller body acts as the bogie, and the larger body acts as the rocker. The small holes are connected via screws (also made on CAD, image below). With wheels attached at the bottom of the legs of the bodies, the vehicle can traverse through rough terrain and over steep hills.
We 3d printed two small bodies and 2 large bodies, one of each for both sides of the body of the vehicle.
BODY OF VEHICLE (SHELL): The two images above are different angles of the body of our vehicle.
The first image is looking down at the body (top perspective). As previously mentioned, there are two rectangular holes located on different sides for wires attached to the circuit to connect to the motors and wheels.
The second image is looking at the side of the vehicle. The body is a rectangular prism with an opening at the top for easy access to the circuit and all the other components within the body. The hole(s) on the side of the vehicle connect the rocker bogie system to the body via screws.
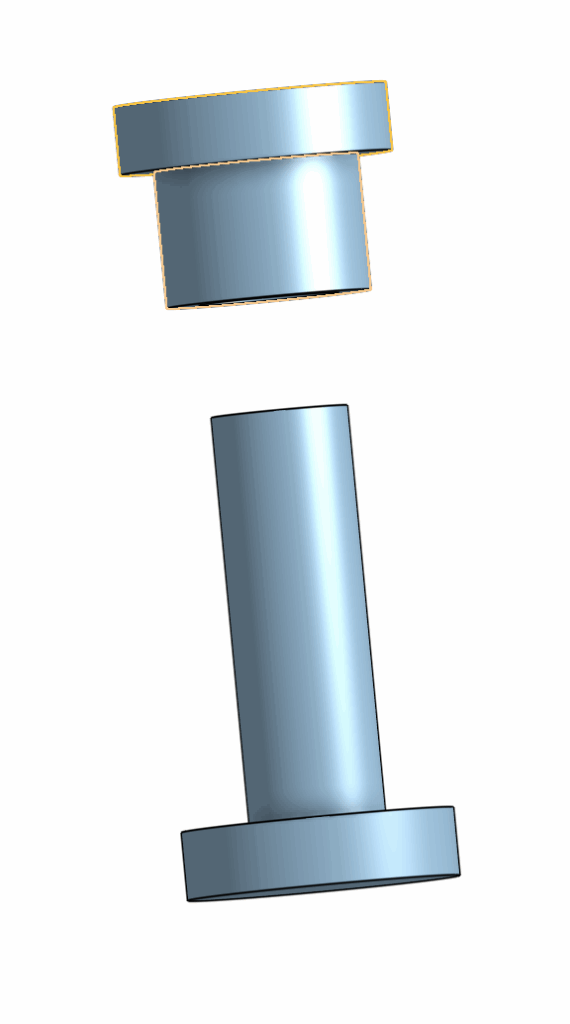
SCREWS: The image above is 1 of 4 screws we used to connect the rocker bogie system parts together and onto the body.
We measured the diameter of the screws to be partially smaller than the diameter of the holes on the rocker bogie system and the body so there wouldn’t be any fitting difficulties. In case of the screws falling out of the holes due to this minor change in diameter, we added super glue to the screws so that nothing would fall off.
THE VIPER: The image above is what our vehicle turned out to look like. We called it “The Viper”, and yes, we added a face and other cool details/features to make it seem more “alive”. As you can tell, the rocker bogie system is tightly screwed on to each side of the body, with wheels and motors attached to each of the legs. The vehicle is well balanced and stable, which is exactly what we as a group aimed for when creating its design. We were satisfied with its design and its ability to traverse all types of surfaces with ease.
Testing was fun because we experimented with different environments and terrain.
For each testing day, we recorded the voltage of the 4 AA batteries before and after the test, the distance the vehicle would be travelling, the time it took for the vehicle to travel the respective distance, the current at different time blocks, and the mass of the vehicle. Additionally, we calculated the efficiency using this data instead of the tool.
We’ve concluded that the when testing the vehicle on the smooth surface, it was 221% more efficient than when testing on the rocky surface:
Gravel efficiency: 0.023%
Smooth efficiency: 0.051 %
0.051/0.023 x 100 = 221%
The rover is 221% more efficient on smooth surface than it is on gravel (rocky surface).
Test Day; The big day
Test day didn’t go as planned. One of the wires disconnected from one of the motors so the wheel didn’t move, resulting in the vehicle having 3 active wheels on one side and 2 on another. This wasn’t a good day for our group, but luckily we had already conducted data from the previous 2 tests so it wasn’t the end of the world.
Conclusions from all test results
Tests before “The big day”:
– The vehicle has a higher efficiency when travelling on smooth surfaces. Unfortunately, on Trappist-1e, the terrain is the complete opposite of smooth, though we can confirm through the rocky-surface test that the vehicle can also traverse quite effectively over rocky/uneven terrain.
– Temperature could have a slight effect on results. The second test day was 1 degrees colder than the first day. There could be a possibility that this small change in temperature changed the outcome (the efficiency, current, voltage, etc). According to scientists, the cold can slow down chemical reactions inside the batteries, leading to higher internal resistance, which reduces its ability to store and release energy. This may have decreased the efficiency ever so slightly, altering the results.
– Having a small vehicle body can be quite challenging when you’re using the breadboard within it very often. A lot of the time, the wires attached to the breadboard were messy and having a moderately larger body may have solved this issue.
The Big Day:
– Just because something works one day, doesn’t mean it will work another day. On the one day that truly mattered, the vehicle decided it would be funny to fall apart. For future projects, I will make sure that everything is properly in place and prepared before making assumptions (assumption example: “It must be fine considering we tested it yesterday”).
– Acknowledge how far I came. On the big test day, it was about more than just the result, it was about the journey and how far me and my group mates had come since the first day of the project. At one point in time, we had no ideas nor suggestions; not much inspiration to be honest. However, we worked well as a team and stayed motivated all throughout.
AI Usage
Surprisingly, I used no direct AI in this project.
*Updated Part; What other conclusions can I make and how can I make the vehicle ‘better’*
The conclusion my group came to applies to the design choices we made because although the vehicle was intended to travel across rocky/uneven surfaces, it didn’t necessarily mean it would travel across that terrain at a consistent high speed. In terms of speed and efficiency, our vehicle performed much better during the flat ground test and considerably worse during the rocky test. This makes sense for any vehicle, but a 2.21x difference between the two is too significant to simply ignore, especially for a vehicle designed to excel in rocky terrain. If I were to improve the vehicle, taking the differing efficiency’s, speeds, and differing amounts of energy required all into account, I would add an additional battery to allow for a greater amount of energy which would lead to faster speed, longer life span (more batteries = more voltage = more power = more life). On top of the additional battery, I would change a major detail; the body. I believe that the body of our vehicle was slightly too large and would always tend to lean one way or the other when moving, causing the majority of the weight to shift to one side. This transfer in weight may have caused the immense differences in our tests and could’ve easily messed up any of the data we calculated. In terms of the material(s) we used, the rubber wheels we used were optimal for traversing across the rocky surfaces, as their soft, flexible nature allowed them to absorb shocks and minimize vibrations. However, one wheel in particular had a tendency to stay flat for a while after we conducted a test which was a wee-bit irritating.
For my third project of the 25/26 Fusion year, me and my peers were all tasked with creating a working circuit to hone our robotic skills.
What I chose to create
After much thought, brainstorming, and research, I decided to create a circuit for a fan because quite frankly, my room gets very warm (even during winter time). Of course, without requiring the necessary skills, I would have to learn step-by-step how to make this circuit.
Before starting right away…
Before attempting to create the fan, I had to learn some basics. I watched a few videos, here is one that helped me the most:
Here’s how it went…
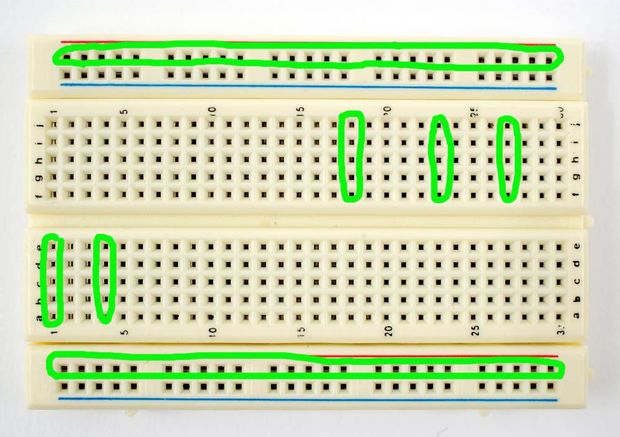
After watching the video and inspecting examples online, I got working. As Mr.Crompton had said in a previous class, there was something called a breadboard; a board used to connect electronic components (wires, resistors, capacitors, and coils) allowing for the conductivity of various experiments and projects. The breadboard is like a soccer field, and the electronic components are like the players. All the players are working together to ensure conductive success (in this case activating the fan).
All pieces used
The breadboard looks like this:
Beside the breadboard (connected via wires) is an Arduino UNO, which looks like this (will elaborate on all the pieces later on):
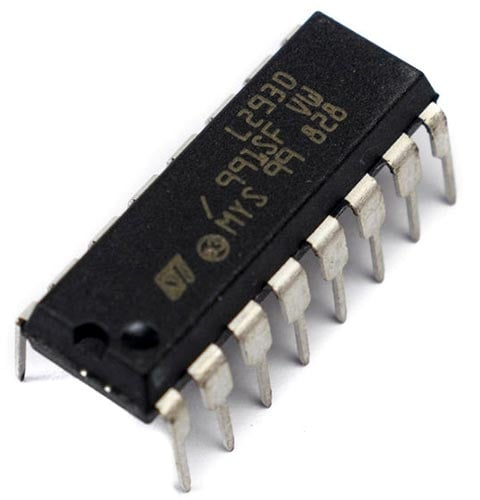
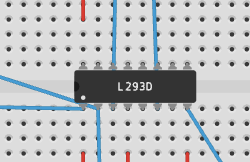
Connected to the breadboard is an L293D motor driver chip:
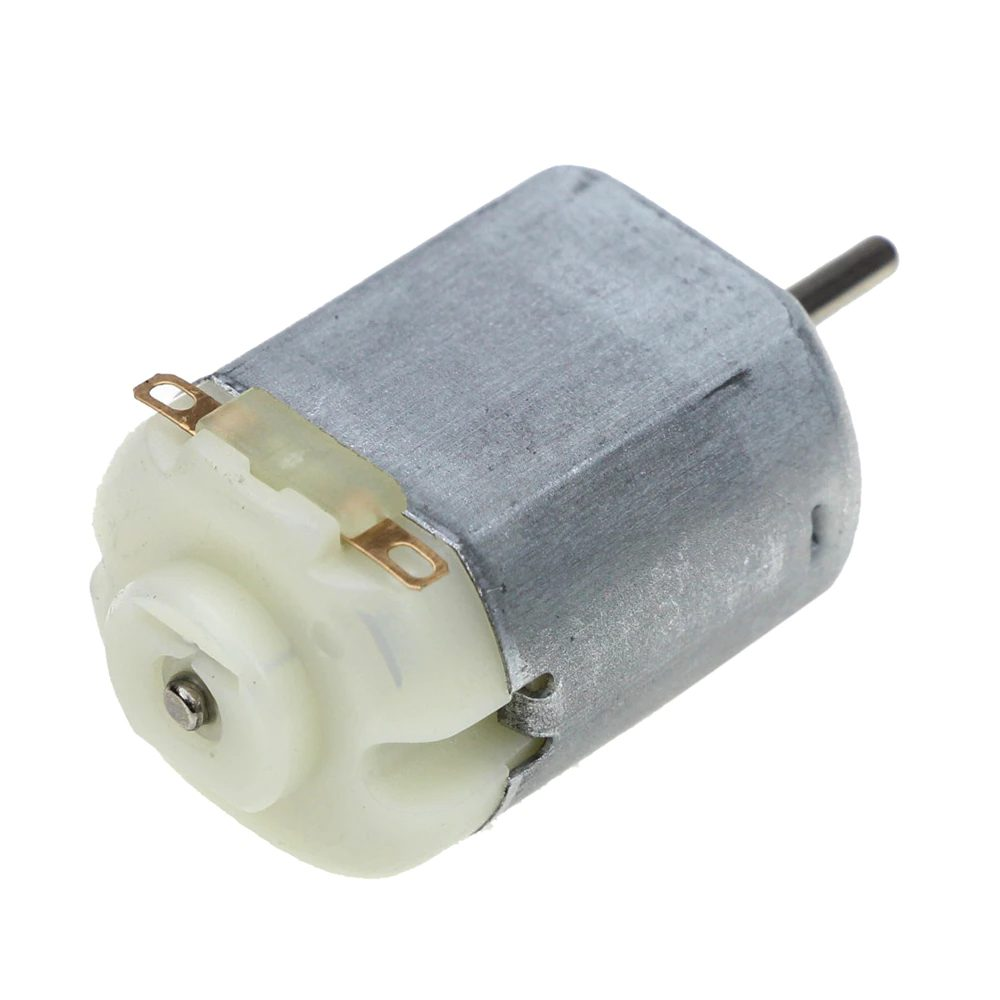
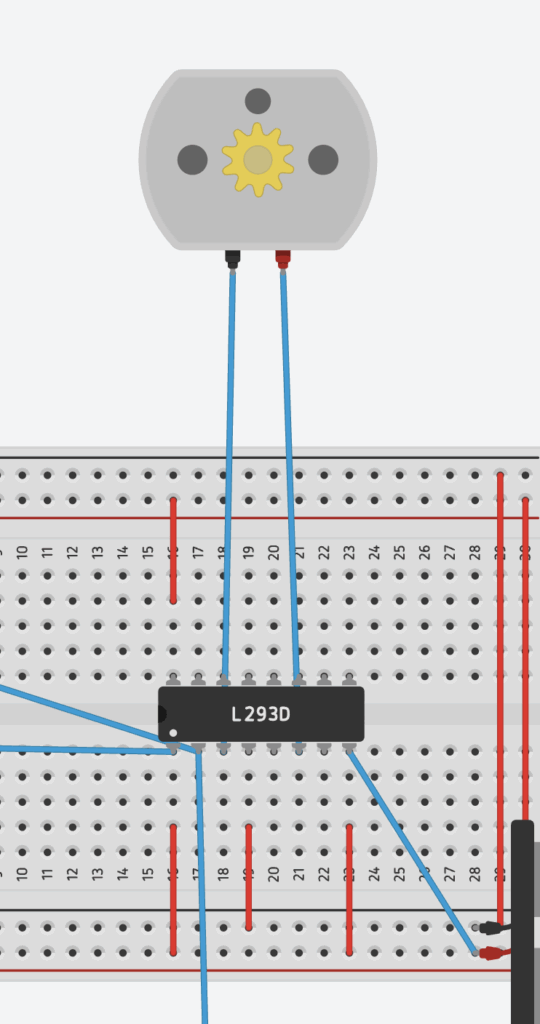
And a DC motor (the fan practically):
What does each component do?
The purpose of each piece
Breadboard:
Arduino UNO: The Arduino UNO is like the brain or head of the whole circuit. It is the component that processes all the code I write, which helps the circuit run smoother and operate more efficiently. It is also responsible for sending signals and giving directions to other components like LEDs, motors, or buzzers to perform actions. In my circuit, the Arduino sends a signal to turn my fan on or off.
L293D: The L293D’s job is controlling larger currents and voltages than the Arduino can handle directly. Its many ‘hands’ (as shown by the picture), otherwise known as its input, output, power, and enable pins, all connect wires to different places within the circuit. The wires connected to the L293D in my circuit are meant to direct electricity from the power source to my DC motor on the Arduino’s instructions.
DC Motor: The DC Motor is the component that actually uses the electricity, turning the energy into motion. The DC motor is like the finish line of a marathon and the other working components are like the coaches and guides along the track, making sure the electricity (the runner) reaches the motor safely and fairly quickly. In my circuit, the DC motor is the fan; the component that actually uses the electricity in order to serve its purpose.
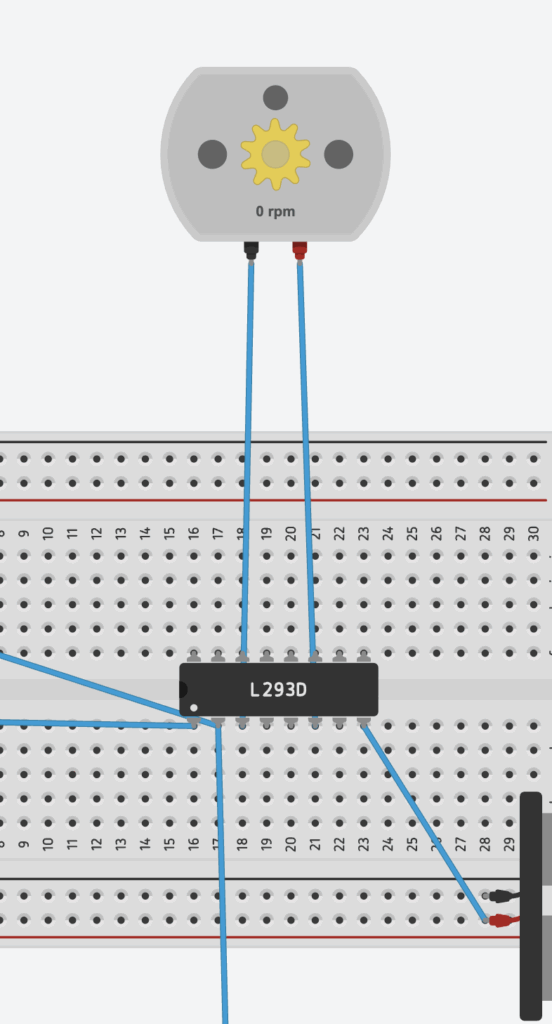
TMP: The TMP is the component that measures temperature and activates the fan accordingly. For example, if my room were to become warmer, the TMP would activate other components (and wires), turning on the DC Motor (the fan).
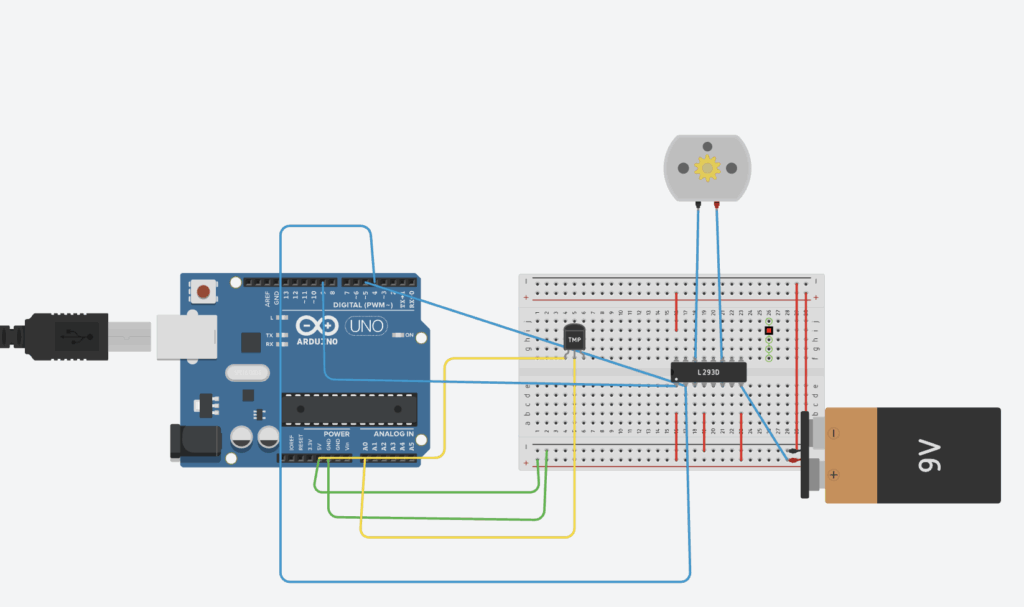
As we can see, all the previously mentioned components have a role in my circuit. We can see the Arduino Uno (far left), the breadboard (middle), the L293D (attached to the middle of the breadboard), the DC Motor (top middle), and the TMP (middle left).
Additionally, all the wires (all colour coded based on different positions/purpose) can be seen attached to the different components.
Although not previously mentioned, I have added code to the circuit so everything can run without additional unnecessary parts. I will elaborate more on my code later on.
Here are the colour codes for all of the wires:
Blue = Connected to the L293D
Red = Connected within the breadboard
Green = Connected to the Arduino UNO/the DC Motor
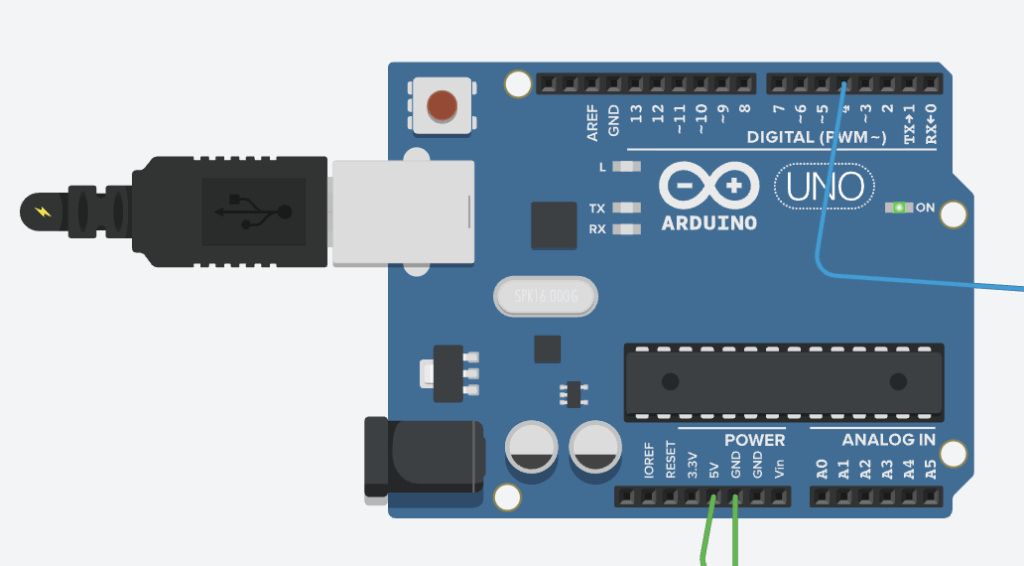
Once I press the “Start simulation” button (top right of the circuit page), the Arduino UNO activates, plugging what I believe is a USB cable into the machine. This activates everything connected to it, which is where the wires come into play.
Here is a picture of the activated Arduino UNO:
How does my circuit work? (Part 2)
Once the Arduino is activated, it releases electricity/power through the connected wires into the components within the breadboard.
The blue wires all connect to the L293D, which was mentioned previously to be the controller of larger currents and voltages.
As you can see in the image below, the L293D possesses many pins or ‘hands’, two of which connect directly to the DC Motor and one connected to the Arduino UNO. The connected wires allow the component to direct the electricity from the power source directly to the DC motor.
Part 3
All the other seemingly ‘useless’ wires also play a major role in my circuit, as they prevent the L293D from not working or from exploding? Here’s what I mean:
Circuit with breadboard wires (first image) vs Circuit without breadboard wires (second image):
Experimenting process
I discovered this by simply experimenting and removing wires that I initially thought were useless, until realizing that they were equally important as the ones connected to the L293D. After researching the purpose of these wires, it appears that they help provide power to the different parts of my circuit, especially the L293D motor driver, which must have its own power connections to work. The red wires distribute power throughout the breadboard so that the L293D and the motor can actually receive electricity, serving a purpose I once questioned.
The TMP’s Purpose
The TMP plays a major role in my circuit, as it allows the fan to only be activated when a certain temperature is present.
First, the TMP measures the temperature and sends a voltage to the Arduino Uno. Then, the Arduino Uno reads the temperature and decides when to run the DC Motor. The L293D reads the Arduino’s signal and powers the DC Motor with the 9V battery. The fans only turns on if the temperature is high enough.
Old Code
I added some code to the circuit in order to make less of a mess on the breadboard and make everything easier.
The first part of my code involves these three wires that go from the Arduino to the L293D pins:
int en1 = 5; // PWM pin → L293D Enable 1 (controls motor speed) int in1 = 4; // Digital pin → L293D Input 1 (controls direction) int in2 = 3; // Digital pin → L293D Input 2 (controls direction)
These match the L293D’s job:
EN1 = speed control (must be HIGH/PWM for motor to run)
if (temperatureC > 30.0) { // Turn fan ON — clockwise direction digitalWrite(motorPin1, HIGH); digitalWrite(motorPin2, LOW); analogWrite(enablePin, 255); // full speed } else if (temperatureC < 25.0) { // Turn fan OFF analogWrite(enablePin, 0); }
This code connects back to the temperature correlating to the DC motor, and how the temperature has to be high enough for the fan to activate.
BOM
Arduino UNO
Breadboard
Wires
L293D
DC Motor
AI Usage
Ai usage was minimal. Used it to help me come up with ideas and explain parts of circuits (not necessarily the ones I used in my circuit) and their purposes. Also helped me elaborate on the red wires and their purpose.
Here is a transcript of our chat(s)(on a google doc):
That is a question many individuals, specifically ones in the space industry, ask themselves. Who knows how many other planets there are in our infinitely expansive universe.
Are there any planets, other than earth, that can be inhabited?
That is another question that many contemplate upon. Can any planets become “liveable”?
The Project
In this Fusion/Science project, we are tasked with finding a celestial body (planet, moon, exoplanet, etc) that has hints of habitability and can become habitable by humans. Along with the task of finding an inhabitable astronomical body, we are also tasked with creating a vehicle prototype that could survive the terrain and environment of our chosen planet.
What planet did you choose and why?
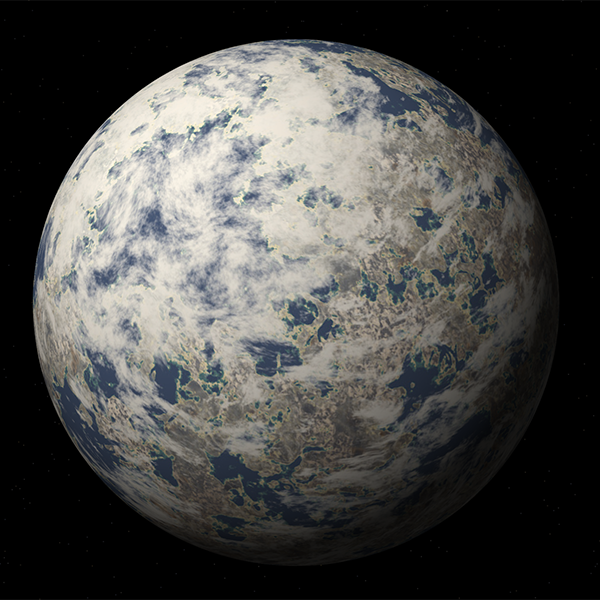
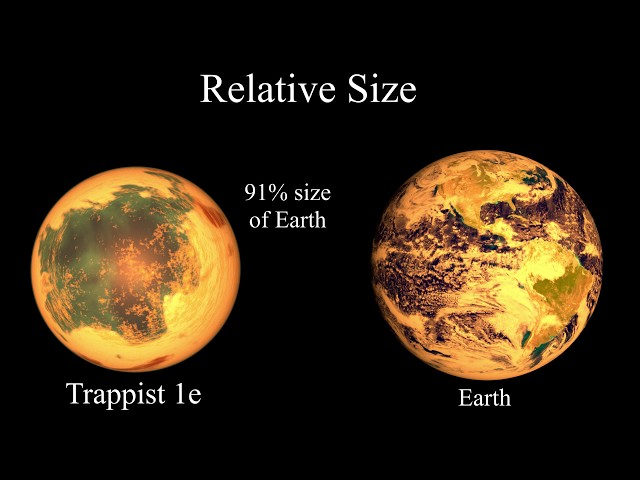
The celestial body I chose was Trappist-1e.
It is a red dwarf exoplanet that resides within the “Trappist 1 system”, a star system 40 light years away from earth and approximately 800,000 years away using current technology. Discovered in 2017, this exoplanet is considered one of the most Earth-like planets found to date due to its gravity, temperature, and physical appearance all being fairly similar to earth’s.
Extra details:
Earth’s Gravity = 9.8m/s^2
Trappist-1e Gravity = 9.12m/s^2
What opportunities present themselves on your new home planet?
Many opportunities are present on my new home planet.
Research suggests that Trappist-1e orbits in its star’s habitable zone; the region around a star (in this case Trappist-1) where temperatures are suitable for liquid water to exist. Considering how Trappist-1e is the right distance from its star, it could potentially support life and contain liquid water.
Not only is Trappist-1e’s size and gravity similar to earth’s, its mass and density also appear similar to earth’s as well. According to scientists, Trappist-1e has a mass and density that suggests a rocky-ish composition, quite similar to earth’s. If true, this would allow humans to easily adapt to the exoplanet’s environment (unless other challenges exist which is elaborated on later).
What challenges do you foresee?
Although there are many opportunities that suggest possible inhabitability, there are also many confirmed and unconfirmed factors that could pose challenges.
As mentioned previously, Trappist-1e lies within its star’s habitable zone. However, one side of the exoplanet is always facing its star, “Trappist 1”, while the other side faces away from the star. This causes extreme temperature contrasts between the day and night sides, which poses as a threat to any living thing on the planet. Hypothetically, if humans were to arrive on the planet’s “hot side”, they would be arriving on land with temperatures averaging at 275°C. The “cold side” has an average temperature of around -60 °C.
An unknown factor is Trappist-1e’s atmosphere. We have’t figured out yet whether Trappist-1e has a protective atmosphere or not, or if it’s been stripped away.
There is a possibility that this exoplanet possesses a secondary atmosphere filled and made with heavier gases such as nitrogen. There is also a possibility that Trappist-1e has no atmosphere at all, which means it experiences frequent extreme temperature swings, possesses no breathable air for life, and is exposed to radiation and vulnerable from impacts within space.
What implications might there be for vehicle design?
Due to the possibility of no atmosphere, we have to reconsider multiple factors for our vehicle design.
Our vehicle has to be resistant against radiation and will be required to have protective layers against the solar flares and cosmic radiation from Trappist-1e’s star, Trappist-1. Of course, if my exoplanet possesses a substantial atmosphere, these factors would be less critical as the atmosphere would reduce the amount of radiation reaching the surface. Otherwise, lots of exposure to radiation would pose a huge threat to both the vehicle and the person inside (don’t think there would an individual in the vehicle but if there was
As previously stated, the planet possesses extreme temperatures contrasting between the day and night. This means the vehicle would need adaptive heating and cooling systems for both contrasting sides of the exoplanet.
My vehicle will likely rely on nuclear, geothermal, or advanced solar power. Trappist-1e is a red dwarf exoplanet and emits infrared light. Unfortunately, standard solar panels cannot convert infrared light into electricity, which is why we would need advanced solar panels that can convert infrared light into electricity effectively.
Due to the suggested terrain of Trappist-1e (rocky composition), the vehicle will likely have wheels that can quickly traverse the exoplanet and easily stick to the surface without falling over. It is unlikely that the vehicle will float away as Trappist-1e’s gravity is fairly similar to earth’s. However, in the likely event that the planet’s surface is extremely uneven, my vehicle would need strong traction and, if necessary, implemented AI assisted navigation.
How do we know what we know about your planet?
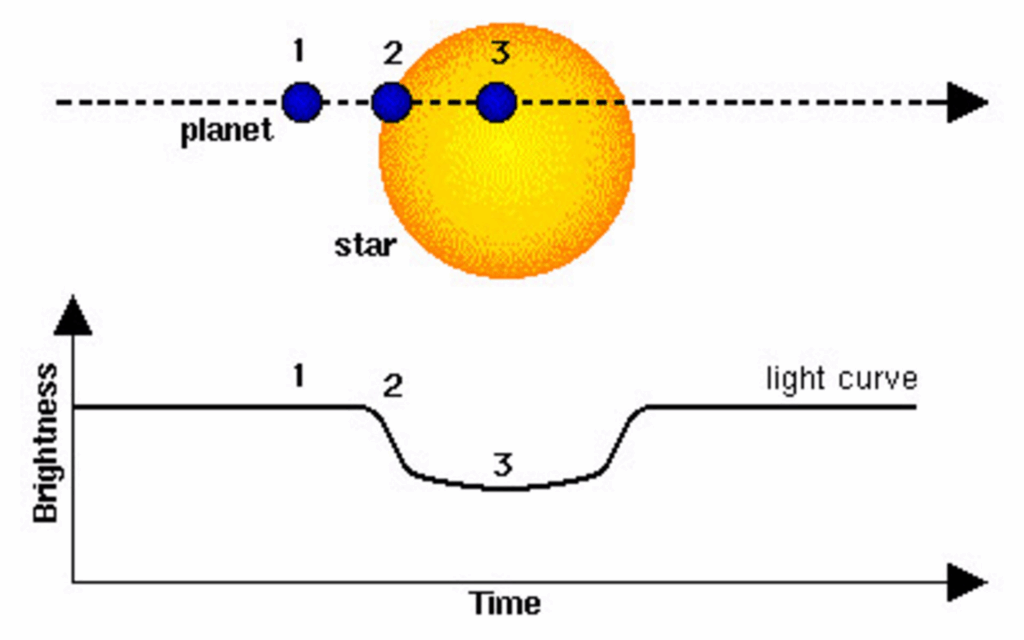
Scientists and astronomers have never physically visited Trappist-1e due to it being trillions of miles away from earth. However, we do know a surprising amount about it because of many years of detailed astronomical research and something called “the transit method”.
“The transit method”? What’s that? Apparently, it is an technique used by scientists and astronomers to detect planets outside of our solar system. As of November 10th 2025, over 4,400 exoplanets have been found using this method, which is quite a significant amount. When a planet/exoplanet passes in front of its host star (in this case Trappist-1e in front of Trappist-1), it blocks a small amount of the star’s light, causing a drop in the star’s brightness. Using this slight change in brightness, scientists have been able to determine Trappist-1e’s orbit, size, and whether it lies in the habitable zone (which it does).
Additionally, scientists have been able to use advanced computer modelling and simulations (from the knowledge they already possessed thanks to the transit method) to find the mass of Trappist-1e. One of the most important tools is “Transit Timing Variations”, otherwise known as TTVs.
Tug of war is extremely popular in space, especially in the Trappist star system. The exoplanets within this star system are naturally packed tightly and closely together, which causes them to pull on each other due to gravitational force. This pull of gravity can cause changes in when the exoplanets cross in front of their star, Trappist-1. These variations and change help astronomers calculate the mass of Trappist-1e and understand how the other exoplanets in the system influence each other through gravity.
I attempted to use minimal AI and rely on outside sources to fully educate me. However, for building the vehicle prototype, I asked AI how radiation and no atmosphere could possibly influence vehicle precautions in outer space, and how Trappist-1e’s environment might also require specific precautions as well.
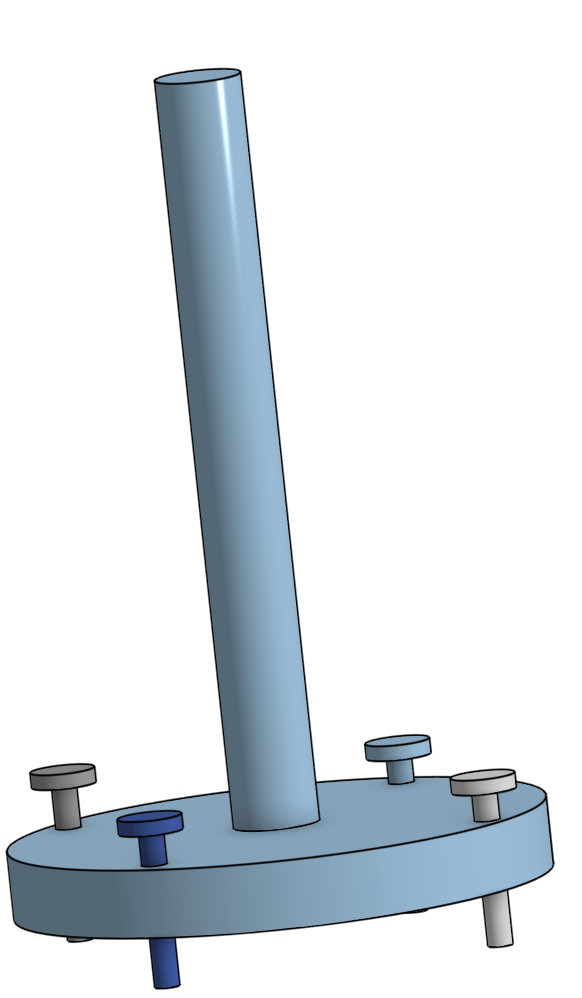
For my second project of the year, I decided to make a wall stand using Onshape.
I was not too familiar with Onshape when starting this project, only having previous experience from Drafting 8. I knew the basics (sketching, extruding, etc) but really wanted to go beyond what was expected. Unfortunately, I was not able too but aspire to attempt more advanced techniques in upcoming Onshape projects.
How my stand works:
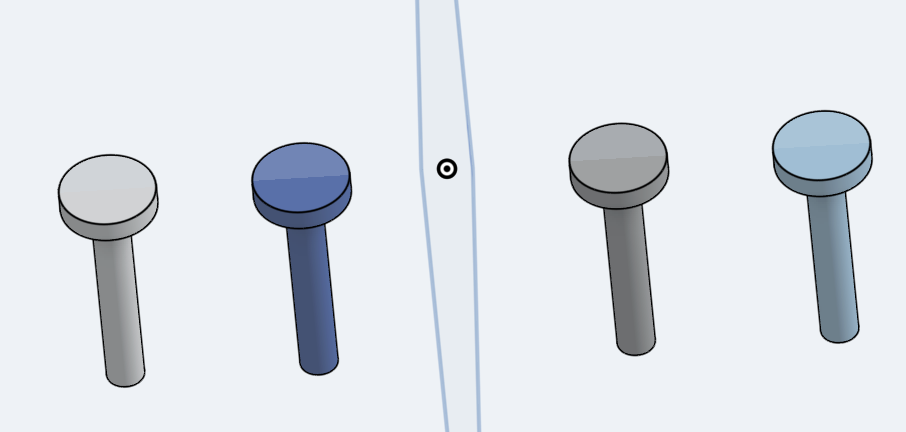
It has a long cylinder-like shape that acts as the stand, with a large, circular platform attached to its bottom. On the platform lay small holes intended for nails to go through. These nails can be attached to walls, allowing the stand to hang coats, jackets, or hanging items in general. They can also not be used at all.
When the nails aren’t used, the stand can stand upright and act almost as a paper towel stand. This allows for a hat or toque stand depending on what the user intends.
Sketching – drawing a 2 dimensional representation of a face in CAD
Sketching was the easiest part by far. I found that it was very simple drawing shapes and lines on Onshape. I was successfully able to draw and use 2d squares, circles, and rectangles in my project.
Extruding – taking a sketch and turning it into a 3 dimensional object
After sketching, extruding was the next part. This step takes any sketch you may have created into a 3d shape. 2d squares, circles, and rectangles became 3d. This really brought my piece to life.
Assembly – taking multiple 3 dimensional parts and sticking them together
This was the most exciting part. After drawing each piece of the stand individually, I was finally able to assemble all the pieces together, creating the stand I aspired to create since the beginning.
Mechanical Drawings – converting your 3 dimensional parts and/or assembly into a 2 dimensional drawing
This was the most difficult part of the process. As previously mentioned, I wasn’t too experienced with OnShape, so when attempting to mechanical draw each piece, I was skeptical.
I searched up some videos. This was one that helped:
Functioning Mates
In OnShape (and the engineering industry), functioning mates are basically the connections between parts in an assembly that define how they move relative to each other.
In my post, I’ve made great use of this feature, allowing all the nails to be able to move up and down, through the holes of the base. Additionally, the cylinder can move up and down into place on the base.
BOM – Bill of Materials – creating a list of all items required to fabricate an assembled object.
There is a list of all the necessary materials on my OnShape document “Assembly 1 Drawing 1”. However, I will also include it on my post:
Wooden circular Platform (Diameter) 10″
Wooden vertical cylinder (Height) 16″
Nails (7D Nail)
Hole Cutting Machine (for holes that the nails go through)
For my first Fusion project of the 25/26 school year, I attempted to create a typing simulator that tracks your wpm (words per minute) and typing accuracy. In this blog post, I will review the process behind this project, provide a flow chart, and how I, as a beginner coder, was able to use online resources to my advantage.
Before joining Fusion, I had very little coding experience, which was obviously a worry when this project was announced. After brainstorming multiple ideas for things I could create, I decided to attempt making a Typing Simulator. As a child, I was fond of these simulators, merely due to the thought of becoming a faster typer. However, based on my past experiences, the simulator would never provide any analysis of my typing capabilities (wpm, accuracy), which led to no typing improvement whatsoever. My goal for this project was to create a typing simulator that would track your wpm and accuracy while simultaneously providing advice on how to improve.
Here is a flowchart I used throughout my project (steps, what to do when encountering roadblocks, etc).
Below this text is the code I created for my game. Feel free to try it out (copy and paste) using Python, Google Colab, or any other coding website that uses Python. Note – This doesn’t work on Java.
sentences = [ “Beethoven, Bach, Haydn, Mozart, Tchaikovsky, and Schubert were all classical composers.”, “The Flappy Fellow From Fusion Flies Free Forever Flourishing.”, “Open The Doors, close the doors, OPEN the DOORS, close THE doors.”, “Real Madrid is a Spanish professional football club based in Madrid.”, “Chemistry, Biology, Earth Science, and Physics are all topics covered in science.”, “The Canucks will win the 2026 Stanley Cup.”, “The Fish and Chips in Ireland sure are the best.”, “Abra-Cadabra Alakazam, Bing Bong Boom, Eenie Meenie Minie Moe.”, “Dog goes woof, cat goes meow, cow goes moo, sheep goes baa.”, “Vancouver is among Canada’s densest and most ethnically diverse cities.”, “If you want to play soccer, you must play with passion.”, “Tomatoes are considered fruits, not vegetables.”, “My name is Darren Entwistle and I am the founder of Telus.”, “What a beautiful day it is on the beach, here in beautiful and sunny Hawaii.”, “Peter Piper picked a peck of pickled peppers”, “The quick brown fox jumps over the lazy dog.”,
]
while True:
def greet(name=”World”): print(f”Hello, {name}!”)
print("Welcome to Macdara's Typing Simulator!")
print("You will be asked to type a sentence. Your goal is to type as accurately and quickly as you possibly can.")
print("There are over 15 different possible sentences that can be generated, each ranging in difficulty.")
print("\nType the following sentence as quickly and accurately as you can:")


sentence_to_type = random.choice(sentences)
print(f"\n{sentence_to_type}\n")


input("Press Enter when ready...")

start_time = time.time()

user_input = input("Type the sentence above: ")

end_time = time.time()

time_taken = end_time - start_time

word_count = len(sentence_to_type.split())
wpm = (word_count / time_taken) * 60

correct_chars = 0

for i in range(min(len(user_input), len(sentence_to_type))):
    if user_input[i] == sentence_to_type[i]:
        correct_chars += 1

accuracy = (correct_chars / len(sentence_to_type)) * 100

print("\n--- Results ---")
print(f"Time taken: {time_taken:.2f} seconds")
print(f"Words per minute: {wpm:.2f} WPM")
print(f"Accuracy: {accuracy:.2f}%")


if accuracy == 100:
    print("Congrats on perfect accuracy!")
if 70 <= accuracy <= 99.9:
    print("Great accuracy, but aim for perfection on your next attempt.")
if 40 <= accuracy <= 66.9:
    print("Please consider practicing your accuracy.")
if 67 <= accuracy <= 67.9:
  print("67 67 67 67 67 67 67 67")
if 0 <= accuracy <= 39.9:
    print("Your accuracy is unacceptable.")


if 10 <= wpm <= 20.9:
    print("No offence, but you could type a teeny bit quicker.")
if 21 <= wpm <= 40.9:
    print("Your typing speed is pretty average... work could be done.")
if 41 <= wpm <= 55.9:
    print("Your typing speed is not too bad, but still consider practicing.")
if 56 <= wpm <= 66.9:
    print("Your typing speed is good. If you can, try typing even FASTER.")
if 67 <= wpm <= 67.9:
    print("67 67 67 67 67 67 67 67 67 67")

if 68 <= wpm <= 80.9:
  print("Your typing speed is excellent. Well done.")

if 81 <= wpm <= 100.9:
    print("Now this is elite typing speed. Only a small percentage of the world's population can type this fast!")
if 101 <= wpm <= 140.9:
    print("Unbelievable typing speed. If you haven't already, you should really considering going professional.")

if 141 <= wpm <= 100001:
    print("Your typing speed is inhumane. Focus on Accuracy.")


play_again_input = input("\nPress '1' to play again or any other key to exit: ")


if play_again_input != '1':
    print("Thanks for playing! Goodbye.")


    break
Sentences
The code below include the sentences that I used for my typing simulator. Every time you run the simulator, the computer will give you one of the following sentences to complete. I made these specific sentences, but any other creative sentences can also work.
import random import time
sentences = [ “Beethoven, Bach, Haydn, Mozart, Tchaikovsky, and Schubert were all classical composers.”, “The Flappy Fellow From Fusion Flies Free Forever Flourishing.”, “Open The Doors, close the doors, OPEN the DOORS, close THE doors.”, “Real Madrid is a Spanish professional football club based in Madrid.”, “Chemistry, Biology, Earth Science, and Physics are all topics covered in science.”, “The Canucks will win the 2026 Stanley Cup.”, “The Fish and Chips in Ireland sure are the best.”, “Abra-Cadabra Alakazam, Bing Bong Boom, Eenie Meenie Minie Moe.”, “Dog goes woof, cat goes meow, cow goes moo, sheep goes baa.”, “Vancouver is among Canada’s densest and most ethnically diverse cities.”, “If you want to play soccer, you must play with passion.”, “Tomatoes are considered fruits, not vegetables.”, “My name is Darren Entwistle and I am the founder of Telus.”, “What a beautiful day it is on the beach, here in beautiful and sunny Hawaii.”, “Peter Piper picked a peck of pickled peppers”, “The quick brown fox jumps over the lazy dog.”,
The “While True” Code
When you use “while True:” and then “break” at the start and end of your code (not including the sentences), it initially creates a loop that immediately exits it because of the break statement. This part of my code helps create the “play again” statement. If the user types “yes” when play again appears, the while true will apply, but when the user types no, the “while true” isn’t true anymore, which allows the “break” to take control.
Printing Sentences
The code below includes the welcoming sentences that guide you through the simulator. This part was the easiest to understand; all I had to do was type – print: (“blah blah blah”) – Then, the sentence in the brackets would appear in the code.
print(“Welcome to Macdara’s Typing Simulator!”) print(“You will be asked to type a sentence. Your goal is to type as accurately and quickly as you possibly can.”) print(“There are over 15 different possible sentences that can be generated, each ranging in difficulty.”) print(“\nType the following sentence as quickly and accurately as you can:”)
Generating Random Sentences
This part of my code helped the system choose a random sentence to generate:
The code below asks the user to press “Enter” when they’re ready to start typing. It then starts a timer and waits for the user to type a specific sentence – (sentence_to_type, which should be defined earlier in the code) – . After the user finishes typing, it stops the timer, calculates how long they took, how fast they typed in WPM, and how accurate their typing was by comparing it to the original sentence. Then, it prints the results, time taken, WPM, and accuracy percentage:
This part of my code was my favourite. Depending on how well the user typed (accuracy, time, WPM), specific sentences (made by yours truly) would generate. I made sure that these comments were appropriate and positive, hoping to encourage the user to practice typing more:
if accuracy == 100: print(“Congrats on perfect accuracy!”) if 70 <= accuracy <= 99.9: print(“Great accuracy, but aim for perfection on your next attempt.”) if 40 <= accuracy <= 66.9: print(“Please consider practicing your accuracy.”) if 67 <= accuracy <= 67.9: print(“67 67 67 67 67 67 67 67”) if 0 <= accuracy <= 39.9: print(“Your accuracy is unacceptable.”)
if 10 <= wpm <= 20.9: print(“No offence, but you could type a teeny bit quicker.”) if 21 <= wpm <= 40.9: print(“Your typing speed is pretty average… work could be done.”) if 41 <= wpm <= 55.9: print(“Your typing speed is not too bad, but still consider practicing.”) if 56 <= wpm <= 66.9: print(“Your typing speed is good. If you can, try typing even FASTER.”) if 67 <= wpm <= 67.9: print(“67 67 67 67 67 67 67 67 67 67”)
if 68 <= wpm <= 80.9: print(“Your typing speed is excellent. Well done.”)
if 81 <= wpm <= 100.9: print(“Now this is elite typing speed. Only a small percentage of the world’s population can type this fast!”) if 101 <= wpm <= 140.9: print(“Unbelievable typing speed. If you haven’t already, you should really considering going professional.”)
if 141 <= wpm <= 100001: print(“Your typing speed is inhumane. Focus on Accuracy.”)
What is a defining and calling a function
In coding, defining a function means creating a named block of instructions that tell the computer what to do when the function is used.
For example: print(“Welcome to Macdara’s Typing Simulator”) – This is a function because it performs a specific task’ printing out a message.
UPDATED FUNCTION
My function in the code is as follows:
def greet(name=”World”): print(f”Hello, {name}!”)
This function prints a greeting message. If a name is provided when the function is called, it prints “Hello, [whatever the name is]!”. If no name is provided, it uses the default value “World” and prints “Hello, World!”. I use this function to greet the individual wherever he may be on planet earth (unless he is an alien on Kepler-B).
Elaborating on “what is a function”
Calling a function means using the function after it has been defined so the computer runs the instructions inside it.
For example, when you write something like: print(“Welcome”) – you are calling the print function. When the program sees this line it runs the function and shows the output.
As previously mentioned, I am a beginner coder and have no past experience using code. If you are in the same position as me, the one thing I would highly encourage is experimenting with code before immediately relying on AI. This was the first thing I did, as it helped me gain an understanding of what I would be working with.
I spent around 5-10 minutes typing in random words, numbers, letters, and even punctuations. I learned that “!”, “print”, and “if” did something, but I wasn’t sure what its purpose was.
Additionally, I learned that in coding, we use functions; self-contained blocks of code primarily designed to perform specific tasks. They are used multiple times in almost all programming languages and serve purposes such as reusability, modularity, and organization. Although I didn’t use any functions, I intend to use some in future projects.
There are also defined functions. These are blocks of code that have a specific person. In my code, I use “print” multiple times throughout my code. It is a defined function and its purpose is to type out a sentence (that I write) for the reader. Keep in mind, there are many defined functions in code.
After this short period of time, I asked AI what these specific words and letters were typically used for. This is when I learned that “print” printed out messages, which is what I used for the sentences the user was meant to type.
AI Usage
In terms of my interactions with AI, I attempted to use it as minimally as possible. I would use AI for educational purposes, not asking for it to write my entire code, but rather write portions I didn’t understand and explain them thoroughly. This way I learned how and what to do rather than mindlessly copying and pasting the code provided by AI.
Some questions I asked AI include:
“How can I track an individuals typing accuracy on a typing simulator using Python code? Explain each step in this process, talking about the terminology you use.”