This is an assignment to make students demonstate abilities to do circuit building and arduino programming. If we never did robotics before it would be an assignment to also demonstrate their learning process with either AI or other sources. Arduino is a programming language commonly seen in breadboard robot circuits.
I personally would be using Tinkercad to do my virtual schematic.
This is the link for tinkercad: https://www.tinkercad.com/
The assignment would require a circuit schematic, BOM(Bill of materials), and Code. Originally there was supposed to be a video record of the physical prototype, but due to the limited amount of Arduino Unos(mandatory for a project) and the bugs with mac computers inputting code into the Unos the physical prototype became optional.
Circuit schematic
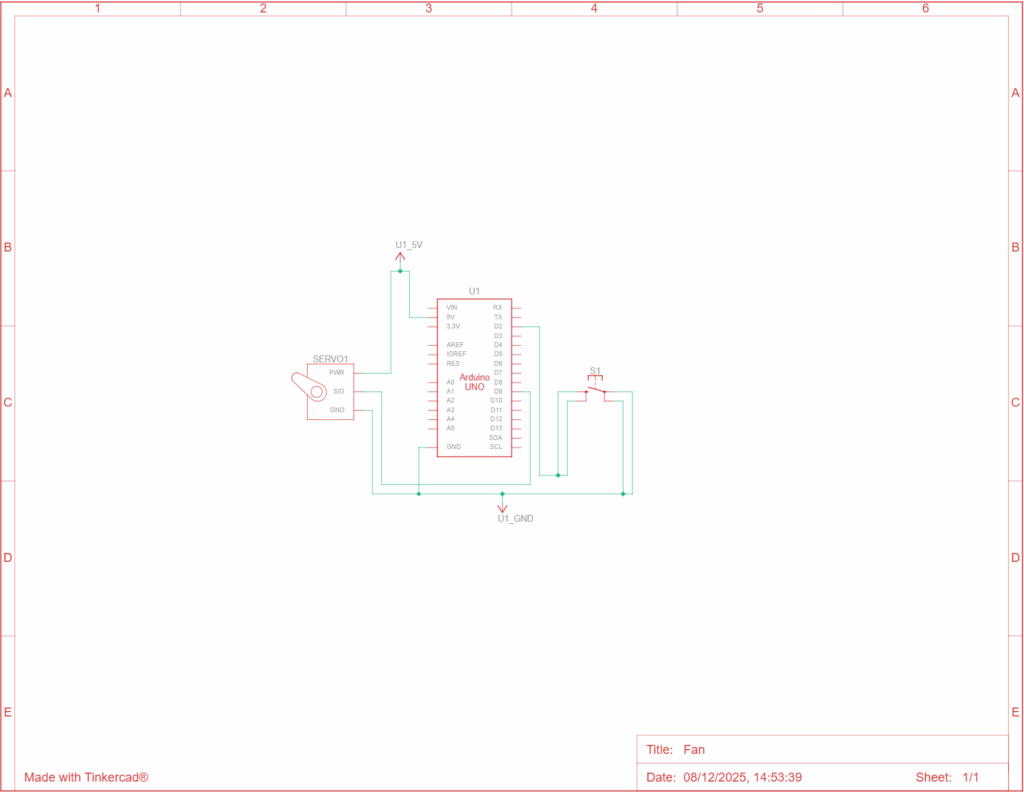
This is a really simple fan. To keep the code simple I used a positional servo but what it basically does is that once the button is clicked the servo spins once(in a positional servo that means 180).
Special thanks to Tiger Wei for helping me with some basics for example ground connects to ground in the wiring and power goes to 5V. And if multiple is needed I can go connect ground to – on the breadboard so the whole lane of – can be plugged for ground. Same for Power.
In here the signal pin on the continuous micro servo is connected to Digital pin 9 on the uno, and ground is connected to ground, power is connected to 5V on the breadboard.
Video
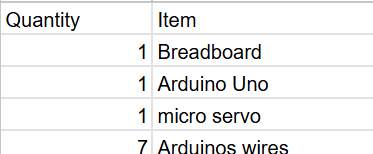
BOM
Code
#include <Servo.h>

const int buttonPin = 2;
const int servoPin = 9;

Servo fan;

const int positionA = 10;
const int positionB = 170;

int currentPosition = positionA;
int lastButtonState = HIGH;

void setup() {
  Serial.begin(9600);

  fan.attach(servoPin);
  pinMode(buttonPin, INPUT_PULLUP);

  fan.write(currentPosition);
}

void loop() {
  int currentButtonState = digitalRead(buttonPin);

  if (currentButtonState == LOW && lastButtonState == HIGH) {

    if (currentPosition == positionA) {
      currentPosition = positionB;
    } else {
      currentPosition = positionA;
    }

    fan.write(currentPosition);

    delay(50);
  }

  Serial.print("Button State: ");
  Serial.println(currentButtonState);

  lastButtonState = currentButtonState;
}
This is the complete code, it functions in a way so that when the button is pressed it rotates.
#include <Servo.h>This tells the Arduino to load the Servo library, which contains all the code needed to control a servo motor. This is like import in Python.
const int buttonPin = 2;
const int servoPin = 9;
These lines create constant variables that define the hardware connections. buttonPin is set to 2, meaning the button’s signal wire is connected to Arduino Pin 2. servoPin is set to 9, meaning the servo’s signal wire is connected to Arduino Pin 9.
Servo fan;This creates a servo object named fan. The word Servo tells Arduino what type of object it is. The word fan is the name you chose for this servo controller.
const int positionA = 10;
const int positionB = 170;
These lines define the two target angles for the servo. positionA is 10 degrees, and positionB is 170 degrees. The servo will toggle between these two fixed points.
int currentPosition = positionA;
int lastButtonState = HIGH;
These are state variables. currentPosition stores the servo’s current angle (starting at 10 degrees). lastButtonState tracks the button’s state from the previous check, and is initialized to HIGH because the pin will be high when the button is not pressed (due to INPUT_PULLUP).
void setup() {
  Serial.begin(9600);

  fan.attach(servoPin);
  pinMode(buttonPin, INPUT_PULLUP);

  fan.write(currentPosition);
}
When the Arduino starts, the setup() section runs one time to prepare everything. Inside it, Serial.begin(9600); starts communication for debugging.The servo is connected to Pin 9 using fan.attach(servoPin).pinMode(buttonPin, INPUT_PULLUP); sets Pin 2 to input mode and activates the internal pull-up resistor. This ensures the button pin is reliably high until the button is pressed (connecting the pin to ground).fan.write(currentPosition); moves the servo to its initial position of 10 degrees.
void loop() {
  int currentButtonState = digitalRead(buttonPin);

  if (currentButtonState == LOW && lastButtonState == HIGH) {

    if (currentPosition == positionA) {
      currentPosition = positionB;
    } else {
      currentPosition = positionA;
    }

    fan.write(currentPosition);

    delay(50);
  }

  Serial.print("Button State: ");
  Serial.println(currentButtonState);

  lastButtonState = currentButtonState;
}
The loop() section runs continuously, checking the button and controlling the servo, int currentButtonState = digitalRead(buttonPin); reads the current status of the button (which will be LOW when pressed).The key condition if (currentButtonState == LOW && lastButtonState == HIGH) checks if the button is currently pressed (LOW) but was previously unpressed (HIGH). This ensures the action only triggers once for a single press.If the condition is met, the nested if/else block runs, it checks the currentPosition and flips the target between positionA (10 degrees) and positionB (170 degrees).fan.write(currentPosition), commands the servo to move to the new position.delay(50), pauses the sketch briefly to debounce the button press, ensuring electrical noise doesn’t cause false triggers.Finally, Serial.print displays the button status for debugging, and lastButtonState = currentButtonState; stores the current state for comparison in the next loop.
Link to TinkerCad
AI usage
(There were some photos in my responses to the AI, that is why the AI knows my wiring is wrong or correct)
Leave a Reply