September 21st, 2025
This project was intended to demonstrate a basic understanding of the python computer language, and to learn a few concepts along the way. Throughout my project I used Chat GPT (Google Gemini was not functional for my computer) as a resource of learning and the full transcript of my conversation with it can be found here:
As for the project itself, I decided to create a program that generates flashcards by prompting the user to input information such as questions and answers. It is a useful study tool for students, because after all of the information has been gathered, users are tested on it. The code was written on a platform called Code HS, but it will be available on Google Colab. Below, is the link to an image of a simple flowchart to help understand the program:
After completing this flowchart, I was able to begin the process of writing the code itself.
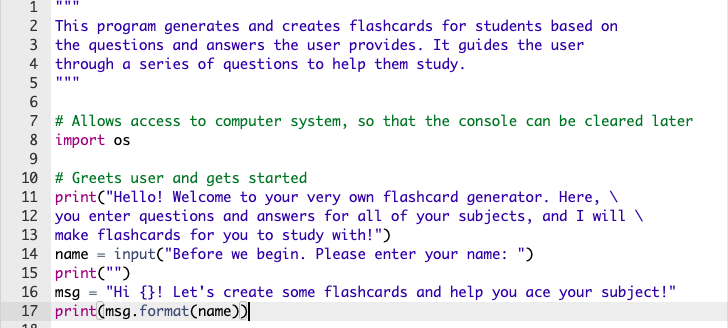
Step 1: Introduction to the User
The below section of code introduces the user to the program. Lines one to five simply describe what the program does, which was helpful for me to refer back to, as the programmer. *Note that all of the writing in green is not run by the computer, as they are simply comments for the programmer (myself) to refer back to. Line eight allows access to the computer system, which will be useful later in the program.
Lines eleven through thirteen are shown on the console to the user, detailing the program. Line fourteen asks the user to enter their name for personalization, which is stored in a variable called “name”. Line sixteen defines another variable called msg, which contains braces to store the variable name.
Finally, on line seventeen, the message is printed to the console, with the help of .format, a string method that fills the empty braces with the variable “name”.
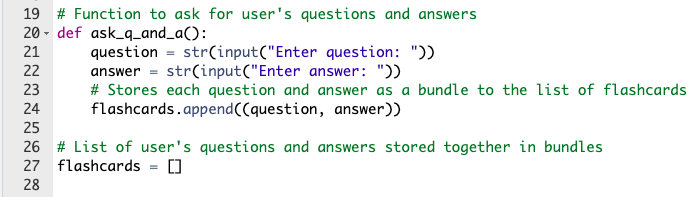
Step 2: Defining the Function
This below section defines a crucial function (allows repeated lines of code to be stored as one action) in the code. Lines twenty-one and twenty-two ask for the user’s question and answer which will create a flashcard later on. Line twenty-four may be the most crucial however, as it stores the question and answer to a list called “flashcards”.
It does this by using the .append string method, with the brackets containing the question followed by the answer. Through this method, the question and answer is stored in the list, so that if the user enters multiple questions and answers later on, they will all be printed in order. Finally, line twenty-seven defines the list known as flashcards through square brackets.
Step 3: Any More Questions?
The above section of code comes after the function “ask_q_and_a” is called. Line thirty-two is straight forward, asking whether or not the user has any more questions to enter. The “while” loop on line thirty-five states that the program will repeat the process (asking the user for information, and then asking whether or not there is more), until the user finally enters that there are no more questions.
It sets this condition by setting the another_question.lower() method equal to the lowercase letter “y”. The .lower() string method converts a capital letter “Y” to a lowercase letter “y”, so that the program can accept both capital or lowercase letters “y” from the user.

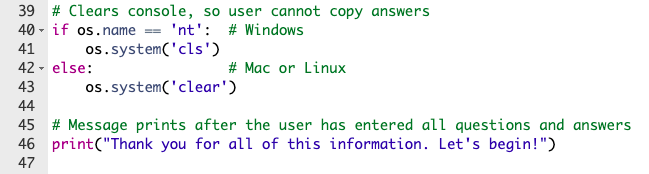
Step 4: Clear the Screen
The above section of code ties back to the “import os” call at the very beginning of the program. It uses its access to the computer system to clear the console so the user cannot see the answers to the questions. Without this portion of the program, the user would be able to simply look at and copy the answer that they had entered earlier into the console.
The if else statement is required to account for different computer systems: Mac/Linux or Windows. On Mac/Linux, the call to clear the console is os.system(‘clear’), but on Windows it is os.system(‘cls). After clearing the console, the message on line forty-six is printed to the console.
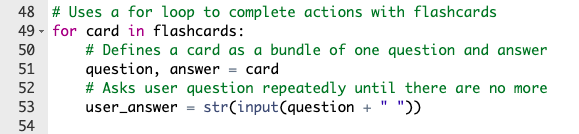
Step 5: Asking the Questions
The portion of code above is the integral for loop that allows the questions that the user previously entered, to be asked back to the console. Line forty-nine is a loop that continues until every card in the set of flashcards has been asked to the user. Line fifty-one explains that one card includes both the question and the answer (a bundle). Line fifty-three asks the question, and the process continues until there are no more questions.
Without the list called “flashcards” and the .append string method from earlier, the computer would not remember each question and answer to be different. It would simply print that latest question and answer that the user entered, overriding each of the previous pieces of information. This is the most integral aspect of the program.
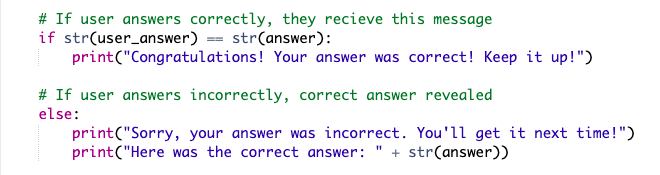
Step 6: Using an if else statement
The above portion of code includes an if else statement that accounts both for if the user answered correctly or incorrectly. If their answer is correct, the message on line fifty-seven is printed to the console, and if it is incorrect, the correct answer and the message on line sixty-one is printed. The rest of the program is simply a message that sends off the user, and concludes the code.
To view the entire code and try the program, click on the following link:
Technology Explorations 10 – Coding Project
To conclude this entry, this was my coding project, and stay updated on my blog for more posts!
Leave a Reply