Introduction
When I started this project, I wanted to challenge myself by rebuilding GPT-2 piece by piece, which I’ve been holding off from doing for a while.
My journey began with micrograd, a tiny automatic differentiation engine (which I’ll explain later). It then escalated into coding a GPT-2 style transformer model, training it on small slices of WikiText and C4, and finally deploying it into a Streamlit app that could answer questions. I saw a clip online on a podcast of a person saying they wish they could have a private chatbot that didn’t have their data sent across the internet, so I set out the goal of creating that.
I did this through adding RAG (retrieval augmented generation) so the chatbot could use my own uploaded notes, which I’ll talk more about later.
This wasn’t easy. Micrograd was deceptively hard, and GPT-2 was even harder. But each step taught me something crucial about how modern AI systems are built, which I believe will really help me going forward.
Micrograd Was Supposed to Be Small
Micrograd looks really simple (or at least it did when I was looking at the repo): just a few dozen lines of Python. But it was one of the hardest parts of this project because it forced me to change the way I thought about math, especially since I’m supposed to assume a college-level calculus to understand it well.
class Value:
    def __init__(self, data, children=()):
        self.data = data
        self.grad = 0
        self._backward = lambda: None
        self._prev = set(children)
This snippet is the core building block of micrograd.
class Value: Each number in your computation isn’t just a number anymore. It’s a node in a graph, or neural network on a larger scale.data: the raw number (like2.5).grad: where the gradient (the derivative of the output in respect to the node) will be stored once you run “backpropagation”._backward: a function placeholder that tells this node how to send its gradient backward to its parents when.backward()is called._prev: the set of “children” (really, the inputs that produced this node). This is what makes the whole thing a graph.
What I learned:
- Graph thinking
- Computations are really a graph where each node tracks how it was created.
- Backpropagation
-
.backward()means gradients flow backward through every operation.
-
- System over calculator
- This system is incredibly efficient, and building it can reap benefits that overshadow any basic calculator.
Extra explanation (micrograd snippet):
- Think of each
Valueas a spreadsheet cell that not only holds a number but also remembers the formula that produced it. - During backprop,
_backwardis set to a tiny function for each operation (add, mul, tanh, etc.) so gradients can be pushed intogradfields of the inputs. _prevlets you traverse the graph in reverse topological order to apply all those tiny_backwardfunctions.
GPT-2 Was Another Level
Micrograd in all of its glory prepared me for JUST THE BASICS. GPT-2 is pushed me into deep water (and a bit into insantity). The architecture looks simple on paper but was full of tricky details that took me a while to grasp.
Attention Was Brutal
Understanding self-attention was the hardest part.
class Head(nn.Module):
    def __init__(self, n_embd, head_size):
        super().__init__()
        self.key = nn.Linear(n_embd, head_size, bias=False)
        self.query = nn.Linear(n_embd, head_size, bias=False)
        self.value = nn.Linear(n_embd, head_size, bias=False)

    def forward(self, x):
        B, T, C = x.shape
        k = self.key(x)
        q = self.query(x)
        wei = q @ k.transpose(-2, -1) * (C ** -0.5)
        wei = torch.softmax(wei, dim=-1)
        v = self.value(x)
        return wei @ v
What I learned:
- Queries, keys, values: queries are “what I’m looking for,” keys are “what I have,” values are “the content.”
- Shapes matter: batch size, sequence length, embedding dim; a single mismatch crashes the model.
- Multi-heads: learn different relationships in parallel.
Code explanation (attention head):
- The head splits the input into three versions:
- Query (Q) = what the token is looking for.
- Key (K) = what the token has to offer.
- Value (V) = the actual info.
- The math compares Qs with Ks to find relevance, then uses those scores to mix together Vs. The output is each token rewritten with context from the others.
Positional Embeddings
Transformers aren’t naturally sequential. Positional embeddings give them a sense of order, which turns out to be foundational.
Code explanation (positional embeddings, conceptually):
- Without positions, the model can’t tell “the dog bit the man” from “the man bit the dog.”
- Positional vectors are added to token embeddings so the model can learn order-sensitive patterns (like bigrams and syntax).
Training Was Such a Freaking Grind
for step in range(max_iters):
    xb, yb = get_batch("train")
    logits, loss = model(xb, yb)
    optimizer.zero_grad()
    loss.backward()
    optimizer.step()
    if step % eval_interval == 0:
        val_loss = estimate_loss("val")
        print(step, loss.item(), val_loss)
What I learned:
- Loss going down feels magical, even when it’s just math.
- Hyperparameters (LR, batch size, dropout) make or break runs.
- Sometimes a single GPU and simpler tooling beat fighting with TPUs.
Code explanation (training loop):
- Grab a batch of inputs/targets.
- Run the model to get predictions and calculate loss.
- Clear old gradients, backprop to compute new ones, and step the optimizer to update weights.
- Every so often, check validation loss to see if the model is learning or overfitting.
From Model to App: LittleGPT
The end result is a Streamlit app that:
- Loads a small HF model locally (e.g., Qwen 0.6B) with device/precision controls and
@st.cache_resource. - Lets you chat and optionally ground answers in your own uploaded notes via embeddings + FAISS RAG.
- Supports quick LoRA fine‑tuning and simple evaluation.
The Heartbeat: Generation
The core generation function uses plain transformers under the hood. It prepares tensors, calls model.generate, and decodes the output:
def generate(
    model,
    tokenizer,
    prompt: str,
    max_new_tokens: int = 128,
    temperature: float = 0.0,
    top_p: float = 0.9,
) -> str:
    """Generate text from a prompt using lightweight decoding defaults."""
    device = next(model.parameters()).device
    inputs = tokenizer(prompt, return_tensors="pt").to(device)
    with torch.no_grad():
        temp = max(float(temperature), 0.0)
        do_sample = temp > 0
        sampling_temp = max(temp, 1e-5) if do_sample else 1.0
        output_ids = model.generate(
            **inputs,
            max_new_tokens=max_new_tokens,
            temperature=sampling_temp,
            top_p=min(max(float(top_p), 0.1), 1.0) if do_sample else 1.0,
            do_sample=do_sample,
            pad_token_id=tokenizer.pad_token_id,
            eos_token_id=tokenizer.eos_token_id,
        )
    generated = tokenizer.decode(output_ids[0], skip_special_tokens=True)
    if generated.startswith(prompt):
        return generated[len(prompt) :].strip()
    return generated.strip()
Code explanation (generation):
- Take the user’s prompt, tokenize it, and feed it to the model.
- If
temperature > 0, the model samples more randomly. Lower = safer, higher = more creative. top_pkeeps sampling only from the most likely words.- The model outputs tokens, we decode them back into text, and strip out the original prompt so only the continuation is shown.
On the chat page, we compose a concise prompt template and call generate with decoding controls sourced from the sidebar:
prompt_template = (
    "You are Littlegpt, Connor's concise assistant. State your identity once at the start of a conversation and only repeat it if the user explicitly asks. Respond in at most four short sentences, without small talk, follow-up questions, or offers of extra help unless requested. Do not use emojis. Use the provided context when it helps.\n\n"
    "### User Instruction:\n{instruction}\n\n### Context:\n{context}\n\n### Answer:".format(
        instruction=prompt.strip(),
        context=input_block.strip(),
    )
)

start_time = time.time()
with st.chat_message("assistant"):
    with st.spinner("Generating response..."):
        raw_response = generate(
            model,
            tokenizer,
            prompt_template,
            max_new_tokens=int(st.session_state.get("max_new_tokens", 128)),
            temperature=float(st.session_state.get("temperature", 0.7)),
            top_p=float(st.session_state.get("top_p", 0.9)),
            top_k=int(st.session_state.get("top_k", 0)) or None,
            repetition_penalty=float(st.session_state.get("repetition_penalty", 1.05)),
            no_repeat_ngram_size=int(st.session_state.get("no_repeat_ngram_size", 3)) or None,
        )
Code explanation (chat page call):
- The app wraps the user’s question and any retrieved context into a prompt template.
- All the generation settings (tokens, temperature, top-p, etc.) come from the sidebar.
- While it runs, Streamlit shows a spinner, then prints the model’s answer with latency.
Retrieval-Augmented Generation (RAG)
Uploads are chunked, embedded with a sentence-transformer, and searched via FAISS (if available). Top‑k snippets are stitched into the prompt.
- Configure and add documents:
@dataclass(frozen=True)
class RAGConfig:
    embed_model: str = "sentence-transformers/all-MiniLM-L6-v2"
    chunk_size: int = 320
    overlap: int = 48
Code explanation (RAGConfig):
- Here is the code simplified:
embed_model: the encoder that turns text into vectors.chunk_size: how big each text piece is.overlap: how much chunks overlap so no meaning is lost across boundaries.
def add_document(self, doc_key: str, name: str, text: str) -> Tuple[int, int]:
    """Add a document if it's not already cached. Returns (chunks_added, total_chunks)."""
    if doc_key in self._documents:
        return 0, self.chunk_count

    chunks = chunk_text(text, max_tokens=self.config.chunk_size, overlap=self.config.overlap)
    if not chunks:
        return 0, self.chunk_count

    embedder = self._embedding_model()
    embeddings = embedder.encode(
        chunks,
        batch_size=min(16, len(chunks)),
        convert_to_numpy=True,
        normalize_embeddings=True,
    )

    embeddings = _normalize(embeddings)

    start_idx = len(self._chunk_texts)
    new_indices = list(range(start_idx, start_idx + len(chunks)))

    self._chunk_texts.extend(chunks)
    self._chunk_sources.extend([name] * len(chunks))
    self._append_embeddings(embeddings)
    self._documents[doc_key] = RAGDocument(name=name, chunk_indices=new_indices)
    return len(chunks), self.chunk_count
Code explanation (add_document):
- Skip files you’ve already added.
- Split text into chunks, embed them, normalize the vectors, and save them with their source name.
- This way the app can later search over them fast.
def search(self, query: str, top_k: int = 3) -> List[Tuple[str, str, float]]:
    if not self._chunk_texts:
        return []

    embedder = self._embedding_model()
    query_embedding = embedder.encode(
        [query], convert_to_numpy=True, normalize_embeddings=True
    )
    query_embedding = _normalize(query_embedding)

    if faiss is not None and self._index is not None:
        scores, indices = self._index.search(query_embedding.astype("float32"), top_k)
        results: List[Tuple[str, str, float]] = []
        if indices is not None and len(indices) and len(indices[0]):
            for idx, score in zip(indices[0], scores[0]):
                if idx is None or idx == -1:
                    continue
                if not (0 <= int(idx) < len(self._chunk_texts)):
                    continue
                j = int(idx)
                results.append((self._chunk_sources[j], self._chunk_texts[j], float(score)))
        return results

    if self._embeddings is None:
        return []

    sims = np.dot(self._embeddings, query_embedding.squeeze(0))
    if sims.ndim == 0:
        sims = np.array([float(sims)])
    top_indices = sims.argsort()[::-1][:top_k]
    return [
        (self._chunk_sources[idx], self._chunk_texts[idx], float(sims[idx]))
        for idx in top_indices
        if sims[idx] > 0
    ]
Code explanation (search):
- Turn the query into a vector and compare it with stored chunks.
- If FAISS is available, use it for speed; otherwise just use dot products.
- Return the best-matching snippets with their sources.
context_chunks: List[tuple[str, str, float]] = []
if rag_store.chunk_count:
    context_chunks = rag_store.search(prompt, top_k=rag_top_k)

conversation_prefix = "\n".join(
    f"{msg['role'].capitalize()}: {msg['content']}"
    for msg in st.session_state.chat_history[-6:-1]
    if msg["role"] != "system"
)

context_sections: List[str] = []
if conversation_prefix:
    context_sections.append("Conversation so far:\n" + conversation_prefix)
if context_chunks:
    joined = "\n\n".join(f"[{src}] {text}" for src, text, _ in context_chunks)
    context_sections.append("Context documents:\n" + joined)
Code explanation (wiring RAG):
- Recent chat history is bundled with the retrieved document snippets.
- They get stitched into a “Context” block that the model sees alongside the user’s instruction.
Under the hood, text chunking uses a simple token-approximate word stride:
def chunk_text(text: str, max_tokens: int = 320, overlap: int = 48) -> List[str]:
    """Split text into overlapping chunks sized ~max_tokens tokens (word-level)."""
    words = text.split()
    if not words:
        return []

    if max_tokens <= 0:
        return [text]

    stride = max(max_tokens - overlap, 1)
    chunks: List[str] = []
    for start in range(0, len(words), stride):
        chunk = " ".join(words[start : start + max_tokens])
        if chunk:
            chunks.append(chunk)
    return chunks
Code explanation (chunking):
- Split the text into word windows of
max_tokens, sliding forward bymax_tokens - overlap. - Overlap makes sure info that straddles boundaries isn’t lost.
Fine‑Tuning with LoRA
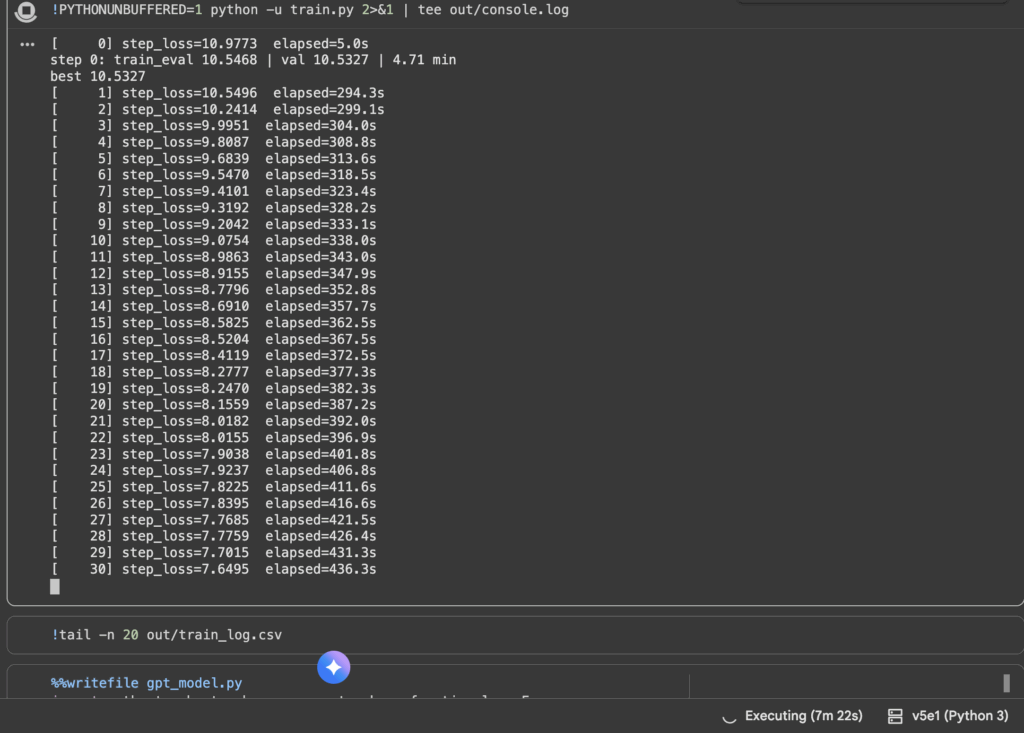
Fine-tuning means taking a pre-trained model (like GPT-2) and teaching it extra patterns on a smaller, domain-specific dataset (like customer support chats, medical notes, or your own writing style). Instead of training from scratch, you “nudge” the model so it adapts quickly to your use-case. Below is an image of me in a Jupyter notebook using a v5e1 (high end Colab GPU) to train GPT-2. The table being printed shows step_loss (how wrong the model was at each step) and elapsed (how long training has run).
- Step 0: Loss was around 10.97.
- By Step 30: Loss has dropped to around 7.64.
That steady downward trend means the model is learning. It’s adjusting weights to better predict tokens from your dataset. The Colab GPU makes this possible in minutes rather than days with something like my laptop.
You can prototype instruction-tuning with LoRA right from the app. The training module prepares a Peft config over common projection layers and uses TRL’s SFTTrainer:
lora_config = LoraConfig(
    r=lora_r,
    lora_alpha=lora_alpha,
    lora_dropout=lora_dropout,
    bias="none",
    task_type="CAUSAL_LM",
    target_modules=[
        "q_proj",
        "k_proj",
        "v_proj",
        "o_proj",
        "gate_proj",
        "down_proj",
        "up_proj",
    ],
)
Code explanation (LoRA config):
- Instead of retraining all weights, LoRA slips in tiny adapters into projection layers.
r(rank): You can think of it as the width of the adapter. Biggerr= more capacity to learn, but also more compute.alpha: A scaling factor that adjusts how much influence the previously mentioned adapters have compared to the now frozen model weights.dropout: Randomly turns off parts of the adapter during training, which prevents the adapters from memorizing the training data and helps them generalize, which is better for model learning.- target_modules: Lists exactly which parts of the transformer get these adapters. In this case, the projection layers (q_proj, k_proj, v_proj, etc.), which is the heart of self-attention.
Training arguments and SFTTrainer setup:
training_args = TrainingArguments(
    output_dir=tmp_dir,
    num_train_epochs=num_train_epochs,
    per_device_train_batch_size=batch_size,
    gradient_accumulation_steps=1,
    warmup_ratio=0.03,
    learning_rate=learning_rate,
    fp16=model.dtype == torch.float16,
    bf16=model.dtype == torch.bfloat16,
    logging_steps=max(1, len(dataset) // max(batch_size, 1)),
    save_strategy="no",
    report_to=[],
)

trainer = SFTTrainer(
    model=model,
    train_dataset=dataset,
    args=training_args,
    peft_config=lora_config,
    tokenizer=tokenizer,
    dataset_text_field="text",
    max_seq_length=max_seq_length,
    packing=False,
)
Code explanation (training args + SFTTrainer):
- Defines how to fine-tune: epochs, batch size, learning rate, precision (fp16/bf16).
- SFTTrainer runs supervised fine-tuning on text, with LoRA activated.
packing=Falsekeeps each training example separate, making it simpler on my end.
Quick Evaluation
A small evaluation loop runs deterministic generations and computes exact match + a simple BLEU proxy:
def _batched_generate(model, tokenizer, prompts: List[str], max_new_tokens: int) -> List[str]:
    device = next(model.parameters()).device
    encoded = tokenizer(prompts, return_tensors="pt", padding=True, truncation=True).to(device)
    outputs = model.generate(
        **encoded,
        max_new_tokens=max_new_tokens,
        pad_token_id=tokenizer.pad_token_id,
        eos_token_id=tokenizer.eos_token_id,
    )
    decoded = tokenizer.batch_decode(outputs, skip_special_tokens=True)
    responses: List[str] = []
    for prompt, text in zip(prompts, decoded):
        if text.startswith(prompt):
            responses.append(text[len(prompt) :].strip())
        else:
            responses.append(text.strip())
    return responses
Code explanation (evaluation generation):
- Batch prompts, generate responses deterministically (no randomness), and clean up the outputs.
- This gives stable, repeatable results for scoring.
Flowchart
How to Read These Flowcharts
The app has three main flows:
- Core Chat Flow – what happens when you open the app, type a prompt, and get an answer (with optional RAG if you’ve uploaded notes).
- LoRA Fine-Tuning Flow (left) – an optional path if you want to add adapters and specialize the model.
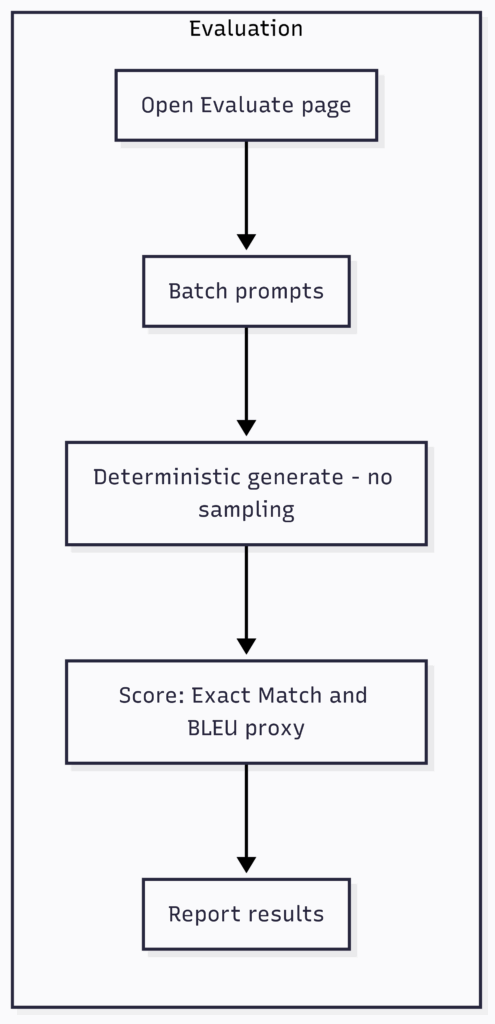
- Evaluation Flow (right) – another optional path for testing the model on batches of prompts and scoring results.
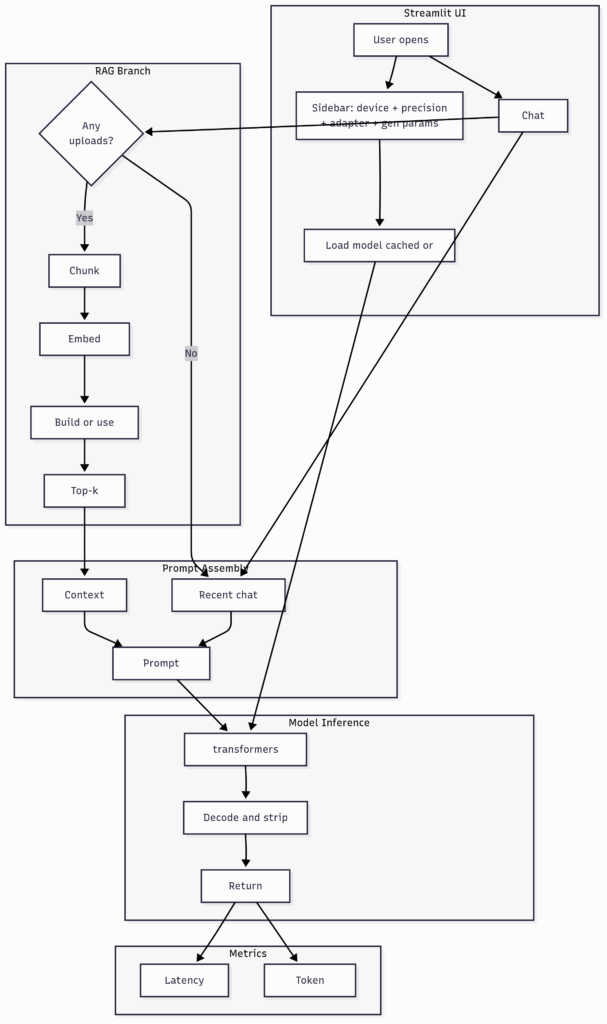

TL;DR
Chat:
Prompt – (optional RAG) – assemble final prompt – generate – decode/return – show latency + tokens.
(LoRA fine-tune and Evaluation are optional side flows.)
Core chat flow
- Open app – Sidebar
Pick device (CPU/MPS/CUDA), precision/quantization, and gen params (max tokens, temperature, top-p). - Load model – Cached base or LoRA adapter
- Chat input – User types prompt
- RAG branch (only if uploads exist)
- Yes – Chunk – Embed – Build/Use FAISS – Top-k search – produce context snippets.
- No – Skip straight to prompt assembly.
- Prompt assembly – Recent chat – Context snippets – Prompt template
- Model inference – transformers.generate – Decode/strip echoed prompt – Return answer
- Metrics – Latency – Token counts
LoRA fine-tuning flow (optional)
Start fine-tune – LoRA config (r, alpha, dropout, targets) – SFTTrainer + TrainingArguments – Train adapters – Save/Load adapter – Model ready for chat
Evaluation flow (optional)
Open Evaluate page – Batch prompts – Deterministic generate (no sampling) – Score (Exact Match + BLEU proxy) – Report results
Ethics, Privacy & Sustainability
When I first built LittleGPT, I thought privacy was something I didn’t need to worry about, since everything ran locally on my laptop. But I realized that good engineering practice is about more than just “does it work for me.” If someone else ran this app, they might upload sensitive files without thinking about how embeddings or indices are stored. That made me stop and think about how to design responsibly, even for a private tool.
The RAG system is private by default. Documents are embedded in memory, and if they’re cached, they sit in a local directory that can be cleared with a single command. Still, I started adding reminders in my write-up that people should avoid uploading files with personal data. If someone adapted this for public hosting, those warnings would be even more important.
I also learned that bias doesn’t go away just because the model is small or running offline. WikiText and C4 are public web datasets, and they contain stereotypes and skewed information. Any model trained on them inherits those patterns. Acknowledging that openly makes the project stronger, not weaker.
The last piece was sustainability. Even a small Colab run uses electricity, and running dozens of experiments adds up. I began calculating the energy draw of my runs and realized that smaller models plus retrieval give you a better balance than just scaling up. That awareness made me more thoughtful about when to train, when to fine-tune, and when to rely on retrieval instead.
Reproducible Evaluation
I wanted my evaluation to be something anyone could repeat. That meant fixing random seeds across Python, NumPy, and PyTorch, and also recording the environment details like which Python and PyTorch versions I was using, whether CUDA or MPS was available, and which model checkpoint I had loaded.
For fairness, I used deterministic decoding: temperature at zero and top-p at one. That meant no random sampling and completely stable outputs. I also froze my validation set so it stayed constant.
The three metrics I tracked were training loss, validation loss, and perplexity. Perplexity is simply exp(cross_entropy), but it feels more intuitive as a number because it tells you how many “guesses” the model is effectively making.
To really see what worked, I also ran a couple of small ablations. Changing the number of attention heads or extending the context length changed performance in ways that were visible in the metrics. Summarizing them in a table gave me a clearer picture than just eyeballing the loss curve.
Example table from my runs:
| Config | Params | Train Loss | Val Loss | Perplexity | Notes |
|---|---|---|---|---|---|
| Base | emb=256, heads=2, layers=4 | … | … | … | baseline |
| Heads = 4 | emb=256, heads=4, layers=4 | … | … | … | more heads |
| Context = 512 | emb=256, heads=2, layers=4 | … | … | … | longer sequences |
Alongside this, I plotted a simple training vs. validation loss curve. It’s one thing to see numbers in a table, but watching the validation curve flatten out while the training loss continues down is the clearest sign of overfitting.
UX Tightening with CLI and Errors
Streamlit gave me a nice web interface, but I wanted something more reproducible and script-friendly. So I built a command-line entry point. Running python -m littlegpt.cli --help shows everything in one place.
Here’s what my --help looked like:
$ python -m littlegpt.cli --help
usage: littlegpt.cli [-h] --prompt PROMPT [--model M] [--device cpu|mps|cuda]
                     [--max_new_tokens N] [--temperature T] [--top_p P]
                     [--rag_index PATH] [--top_k K] [--show_sources]
                     [--seed 42]

Generate text locally with LittleGPT.

optional arguments:
  -h, --help            show this help message and exit
  --prompt PROMPT       Text to continue
  --model M             HF model id or local path (default: Qwen-0.5B)
  --device DEV          cpu|mps|cuda (auto-detects)
  --max_new_tokens N    Max tokens to generate (default: 128)
  --temperature T       0 = deterministic
  --top_p P             nucleus sampling (default: 0.9)
  --rag_index PATH      Optional FAISS index dir
  --top_k K             Retrieval chunks to include (default: 3)
  --show_sources        Print sources under the answer
  --seed S              RNG seed for reproducibility
I also included clear example commands in my post. One shows a fully deterministic run that I used when grading evaluation:
python -m littlegpt.cli --prompt "Explain positional embeddings in two sentences." --temperature 0
And another demonstrates retrieval with citations:
python -m littlegpt.cli --prompt "Summarize my notes on ecosystems." \
  --rag_index ~/.littlegpt/index --top_k 4 --show_sources
Finally, I made sure the CLI spoke in plain English when things went wrong. Instead of PyTorch tracebacks, it now says things like “CUDA not found, falling back to CPU” or “Out of memory at shape [B,T,C], try reducing context length.” Those little touches made it feel much more polished.
How to Run It
Local quickstart:
python -m venv .venv && source .venv/bin/activate
pip install -r littlegpt/requirements.txt
streamlit run littlegpt/app.py
Code explanation (local run):
- Make a Python virtual environment, install requirements, run the Streamlit app.
- It’ll launch on localhost:8501.
Run tests:
pytest -q
Code explanation (tests):
- Run
pytest -qto quickly check if things are working. If it returns no errors you’ll be good. In my experience, it’s typically you not installing proper packages if it doesn’t work.-qruns pytest in quiet mode, great for smoke checks in CI or local validation.
Expose on a remote host during testing:
streamlit run app.py --server.address 0.0.0.0 --server.port 7860
Code explanation (expose app):
- Running with
--server.address 0.0.0.0makes the app visible from outside your machine, as long as the port is open.
Deploying on Hugging Face Spaces (Single Streamlit Space)
Follow the built-in guidance:
huggingface-cli repo create <org>/<space-name> --type=space --sdk=streamlit
Code explanation (HF Spaces):
- Create a new Space with Streamlit SDK, push your (which is really mine!) repo (with requirements.txt and app.py).
- Spaces automatically runs the app online.
Copy this repository into the Space (or push via Git) ensuring requirements.txt, app.py, and the pages/ directory are included.3
What I Learned Building the App
I didn’t expect hardware details like device choice and precision to matter as much as they did. Early on I thought, “just run it wherever it works,” but the difference between CPU, MPS, and CUDA was night and day, not just in speed, but in how usable the app felt. Even applying quantization past just like what I’ve seen online (INT8 on CPU, 4-bit on CUDA) was a lesson on raw power vs. speed.
I also came away with a new respect for small models combined with retrieval. A 600M-parameter checkpoint on its own feels underwhelming, but once you give it the right snippets of context, it suddenly becomes sharp, even “smart” in ways that surprised me. That changed my view of model size, and I now feel like this is something I could use daily while maintaining privacy.
On the practical side, I learned how important caching is for user experience. Streamlit’s @st.cache_resource was something I added almost as an afterthought, but without it the app felt sluggish and pretty brittle. With it, everything kinda clicked. Loading a model once and serving it repeatedly made the app feel polished during my testing. I even added a “pre-warm model cache” as the app boots up, which while inconspicous to the user greatly helps with speeds.
Finally, I found myself obsessing over the small UX details. A tight prompt template. Stripping out small talk. Keeping responses short and to the point. Showing latency and token counts in the corner
(at one point, it gave me response like “Hi, I’m littlegpt. Hi! I’m littlegpt…, this would go on for hundreds of lines).
Looking back, the lesson I learned was that the work and learning is really in the small details. I could have never done GPT-2 if I hadn’t perfected micrograd, as tedious as that was. Overall, I learned to really slow down, test every aspect of my learning, and feel confident with it. Only then would I move on.
Credits
- micrograd and nanoGPT (Andrej Karpathy) for inspiration.
- Hugging Face
transformers,datasets,peft,trl. - sentence-transformers and FAISS for retrieval.
- Streamlit for simple deployment.
demo video
Code
https://github.com/cwklurks/littlegpt
AI Usage:
https://chatgpt.com/share/68d34220-e990-8010-8955-0e733c2cbec5
https://chatgpt.com/c/68d1db4d-410c-832e-bbb7-7db7eb4f1ff6
Leave a Reply