In this post, I will focus on recording my progress, my design choices and challenges, and the next steps of my Personal Project.
Problem Definition
Many second-generation immigrants experience challenges when communicating with their grandparents and relatives as they often do not fluently speak a common language. For example, a grandson who speaks limited Chinese and grandparents who do not speak English may only be able to talk about simple topics, such as greetings or daily routines, and rarely engage in meaningful conversations.
Existing Solutions
There have been many available products with some form of speech translation, such as smartphone apps, earbuds, and portable devices. These products are broadly used for travelling, multilingual conferences, customer service, and education. They are developed to support general situations.
My Idea
However, these products are mostly focused towards having something that can just simply translate across languages. My project will focus more on having flowing, meaningful conversations across language barriers. Specifically, it will have two core features: a fast, streamlined translator, and a personalized voice. It currently uses a three model pipeline with an Automatic Speech Recognition (ASR) model, a Machine Translation (MT) model, and a Text-To-Speech (TTS) Model.
My Progress
Since my last post on Feb 19, I have made smooth progress as planned. I finished the first stage (testing models) and the second stage (collecting data).
For the first stage, I put together a pipeline using three models and test it on online data:
OpenAI’s Whisper – To convert from voice to text
Facebook’s M2M100 – To translate text to different languages
Qwen’s Qwen3 TTS – To speak out the translated text.
In the next stage, I used a script between a grandson and his grandparents to test my pipeline. It was made of 100 conversation-like sentences in both English and Chinese. This data is more similar to how this project will be used, so it is more realistic than online data. I recorded the English copy, and asked my mother to read the Chinese one. The pipeline did well enough, so I moved to the next stage.
I am still working on the third stage: implementing the core features. I have worked on a threading feature to parallelize the models. So far, it has only been implemented on one of the three models. I am nearly finished with the personalized voice feature. I have included personalized voice into the text-to-speech component, and it works well to clone my voice, even across languages. One of my tests used a few seconds of only-English baseline, and was able to imitate my voice speaking Chinese.
My Spoken English (Baseline)
AI Generated Chinese
My Spoken Chinese (Comparison)
Note: The generated speech was made from ONLY the Text-To-Speech model, not the full pipeline.
Challenges So Far
During my testing, I found that my ASR model, Whisper, kept returning the same phrases over and over when translating Chinese Audio. To fix this problem, I can either debug and try to fix this repetition glitch, or use a different ASR model.
Design Choices
I have decided to try using a different ASR model. This choice also allows me to try a different pipeline approach. Rather than using three models for each step, I can find a single model that can do the first two steps. I have found two models so far that fit this: Meta’s SeamlessM4T, and IBM’s Granite 4.0. Each has their own advantages which can be viewed in “AI-Transcript-2.pdf” below. I will first be using IBM’s Granite as it is faster, less memory intensive, and usually has less errors. One of its primary disadvantages is it cannot translate any two supported languages, but must be translating from or to English. However, this is not a problem for now, as I am primarily using the English-Chinese pivot.
Future Challenges
A challenge I think I will face soon is speed. In my testing, the ASR model was quite fast, and only needed 1 second of processing for every 5 seconds of audio. However, the TTS model has been very slow, taking upwards of 17 seconds just to generate 2 to 3 seconds of speech. Although I am planning on implementing threading to parallelize the models, this cannot fix the core issue because a single TTS pass will already take 17 seconds and will interrupt the flow of the conversation.
Next Steps
To finish my third stage, I need to first flush out my implementation of voice cloning within the whole pipeline. I also need to finish the streamlined pipeline. After finishing, I should have a working pipeline that takes in a constant stream of audio, and returns a constant stream of translated speech. I plan to finish this by April 13th. During spring break (March 14th to 28th), I will be busy with a Band Tour, so I really only have 2 weeks to finish these two steps. I think I am pretty close to finishing, so this should be enough time.
AI Transparency Statement
I am also using AI to aid in my programming process. In particular, I am using Claude to help debug errors, and find specific python libraries or methods that can be useful for my specific need. For example, it showed me how to use the "decode_example" method of the "Audio" class to load audio from a file and cast it to a custom sampling_rate.
In addition, I have also used Claude’s wide knowledge to compare AI models before I use them.
Many second-generation immigrants experience challenges when communicating with their grandparents and relatives as they often do not fluently speak a common language. For example, a grandson who speaks limited Chinese and grandparents who do not speak English may only be able to talk about simple topics, such as greetings or daily routines, and rarely engage in meaningful conversations.
My Idea
This project began from my experience as a second-generation immigrant and the challenges I faced when talking with my grandparents. I found it difficult to translate my thoughts to Chinese, and couldn’t understand many of the things that they were saying.
My idea is to use AI to create an app that can translate my speech in real-time, while mimicking my voice. Given the time constraints, the final product will likely be software running on a laptop rather than on a phone. The prototype will need to recognize speech input, translate between English and Chinese, and deliver output as quickly as possible while using personalized voices for each speaker.
Target Users
This project is designed to facilitate intergenerational communication. It can be useful for immigrant families. More broadly, it can be used among friends and any close relationships with language barriers to strengthen their bonds to bring them closer.
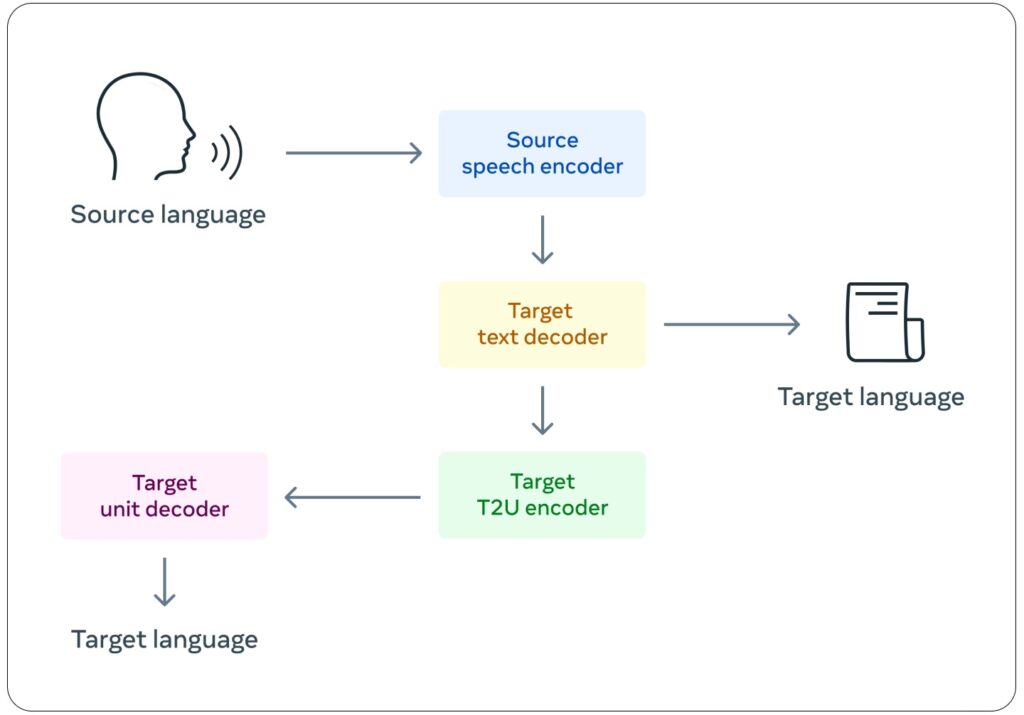
There have been many available products with some form of speech translation, such as smartphone apps, earbuds, and portable devices. These products are broadly used for travelling, multilingual conferences, customer service, and education. They are developed to support general situations. Most of these current products use a 3-model pipeline* and are designed for broader public use. So they have common limitations in generating personalized human voice and real-time translation. More specifically:
Cascading delays prevent real-time translation as each model adds a delay.
Errors will propagate across models. If one of the models has an error, that error will pass and grow through the layers.
It is hard to preserve the emotions and expressions across the conversion from audio to text and back to audio, especially across different languages.
3-Model Pipeline:
ASR – Automatic Speech Recognition to transcribe speech to text
Open AI’s Whisper
Meta’s Wave2Vec2
Qwen3 ASR
LLM – Large Language Model to translate text
Google Neural Machine Translation
Meta’s M2M-100 and No Language Left Behind (NLLB)
TTS – Text-to-speech to speak the translation.
Microsoft’s Azure Neural TTS
Meta’s SeamlessExpressive
Qwen3 TTS
There are newer models that are end-to-end speech translation models. Rather than having 3 separate models, these models directly translate from audio input to audio output without any middle steps or models. This will improve the time delay of the translation, but the main downsides are its massive size and the large amount of data required to train or fine-tune it.
My Solution
My solution is meant to add onto and improve the existing 3 model pipeline. Luckily, there are many open-source and free models online for Automatic Speech Recognition (ASR), translation, and text-to-speech (TTS). I will start-off with pretrained models, then I can fine-tune them and adjust the pipeline as necessary to achieve the following goals:
Be able to respond in parallel with input speech. For example, if I were to talk for 10 seconds, rather than waiting for me to finish talking, it would immediately begin to process my speech, and start outputting translated speech while I am still talking.
Have a personalized TTS model that can mimic the speech of the person who is actually speaking, even across languages, so it feels more personalized and like two people in an actual conversation.
Task Schedule
Stage 1: Create and test a simple pre-trained 3-model pipeline. (Deadline: February 26th, 2026)
Setup in Google Colab
Use pre-trained Hugging Face models
Test the 3 models together in the pipeline
ASR model
LLM Translation model
TTS model
Stage 2: Collect Data (Deadline: March 7th, 2026)
Speech data with transcription
Record in English and Chinese
Fed into both ASR and TTS models for fine-tuning
Language translation data
Optional as the pre-trained model may already be good enough
Focus on more day-to-day and colloquial language.
Stage 3: Fine-tune model and adjust pipeline (Deadline: April 13th, 2026)
Fine-tune the small details of the 3 models
Add improvement features
Parallel translation
Personalized voice
Stage 4: Finish first demo (Deadline: April 17th, 2026)
Testable demo for testers (approximately 6 to 8 people)
Use fine-tuned and adjusted models.
Implement easy-to-use speech input
Implement output speech from speaker
Design user-friendly UI and UX
Design a google form for testing feedback.
Stage 5: Test Demo (Deadline: April 23th, 2026)
Share demo with testers
Receive feedback for the demo
Stage 6: Post-test optimization (Deadline: April 30th, 2026)
This assignment is to design a vehicle for a planet – our potential future home. This is the second half of the Planetary Exploration Project (PEP).
In the first half, our group conducted research on the planet Proxima Centauri B and learned that the planet potentially has similar conditions as the Earth but with a lot of unique and uncertain conditions. We made several assumptions based on our collected data to inform our vehicle design, including a rough, rocky surface, thinner atmosphere, stronger gravity, and hush radiation.
The second half of this project is to build a prototype of the vehicle, test how the prototype works to address these assumed conditions and identify the limitations and future work.
We spent two months and went through many stages to land on some preliminary outcomes. This report documents the stages and associated work we have done up to this point.
STAGE 1: Identify the Problem (1-2 Weeks)
Since we are building and testing our vehicle our school campus, we cannot mimic the conditions of a thinner atmosphere, greater gravity, and severer radiation, like on Proxima Centauri B, we focus our problem on:
Building a strong and efficient vehicle to consistently and safely travel a 10 km round trip on uneven, rocky terrain with inclines.
STAGE 2: Design Prototype (2-3 Weeks)
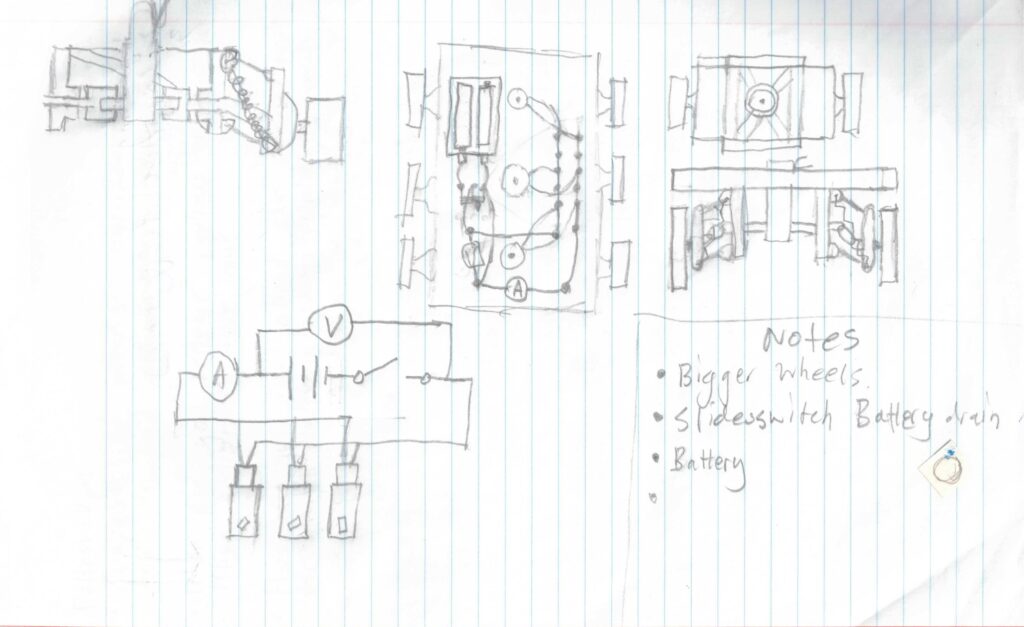
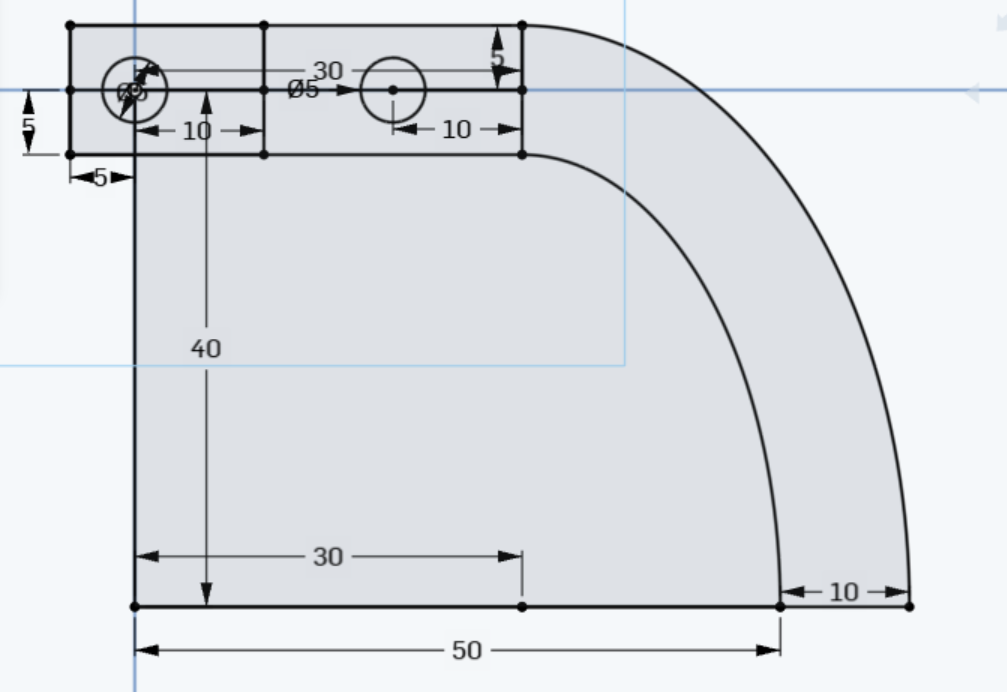
Design Sketches
It started with sketches to think through design ideas and plan the steps.
My Handdrawn Sketches
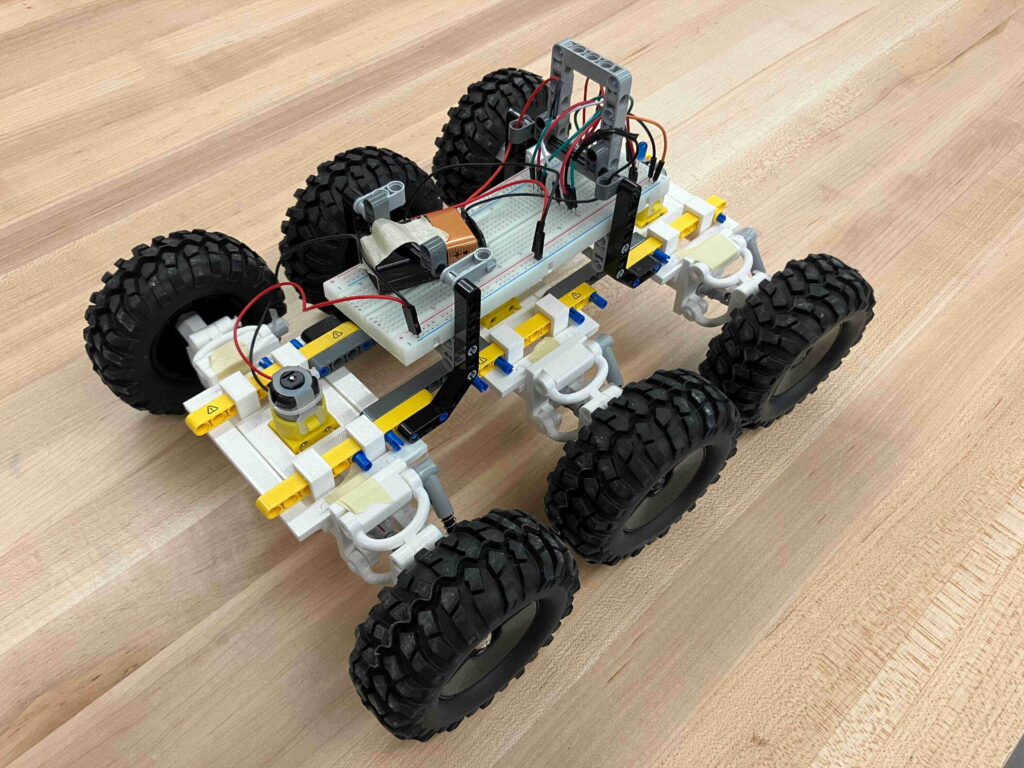
Design Overview
The prototype is a six-wheeled vehicle driven by three motors. It is approximately 320 mm long and 230 mm wide. It includes three modules that are connected together firmly to form the base plane of the vehicle. The electrics and batteries are placed centrally on the top of the base plane. The vehicle casing is not considered the most relevant factor for this defined problem and is therefore not included in this project. It should be addressed in future design development, particularly when considering issues related to radiation and thermal management.
Key Design Features
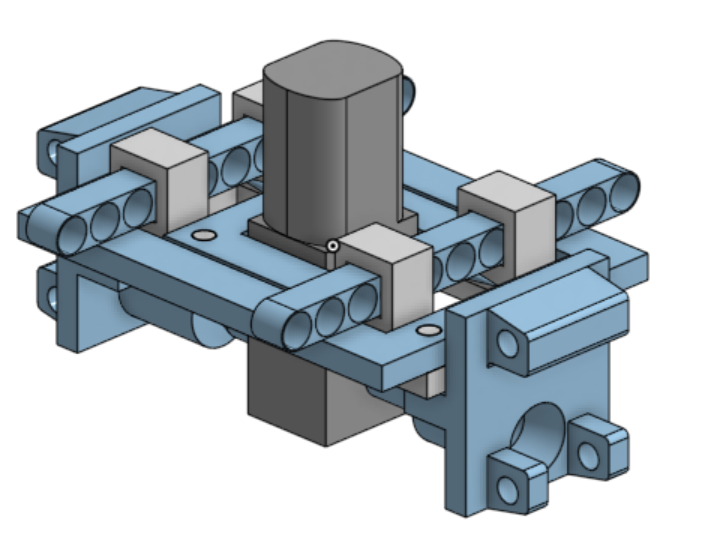
Modular Design
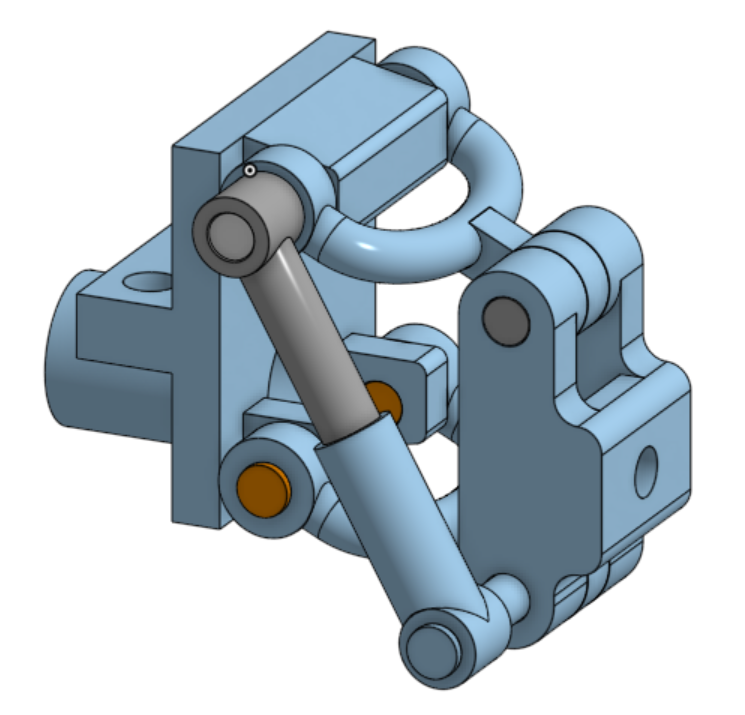
We chose a three modules design because this would save three motors and reduce the overall vehicle weight. Each module includes a dual-shaft motor, a pair of independent suspension systems, double-universal joints, and wheels.
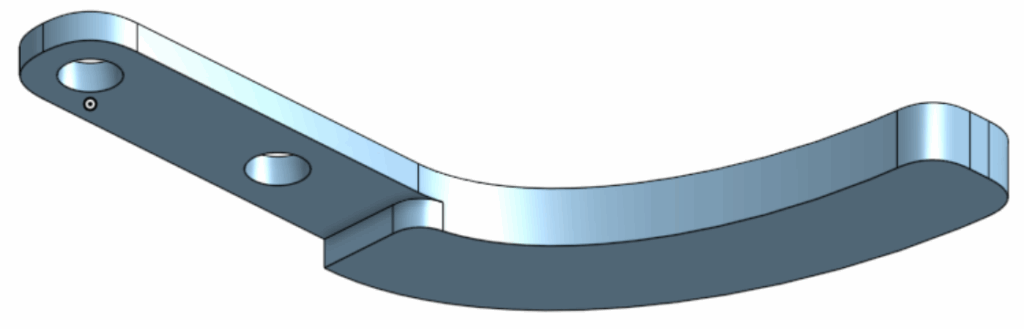
Single Module CAD
Suspension System
A core feature is the suspension system, which allows for each wheel to adapt to different elevations while keeping the base stable. It is based on a double wishbone design. It consists of a spring, a frame, two couplers, a wheel holder, and a space for a double universal joint. The frame, couplers, and wheel holder form a four-bar linkage that ensures the wheel stays upright while still being able to move up and down. The spring adjusts the height of the wheels at different elevations.
Universal Joint
The universal joint is an essential component that connects the dual-shaft motor and wheels to ensure that they can still spin at any height.
Design Electronics
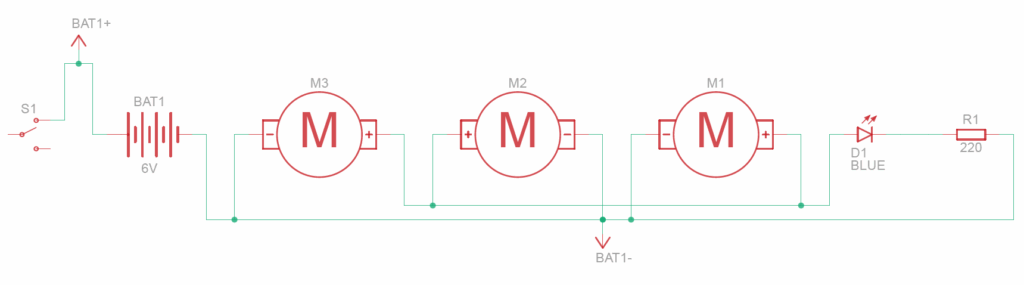
The electronics are placed down the center of the vehicle to organize the wires and keep the vehicle balanced. The electronics consist of the motors, a battery, a breadboard, a slide switch, a LED, a resistor, and a lot of wires. The circuit connects the battery to the motors. The slide switch controls the on or off of the motor, and the LED signals when the motor is on.
The circuit was adjusted to fit better on the breadboard when making the physical prototype.
Additionally, in order to make measuring voltage and current easier during the testing, we specifically designed the circuit with this in mind.
The circuit originally had a direct connection from the positive end of the battery to the slideswitch. For the voltage, we added some wires in parrellel to the original wire. This allowed us to easily attach a voltmeter to these new wires, without disturbing the original wire. For the current, we split the original wire into two in-series wires. This allowed us to easily disconnect the wires and attach an ammeter in-between them to measure current.
Schematic
Circuit
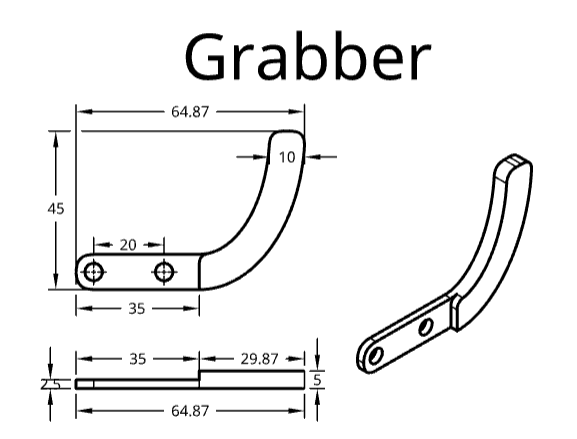
Prepare Materials
Bill of Materials
Material
Type
Amount
Lower Body – Motor Holder
3D printed
3
Lower Body – Motor Adaptor
3D printed
6
Lower Body – Wheel Adaptor
3D printed
6
Lower Body – Plate
3D printed
3
Upper Body – Plate
3D printed
6
Suspension – Center Half
3D printed
6
Suspension – Wishbone
3D printed
12
Suspension – Axle Holder
3D printed
6
Axle – 10mm, Round, Endcap
3D printed
12
Axle – 20mm, Round, Endcap
3D printed
6
Axle – 35mm, Round, Endcap
3D printed
6
Axle – 43mm, Round, Endcap
3D printed
6
Breadboard
Electronics
1
9V Battery
Electronics
1
9V Battery Head
Electronics
1
Blue LED
Electronics
1
Slideswitch
Electronics
1
Resistor (220Ω)
Electronics
1
Hobby Gearmotor
Electronics
3
Wires (Male to Male)
Electronics
8
Toothpick
Other
6
Wheels
Other
6
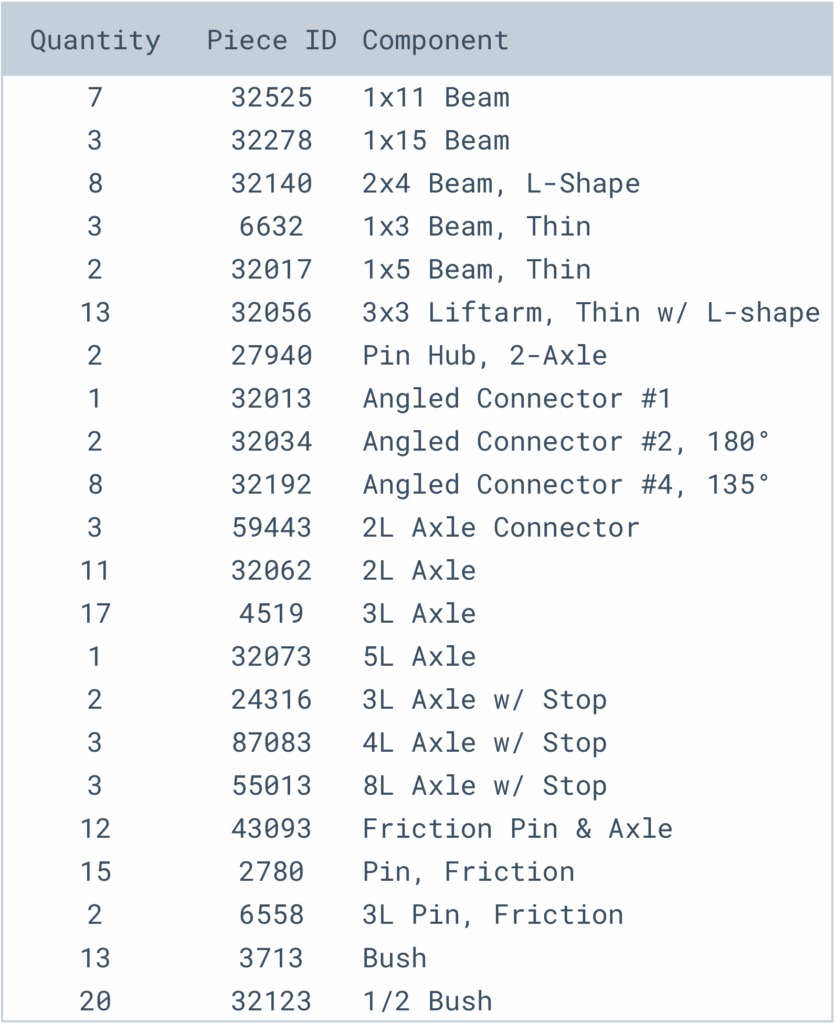
Technic – Universal Joints
LEGO
12
Technic – Springs / Shock Absorber
LEGO
6
Technic – Spacer / Bush
LEGO
8
Technic – Beams
LEGO
22
Technic – Axle
LEGO
8
Technic – Pin
LEGO
24
STAGE 3: Build the Prototype (3 Weeks)
Final Prototype Assembly
Learn from Failures
Printing Tolerance
When designing the parts in Onshape they could fit perfectly together, but when printing parts that needed to mesh together, I needed some tolerance. Getting the right tolerance took a bit of trial and error. I found that for circular connections, 5 mm diameter for the hole and 4.75 mm for the axle worked well.
Printing Precision
Although CAD design can have really small dimensions and high precision, the physical products from 3D-printing did not perform as expected and were constrained by the resolution of my equipment. For example, the complicated universal joint mechanism could not be printed to a degree that it could handle the strengths of the motor. In the end, we used lego universal joints.
Wheel Size
During assembly, the wheel size was not big enough. The first prototype’s wheels had a diameter of 60mm. They were small and the vehicle base sometimes hit the floor. The new wheels are 95 mm wide and are just big enough to run on uneven terrain with small clearance.
Material Strength
When I assembled the car, a few 3D pieces were broken easily. I found the reason is that the layered 3D printing makes the piece relatively weak vertically between layers, so I re-oriented the 3D pieces to print some stress points horizontally and it fixed the problems.
STAGE 4: Test the Prototype (2 Weeks)
Purpose of Test
We tested the prototype to answer the following questions:
How well does the suspension system work on uneven terrain?
Does it perform as expected?
What is the efficiency of the prototype?
Does it help to estimate the needed energy for a 10km round trip on the planet?
Therefore, we conducted three separate tests:
The suspension test
The distance efficiency test
The energy efficiency test
Suspension Test
The suspension test is qualitative and is meant to gauge how well the suspension engages with the uneven, rocky terrain while stabilizing the ride. With the suspension system, the wheels are expected to land on different elevations independently.
Since the size of wheels is critical to the outcome of the test, we conducted comparison tests with two sizes of wheels 60mm and 95 mm.
While they were tested on different slopes and surface conditions, they both demonstrated good suspension performance with the ability to consistently engage with the uneven surface and remain stable.
Suspension Test with 60mm wheels:
Suspension Test with 95mm wheels:
Distance Efficiency Test
Formulas
Distance efficiency is a measure of how much energy is needed to travel a certain distance, calculated by the formula:
is distance efficiency. is the distance. is the consumed energy, which is the product of battery voltage, current, and the time spent ().
Test Design
We design two types of terrain, flat and incline, to test the baseline of distance efficiency with the flat scenario and a challenging situation with the incline scenario.
Data Collection and Calculation
Distance
Voltage
Current
0.65 m
6.15 V
5.40 A
Flat Test (Base Scenario)
Time – Test 1
Time – Test 2
Time – Test 3
1.075 s
1.059 s
1.075 s
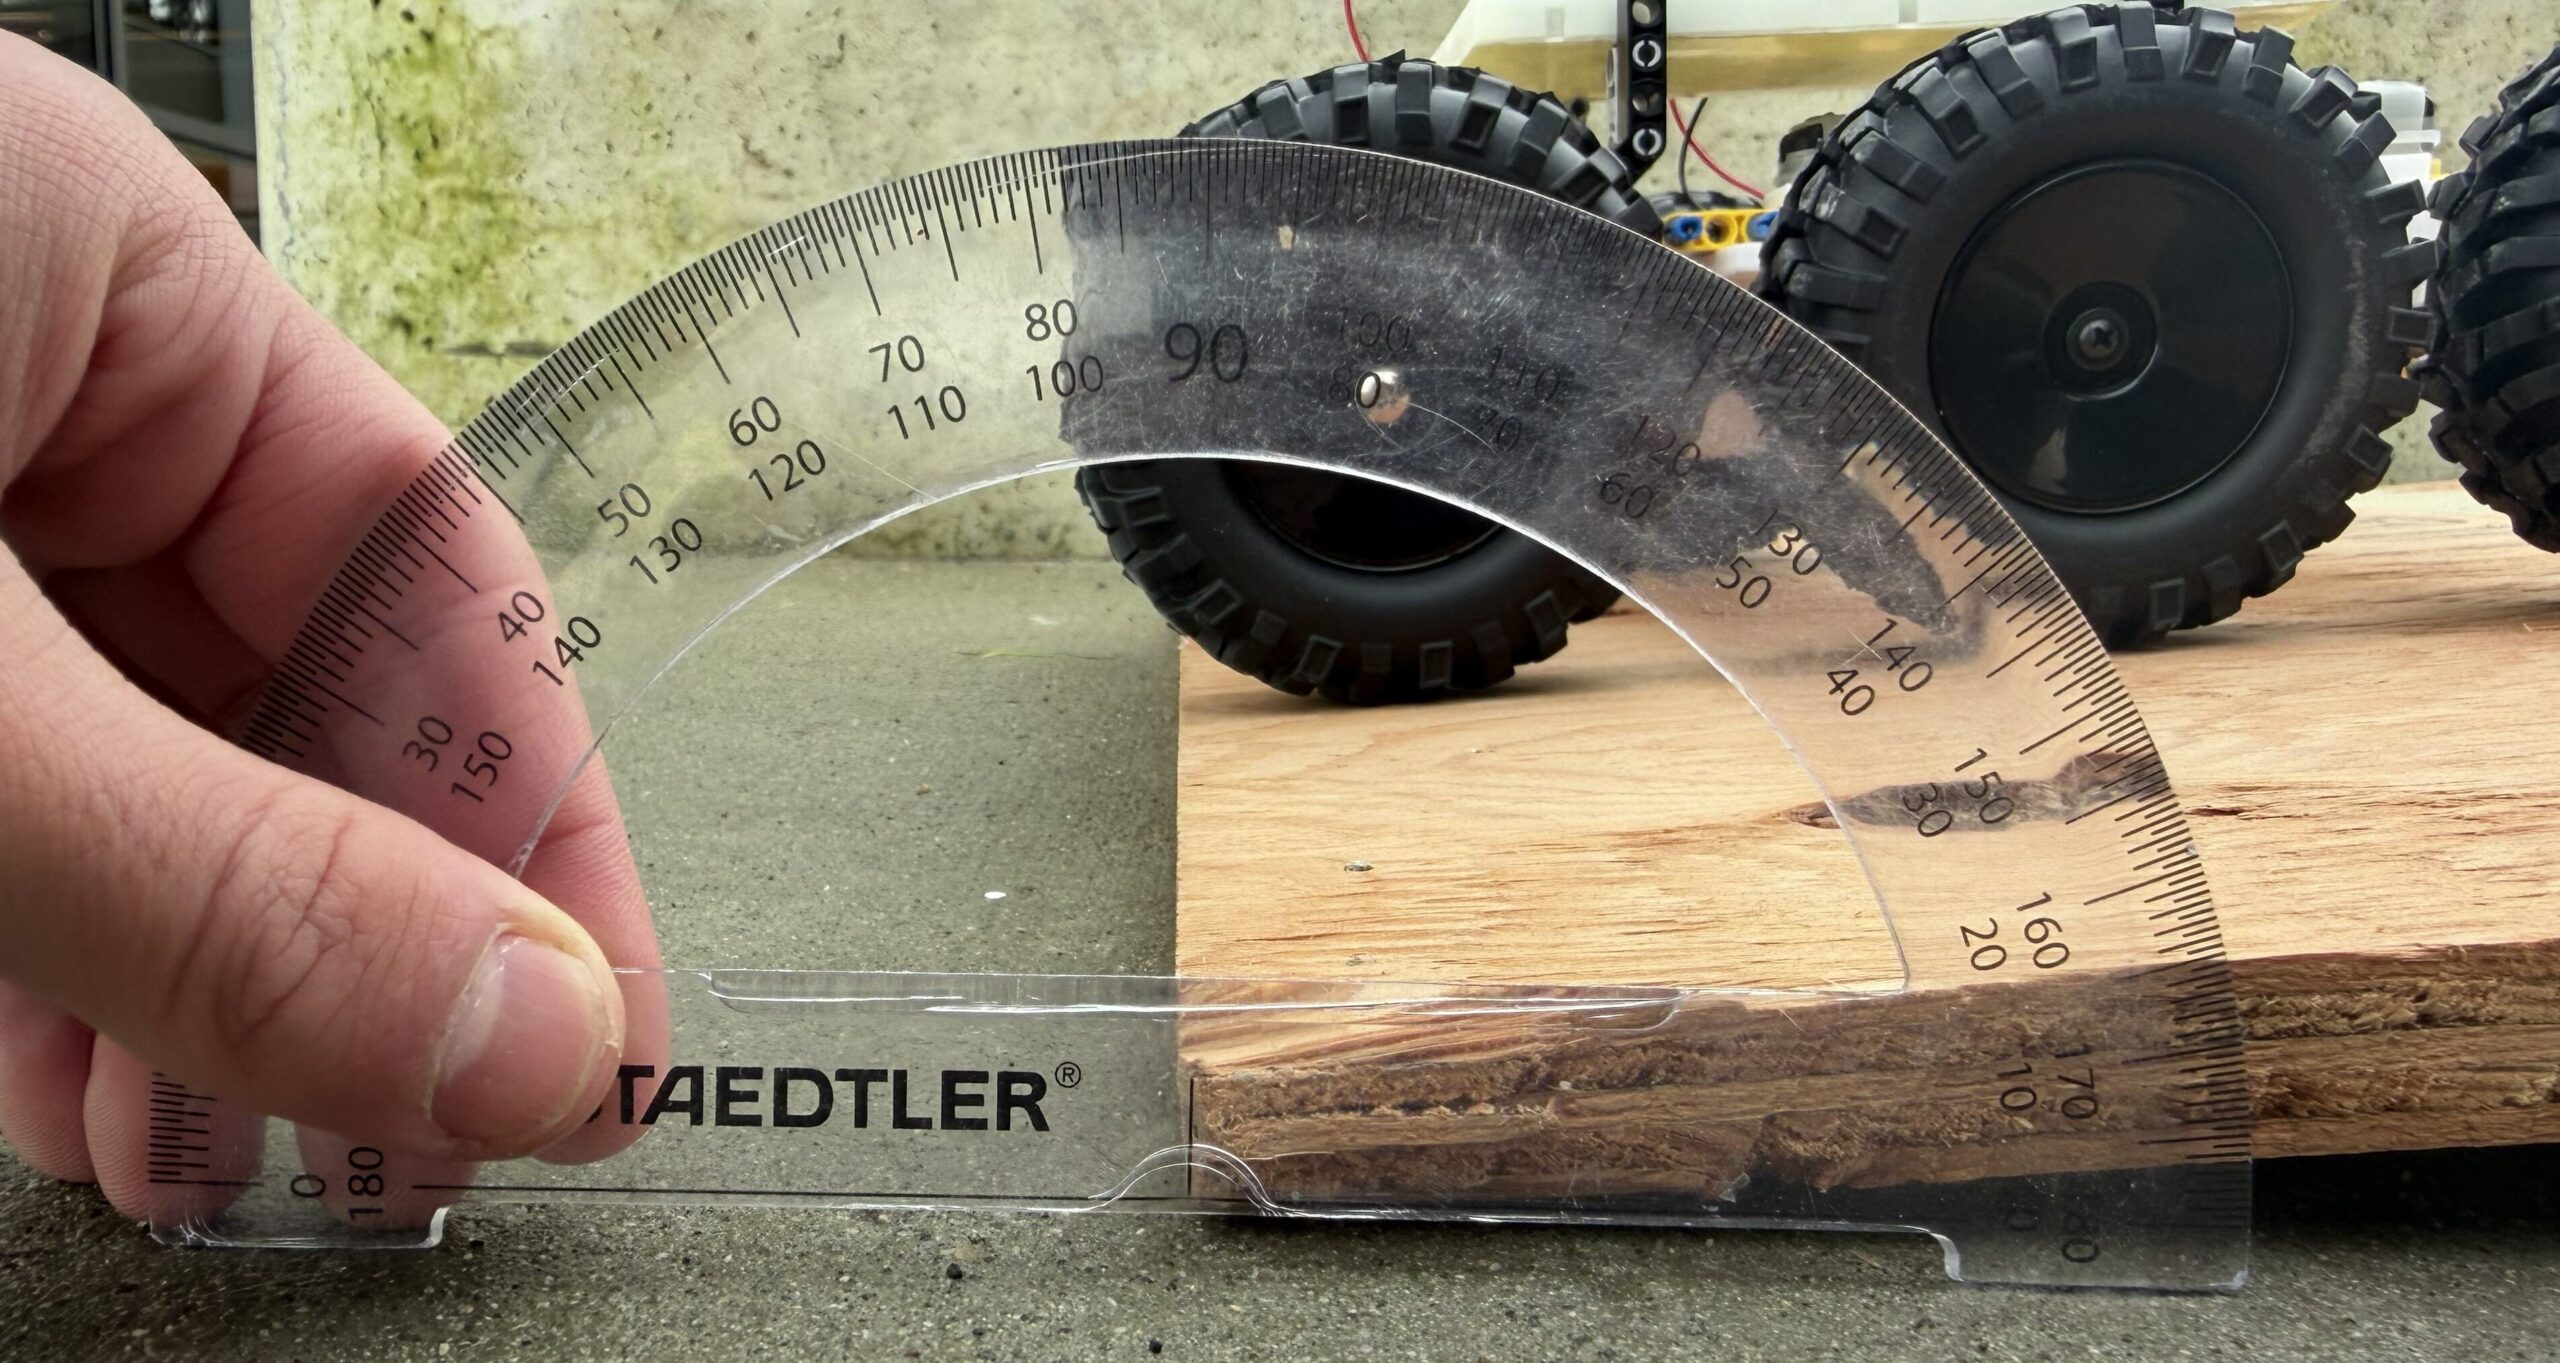
Small Incline Test (Challenging Scenario)
This incline had a 7.4cm rise and waa 6.5 degrees from the horizontal.
Time – Test 1
Time – Test 2
Time – Test 3
Time – Test 4
Time – Test 5
1.692 s
1.742 s
1.601 s
1.559 s
1.592 s
We can get how much extra energy the incline scenario needed by:
Analysis and Conclusion
As expected, the tests indicate that more energy is required for an incline situation. However, the 53% increase in energy consumption for climbing a small hill suggests that the prototype is highly inefficient, or that the tests contained errors and should be improved—for example, by testing over a longer distance and measuring voltage and current in each trial. In addition, a decline scenario should be tested as part of future work to better understand energy consumption across various situations.
Energy Efficiency Test
Formulas
Energy efficiency is a measure of the ratio of the gained gravitational potential energy from a certain extra energy the motor uses, calculated by the formula:
m is the mass of the vehicle. g is the gravitational field strength. Δh is the height change. uses the formula from distance efficiency.
Test Design
Initially, I was challenged by how to calculate energy in and out, because based on what we learned in science class, the would always be zero in the flat case. This would imply zero efficiency which does not make sense to this test.
The idea is to use the flat case as a baseline and test the energy efficiency on an incline terrain (Δh=7.4cm). This gives us how much extra energy it uses () to gain height. We can calculate the potential energy () of the height increase. The percentage of the potential energy and used energy will indicate the energy efficiency.
Data Collection and Calculation
Uses the same data as Distance Efficiency.
Analysis and Conclusion
This data means that it takes 100J just to gain 3.6J of gravitational potential energy. Again, this result indicates that the prototype is very inefficient, or there are test errors. This reflects the same conclusion of the distant efficiency test.
Friction was one of the biggest factors of this low efficiency. Energy is lost throughout the many layers in the system. The initial electrical energy is transferred into the motor and through its gearbox to become rotational motion. This rotational motion goes through many axles and the universal joints, to get to the wheels.
STAGE 5: Implications on Proxima Centauri B
I will now extend our findings of Distant Efficiency to estimate how much energy is needed for a 10km round trip for a larger vehicle on Proxima Centauri B.
Firstly, I need a rough model of the large vehicle. I will assume that the vehicle will be ~10 times bigger. I will estimate the large mass .
Scenario One: If the surface is roughly flat, the stronger gravity will have no effect on it. So, the estimation of distance efficiency is:
Scenario Two: if the surface contains one-third of flat, one-third of small incline, and one-third of decline, and in the worst case scenario, the decline distance efficiency is the same as the flat. I also had to consider the impact of increased gravity (1.3 times of earth gravity) on the distant efficiency of incline case.
Assume it is proportional to the increased gravity, so
So, the estimation of distance efficiency is:
The energy needed to travel the 10km round trip on this mix terrain is:
According to my research, 1 kg of battery is required for every 150 Wh of energy. The required battery mass is 1300kg. This is significantly heavier that the vehicle already and it does not consider the increase in total mass caused by the battery. The real battery would have to be even bigger.
We are assuming that Proxima Centauri B has a thinner atmosphere. This would decrease air resistance; however, we didn’t consider this factor for two reasons. Firstly, the prototype doesn’t have an outer case and is very open. The real vehicle would definitely have an outer shell to protect the passengers, so the air resistance would be larger. It would be to complex to model the air resistance along with the thinner atmosphere, so we simplified the model to assume similar effects of air resistance. Secondly, the real vehicle is not designed to go fast on uneven, rough terrain. Air resistance would not effect efficiency a lot at relatively low speeds.
In the future, the work should focus on the development of far more efficient vehicle designs and lighter, higher-efficiency energy sources.
Conclusion
I enjoyed this project, especially the design and build stages. However, the result was not quite as I expected. I believe I could learn more and improve the design further with more time for testing. All of the “failures” during this learning experience have taught me that engineering design is rarely straightforward and often requires forward thinking, extensive trial and error, and working within practical constraints.
If I were to continue working on this project, I would consider the following improvements.
Design Stage
Stronger Prototype Materials – 3D printed parts have limitations in strength, precision, and connection. Some of these have already been detailed in this report. Primarily, the parts kept falling off during testing, and the prototype wasn’t very durable. These significantly affected test consistency and performance. Next time, I may want to experiment with using metal.
More Power – I originally started with a 4.5V battery and it really limited the prototype’s ability on inclines. I switched to a 9V battery and its performance signifcantly improved. However, it still struggles on a little steep slopes. I may want to use higher voltages in the future to counteract this, but this may raise some safety issues.
Less Friction – Friction was a major contributor to the low efficiency. This could be done by adding bearings or lubrication, or simplifying the system and the number of layers.
Testing Stage
Reduce Test Errors – The such low efficiency in the Analysis stage may be due slightly to testing errors. I would adjust these tests by:
Testing over a longer incline, hopefully 5 seconds or more.
Constantly measuring current during the incline, rather than at the beginning and end of the tests.
More repetitions of tests.
Testing more different angles of incline, including declines.
Adding gravel and rough terrain to the incline tests as well.
Deeper Suspension Testing – The original suspension tests were very simple and uninformative. It would be better to have multiple parameters to change and compare, such as wheel size, spring stiffness, and suspension range. Additionally, I would test multiple different terrains, including a much more chaotic and bumpy one, to test the limits and advantages of my suspension.
AI Transcript:
I used AI to check the energy density of the optimal electric batteries.
This blog will report my research on the Habitability of our closest exoplanet – Proxima Centauri B – and its potential challenges. This will inform my next steps to explore potential devices for humans who wish to survive there.
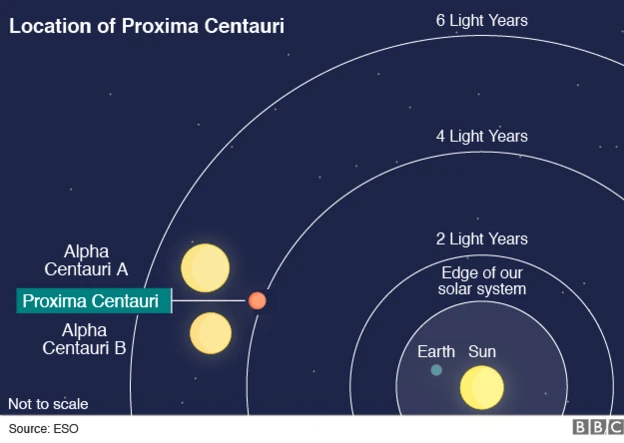
Our Closest Solar Neighbour
Proxima Centauri is the nearest star to us. It is still far to travel there, but we are in a hope of advanced technology of space vehicle to make it happen.
>> Discovery
Robert T. A. Innes (1917) discovered Proxima Centauri. He used photographic astrometry to estimate the distance (4 light-years) and gave the name “Proxima” to the star, meaning “nearest in Latin”.
>> Mass Estimation
According to the data used by Anglada-Escudé et al. (2016), Proxima Centauri has an estimated mass of only 0.120±0.015 times that of the Sun, a radius of 0.140±0.012 times that of the Sun and an effective temperature of 3050±100 K. It is among the smallest main sequence stars known with a mass only about a third again more than the least massive normal star theoretically possible.
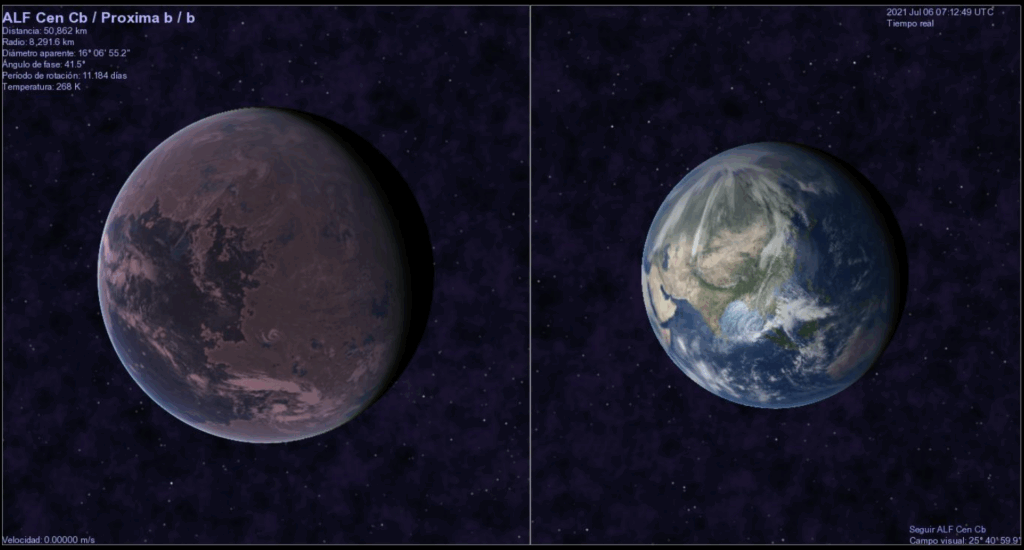
Potential Earth-Like Planet
Piquito veloz´s screenshot – This image was created with Celestia. Proxima Cen b texture by NASA/JPL-Caltech/MIT (2020) (license). Earth texture by NASA Blue Marble (2002) (license) Default cloud map in Celestia. Purple background is an adapted version since the Planck’s Cosmic Microwave Background Map (2015 alt. color scheme) (license).
Proxima Centauri B is the closest planet to Proxima Centauri.
>> Discovery and Distance
Proxima Centauri B was found using Radial Velocity (Anglada-Escudé et al.,2016). Radial Velocity also gives us the Orbital Period, Minimum Mass, Eccentricity, and the Semi-Major Axis.
Orbital distance: 0.05 AU (5% of the Earth-Sun distance)
Orbital period: 11.2 days
Multiple independent telescope datasets confirm the same orbit.
Proxima Centauri B is similar in size and mass to our home planet – Earth, which may signal Earth-like physical conditions that are suitable for human living.
>> Mass Estimation – minimum 1.27 Earth Masses
Minimum Mass: Anglada-Escudé et al. (2016) estimated the minimum mass of Proxima Centauri B by using Radial Velocity measurements from HARPS and UVES.
Maximum Mass: Based on statistical analysis of Kepler results performed by Leslie Rogers (Hubble Fellow at Caltech) and others, it is known that exoplanets seem to transition from being predominantly rocky to predominantly volatile-rich probably at a radius of about 1.5 RE and certainly no greater than 1.6 RE. A planet with this radius corresponds to a mass of about 6 ME, assuming an Earth-like composition. With an unconstrained orbital inclination, there is about a 98% chance that Proxima Centauri b (minimum mass of 1.27 ME) has an actual mass below this threshold.
>> Size Estimation – 1.1~1.3 Earth radii
Proxima Centauri b’s radius was not measured directly but estimated by empirical models with assumption of rocky composition and no large gas envelope.
The calculation was based on Mass-Radius Relation from other known rocky exoplanets and the 1.27 minimum Earth masses.
Anglada-Escudé et al. (2016) mentioned that there is a 1.5% chance that the orbit of Proxima Centauri b is oriented to produce transits visible to us here on Earth. If such transits actually occur, the actual mass and the radius of this new exoplanet could be determined in the near future.
>> Rocky Composition or Ocean Planet?
Based on the estimated minimum mass, the planet is likely rocky comparing other planets in this mass range (Anglada-Escudé et al.,2016)
Brugger et al. (2016) modelled possible compositions and confirmed that a rocky planet with or without some water is the most plausible scenario.
Proxima Centauri B is within the habitable zone of Proxima Centauri. It speculatively has habitable Features.
>> What is the Habitable Zone (HZ) of a star?
The HZ of a star is the region around a star where the temperature of an exoplanet could be good for liquid water to exist.
>> How do we know Proxima Centauri B is within Proxima Centauri HZ?
Based on detailed climate and geophysical modelling, for a star like Proxima Centauri with a surface temperature of 3050 K and an Earth-size planet orbiting Proxima Centauri, the outer and inner limit of the HZ is between 0.081 AU and 0.041 AU. (Kopparapu et al.,2013, 2014). Proxima Centauri b is 0.04848 AU from Proxima Centauri.
Gravity Conditions may be suitable for life
>> Habitable Range
0.75 – 1.05 times Earth gravity calculated by gravity formula with mass and radius of Proxima Centauri b.
The estimated gravity is within a habitable range (0.5-2g Earth gravities).
Temperatures could be liveable with an Earth-like atmosphere
>> How would we estimate it?
Meadows et al. (2018) used climate-photochemistry models to simulate several plausible states for the atmosphere environment of Proxima Cen b. For Earth-like atmosphere, only modest amounts of carbon dioxide (0.05 bar) or methane (0.01–0.03 bar) are required to warm the planetary surface and can obtain cold but habitable surface conditions.
>> Complicating factors – Atmosphere and Rotation
Stellar flares could strip the atmosphere to make the surface hostile.
Tidally locked: 7°C to 27 °C on dayside, -223°C to -123°C on nightside depending on atmosphere thickness. With ocean heat transport, temperature differences are smaller. (Turbet et al.,2016 using 3D climate models)
Water as the source of life may exist within the HZ
>> How would we know?
No direct observation yet of liquid water (or water vapor) on Proxima b.
Most of our estimates are based on theoretical modeling and simulations.
Water could possibly exist on Proxima Centauri b according to many models. Brugger et al. (2016) showed models where up to ~50% water by mass is possible, leading to a deep global ocean. Coleman et al. (2016/17) modelled several distinct formation paths and found that the planet’s water content depends strongly on where and how it formed. Meadows et al. (2018) found that whether water is currently present depends heavily on atmospheric composition and how much the star’s radiation has stripped things away over time.
A range of gases (CO₂, N₂, H₂O) may exist to support human life, plant growth, and protect inhabitants
>> How would we know?
Noack, Kislyakova, Johnstone, et al. (2021) modeled interior heating (including induction heating) and long-term outgassing for Proxima b, and suggested that volcanic outgassing could supply CO₂, H₂O, and other volatiles, depending on interior composition and thermal evolution. This is important because the supply of gas from the planet’s interior could help maintain an atmosphere against losses.
>> Atmospheric Challenges
The potential gases depend on planet’s formation and atmospheric retention.
Many models suggested that high stellar flaring, XUV flux, and particle radiation significantly influence atmospheric chemistry and loss.
The high-energy radiation from the stellar flare can heat and erode the atmosphere, break apart water molecules, destroy potential ozone layer, and threaten any potential lifeforms on the surface.
Entire spectrum of electromagnetic radiation
>> Extremely strong X-ray and UV radiation
Proxima b’s XUV (X-ray + extreme-UV) flux is much higher than Earth’s; “nearly 60 times higher than Earth” for its high-energy flux, according to full spectral energy distribution model constructed by Ribas, Gregg, Boyajian, & Bolmont (2017).
>> Extremely high-energy solar flare burst
The biggest flare briefly made the star 14,000 times brighter than normal as observed by MacGregor led group in 2019 by using simultaneous observations with nine telescopes. (NASA, 2017)
Very Thin or Absent Atmosphere
Atmospheres are also essential for life as we know it: Having the right atmosphere allows for climate regulation, the maintenance of a water-friendly surface pressure, shielding from hazardous space weather, and the housing of life’s chemical building blocks.
Stellar flare strips away the atmosphere and Earth-like atmosphere would not survive. Katherine Garcia-Sage et al. (2017)’s model suggested that Proxima Centauri’s powerful radiation drains the Earth-like atmosphere as much as 10,000 times faster than what happens at Earth.
Lack of Strong Magnetic Field Protection
Interior models suggested magnetic fields are possible and likely multipolar in nature due to slow rotation speeds. The field strength was predicted to have values of 0.06 – 0.23G. (Herath et al., 2010). It is lower than Earth magnetic fields value ~0.3G.
Tidally Locked Orbit
Proxima Centauri B is also highly likely to be tidally locked, as it is much closer to Proxima Centauri than Earth to the Sun. Rather than having a day/night cycle like Earth, Proxima Centauri B would have one hemisphere in constant sunlight, and the other in constant dark. (NASA, 2020)
Without a thicker atmosphere, the vehicle must be heavily insulated with active thermal control systems to maintain stable temperatures.
Heavy Shielding
The vehicle must have heavy shielding to protect its vital components from radiation and cosmic rays. (for example, lead)
Dust Protection
The vehicle’s joints and sensors may need to be sealed and protected to prevent dust (like on Mars) from wearing down and disrupting components.
Autonomous Navigation
Sometimes there are environments where it is too difficult or expensive to protect humans on the vehicle, so the the vehicle would need Autonomous Navigation to move without human control. Additionally, Autonomous Navigation may be able to control a bulky vehicle in unknown environments better and safer than a human could.
Movement
Without a thicker atmosphere, the vehicle cannot rely on any form of aerodynamic movement or braking.
Limitation on Data Collection
Due to the fact that Proxima Centauri B hasn’t transitted, it eludes the usual method for learning about its atmosphere. Instead, scientists must rely on models to understand whether the exoplanet is habitable.
>> What is a Transit?
A transit occurs when a planet passes between a star and its observer. Transits within our solar system can be observed from Earth when Venus or Mercury travel between us and the Sun. (NASA, 2020)
The planet passing in front of its star ever so slightly dims its light. This dimming can be seen in light curves: graphs showing light received over a period of time. (NASA, 2020)
However, Proxima Centauri B has not been detected passing in front of its star. (NASA, 2020)
>> Importance of Transits
Transits can help determine a variety of different exoplanet characteristics: the size of its orbit, its orbital period, and the size of the planet itself. (NASA, 2020)
We can also learn about an exoplanet’s atmosphere during a transit. As it transits, some light will go through its atmosphere and that light can be analyzed to determine what different atmospheric elements influenced its particular dispersion. (NASA, 2020)
These can help determine the temperature of the planet itself. This can tell us whether the surface has a comfortable temperature suitable for life. (NASA, 2020)
AI Use Statement
I asked AI specific questions and resources for its answers. Then I selected the resources I used and found their original papers to ensure the credibility of the answers.
Anglada-Escudé, G., Amado, P., Barnes, J. et al (2016). A terrestrial planet candidate in a temperate orbit around Proxima Centauri. Nature 536, 437–440. https://doi.org/10.1038/nature19106
Brugger, B., Mousis, O., Deleuil, M., Deschamps, F. (2017). Constraints on Super-Earth Interiors from Stellar Abundances. The Astrophysical Journal 850https://www.doi.org/10.3847/1538-4357/aa965a
Coleman, G. A. L., Nelson, R. P., Paardekooper, S. J., Dreizler, S., Giesers, B., Anglada-Escudé, G. (2017). Exploring plausible formation scenarios for the planet candidate orbiting Proxima Centauri. Monthly Notices of the Royal Astronomical Society 467, 996–1007, https://doi.org/10.1093/mnras/stx169
Garcia-Sage, K., Glocer, A., Drake, J., Gronoff, G., Cohen, O. (2017). On the Magnetic Protection of the Atmosphere of Proxima Centauri B. The Astrophysical Journal Letters 884 https://doi.org/10.3847/2041-8213/aa7eca
Herath, M., Gunesekera, S., Jayaratne, C.(2021). Characterizing the possible interior structures of the nearby Exoplanets Proxima Centauri B and Ross-128 B. Monthly Notices of the Royal Astronomical Society 500, 333–354, https://doi.org/10.1093/mnras/staa3110
Kopparapu, R., Ramirez, R., SchottelKotte, J., Kasting, J., Domagol-Goldman, S., Eymet, V. (2014). HABITABLE ZONES AROUND MAIN-SEQUENCE STARS: DEPENDENCE ON PLANETARY MASS. The Astrophysical Journal Letters 787https://doi.org/10.1088/2041-8205/787/2/L29
Meadows, V. S., Arney, G. N., Schwieterman, E. W., Lustig-Yaeger, J., Lincowski, A. P., Robinson, T., Domagal-Goldman, S. D., Deitrick, R., Barnes, R. K., Fleming, D. P., Luger, R., Driscoll, P. E., Quinn, T. R., & Crisp, D. (2018). The Habitability of Proxima Centauri b: Environmental States and Observational Discriminants. Astrobiology, 18(2), 133–189. https://doi.org/10.1089/ast.2016.1589
Noack, L., Kislyakova, K., Johnstone, C., Güdel, M., Fossati, L. (2021). Interior heating and outgassing of Proxima Centauri b: Identifying critical parameters. Astronomy & Astrophysics 651 https://doi.org/10.1051/0004-6361/202040176
Ribas, I., Gregg, M. Boyajian, T., Bolmont, E. (2017). The full spectral radiative properties of Proxima Centauri. Astronomy & Astrophysics 603https://doi.org/10.1051/0004-6361/201730582
Turbet, M., Leconte, J., Selsis, F., Bolmont, E., Forget, F., Ribas, I., Raymond, S., Anglada-Escudé, G. (2016). The habitability of Proxima Centauri b. Astronomy & Astrophysics 596 https://doi.org/10.1051/0004-6361/201629577
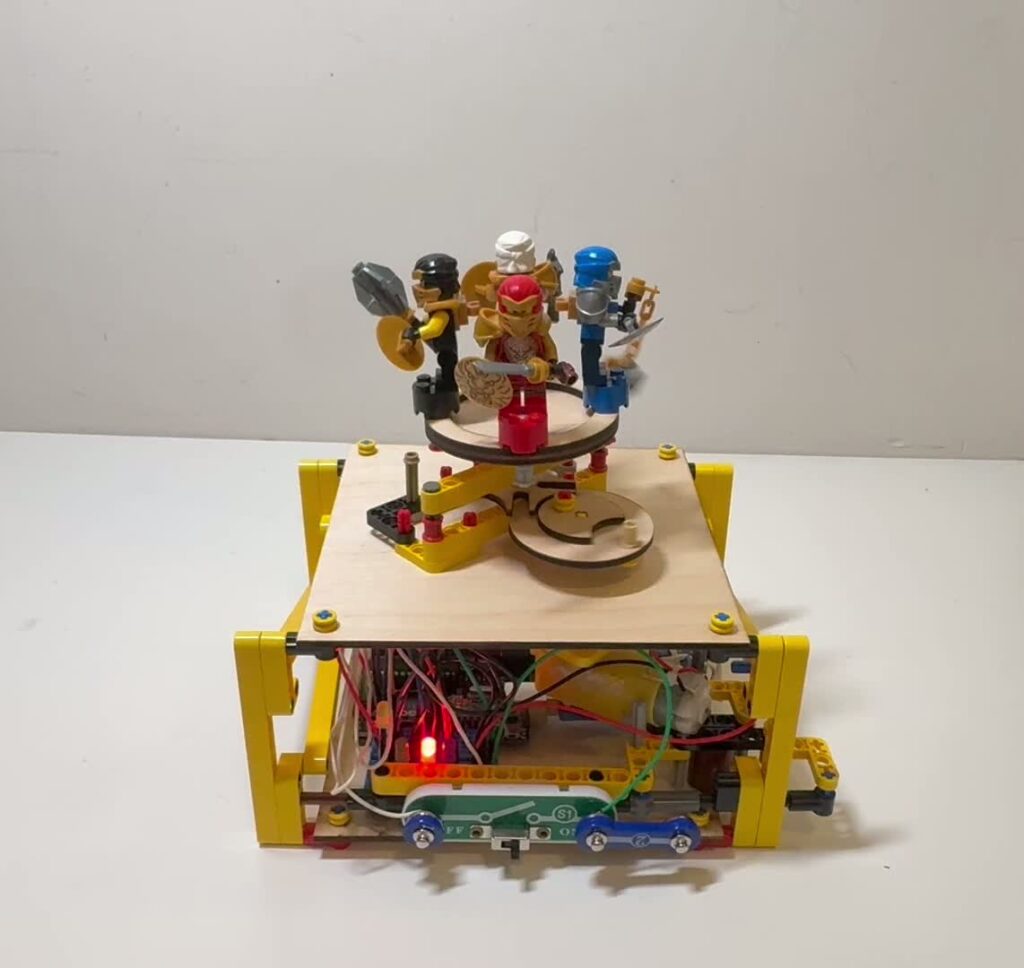
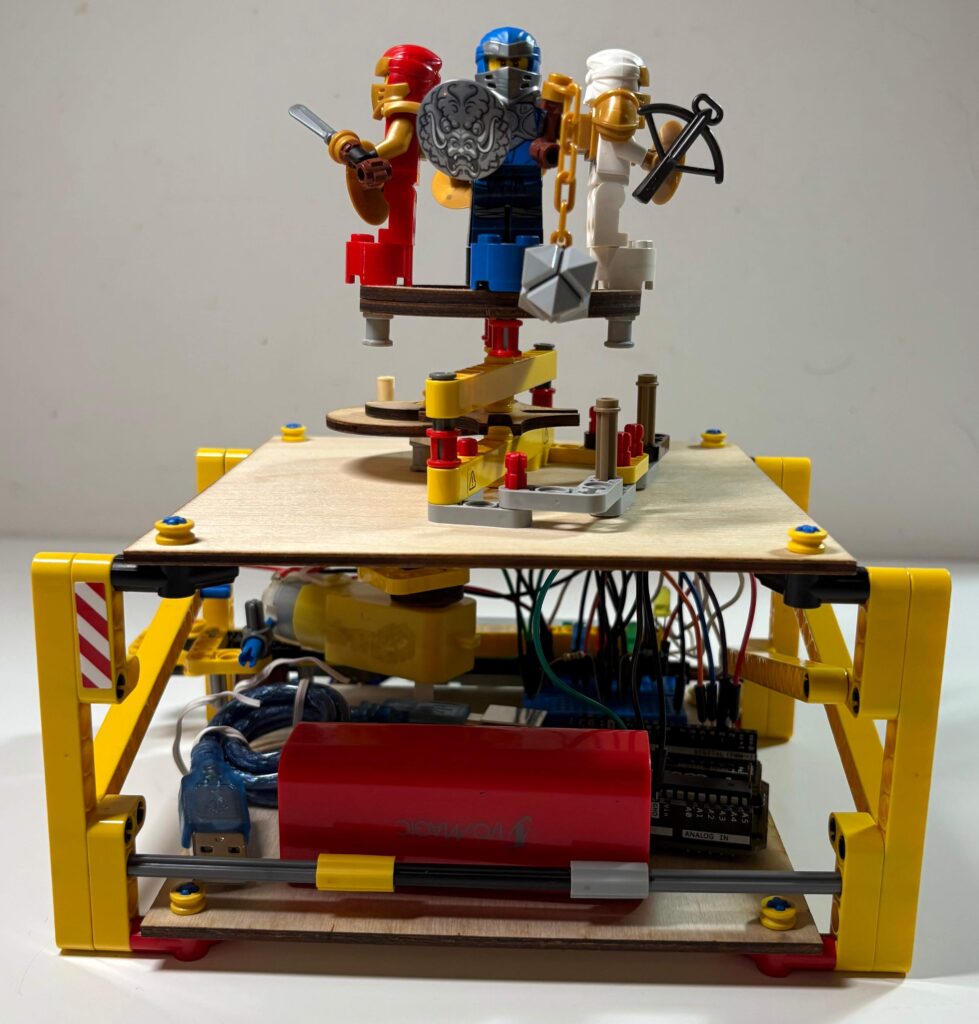
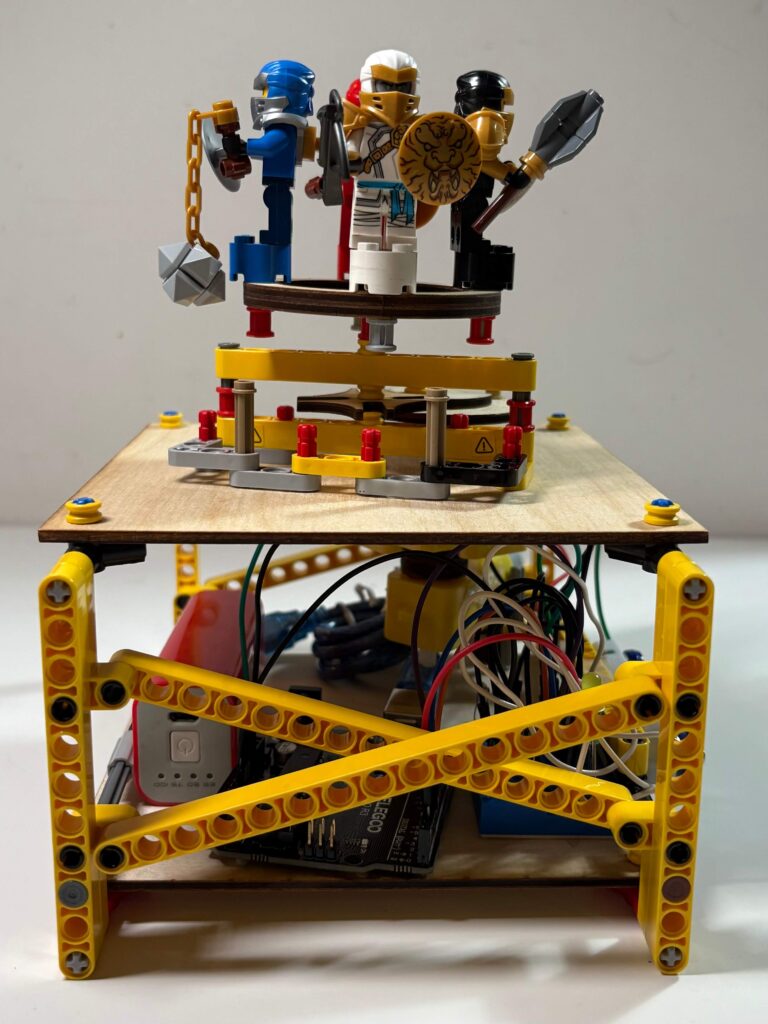
This project intends to demonstrate the basics of robotics through the use of Arduino. I was really interested in the Geneva Drive mechanism, so I decided to base my project around it.
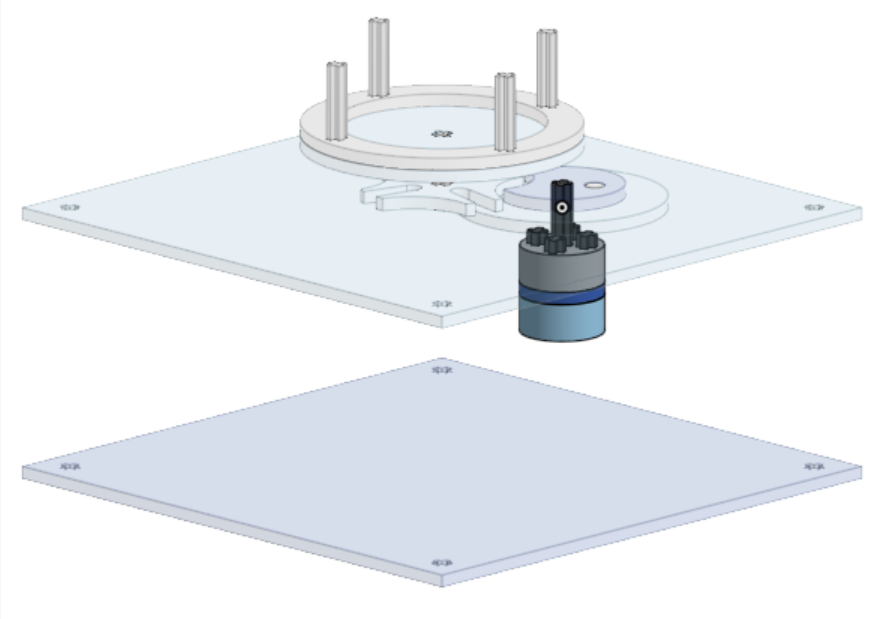
I designed a display stand that can rotate to show four different things. However, a constantly rotating display stand would make it hard to see each thing clearly. By using a Geneva drive, I can transform a constant turning motion into separate 90° turns with pauses in between. Additionally, I added LEDs to light up each display item with a different colour and set them up to match the rotations of the display.
I selected four Lego Ninjago Minifigures to put on the display as Lego Ninjago is one of my favourite tv show and an integral part of my childhood.
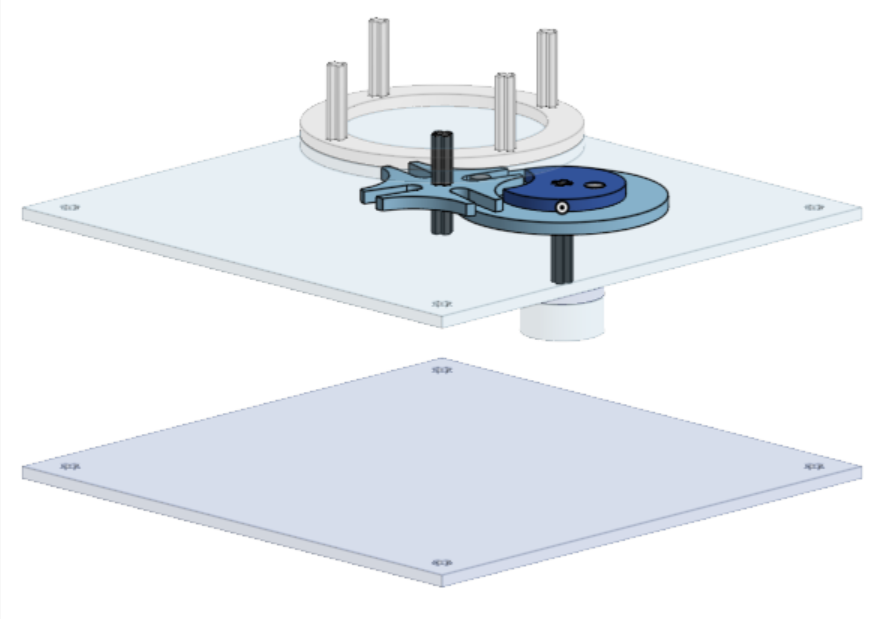
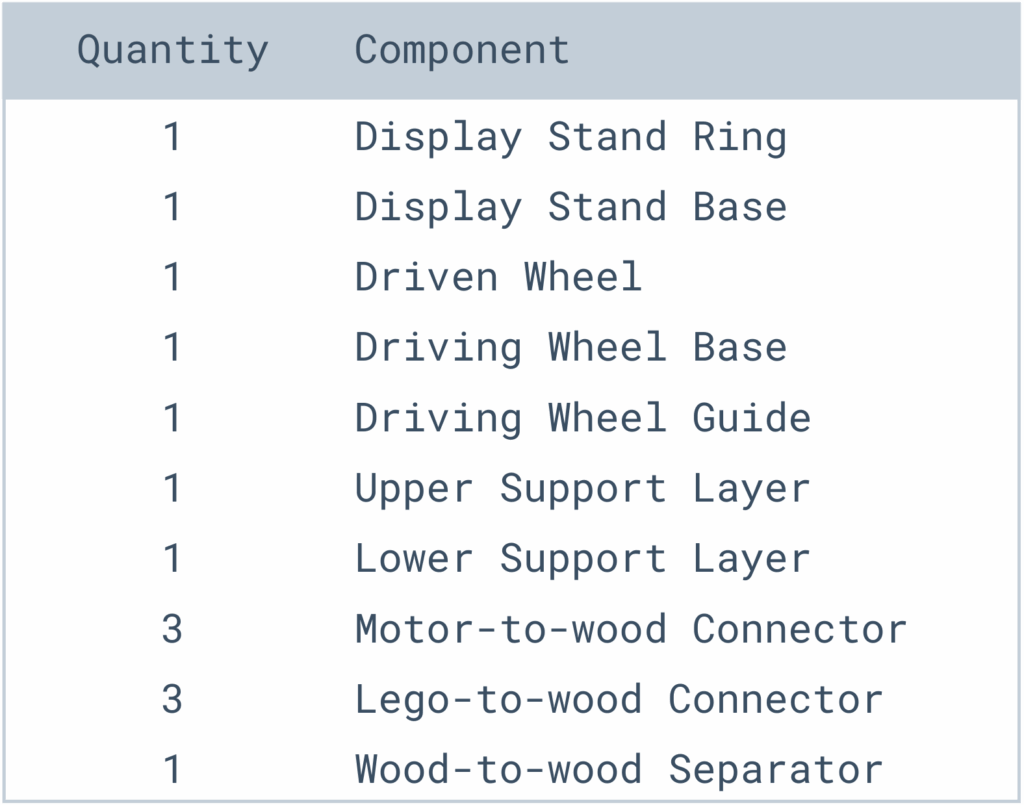
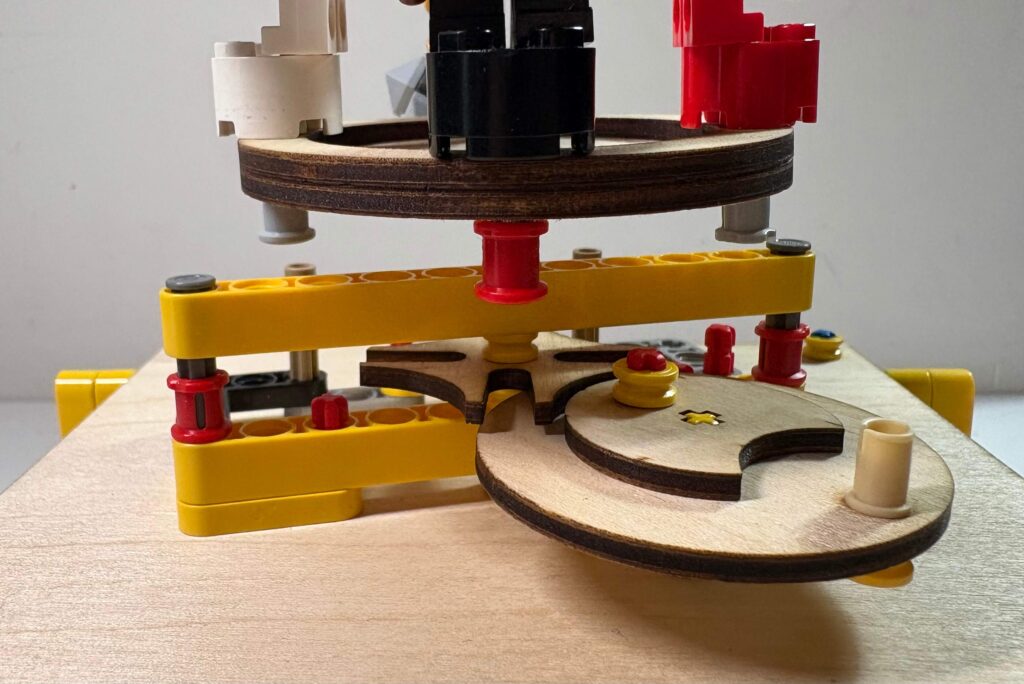
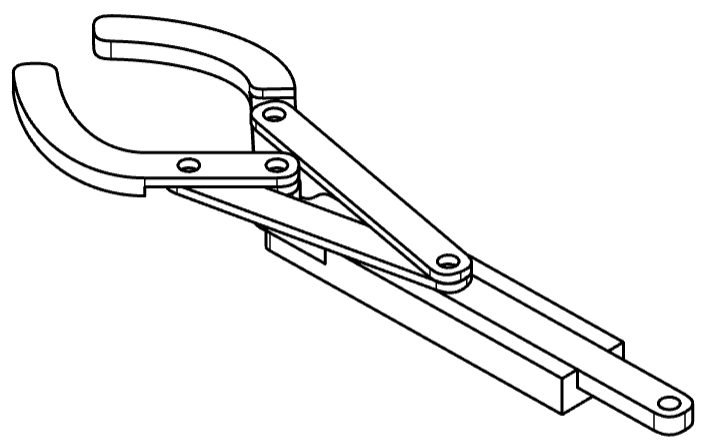
Geneva Drive Mechanism (Driven Wheel, Driving Wheel, and Wheel Guide)
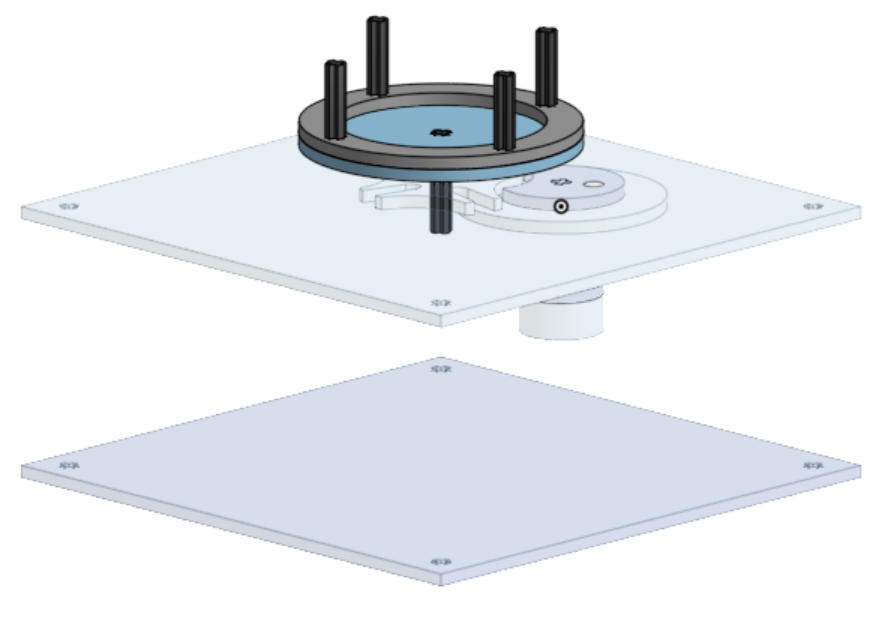
Motor Adapter and Connector to Driving Wheel and Wheel Guide
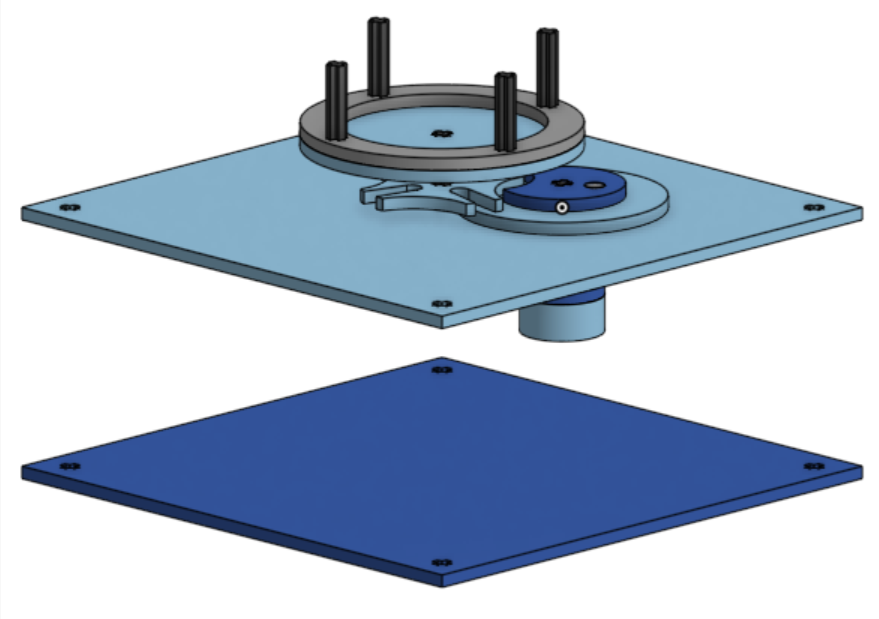
Display Stand and Connector to Driven Wheel
Full Assembly
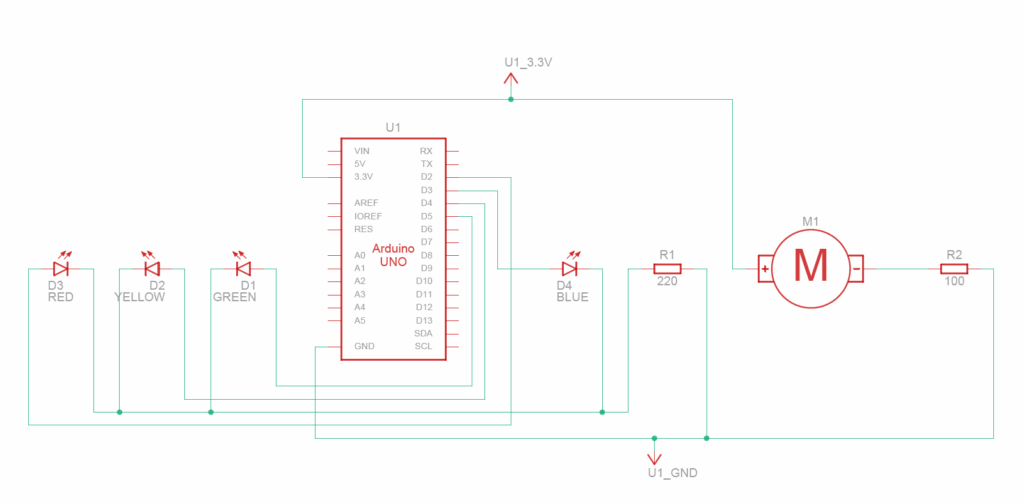
◈ Circuit Schematic
TinkerCAD Circuit
Auto-Generated TinkerCAD Circuit Schematic
The Motor is connected to a 3.3V and a different grounded resistor. I tested many different resistance values to find a suitable rotation speed and landed with a 10Ω resistor.
The 4 LEDs are each connected to a different Arduino Pin (D2 to D5) and then to the same grounded resistor (220Ω).
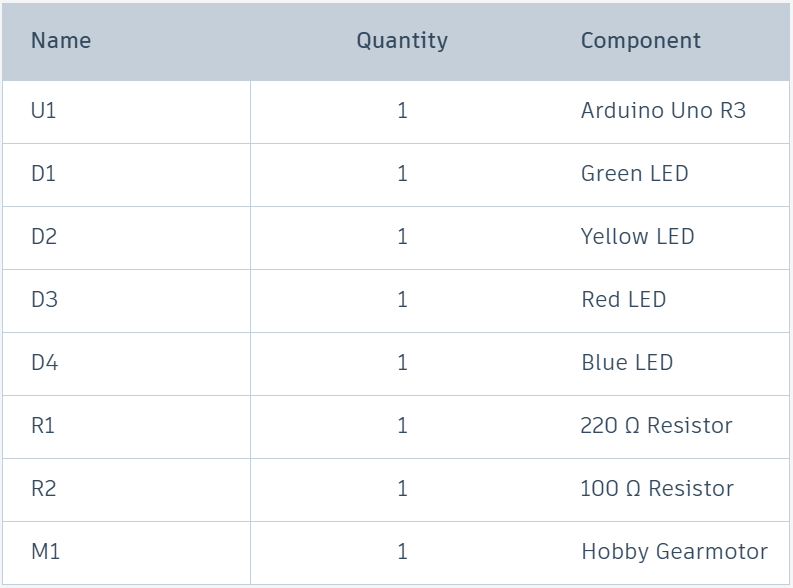
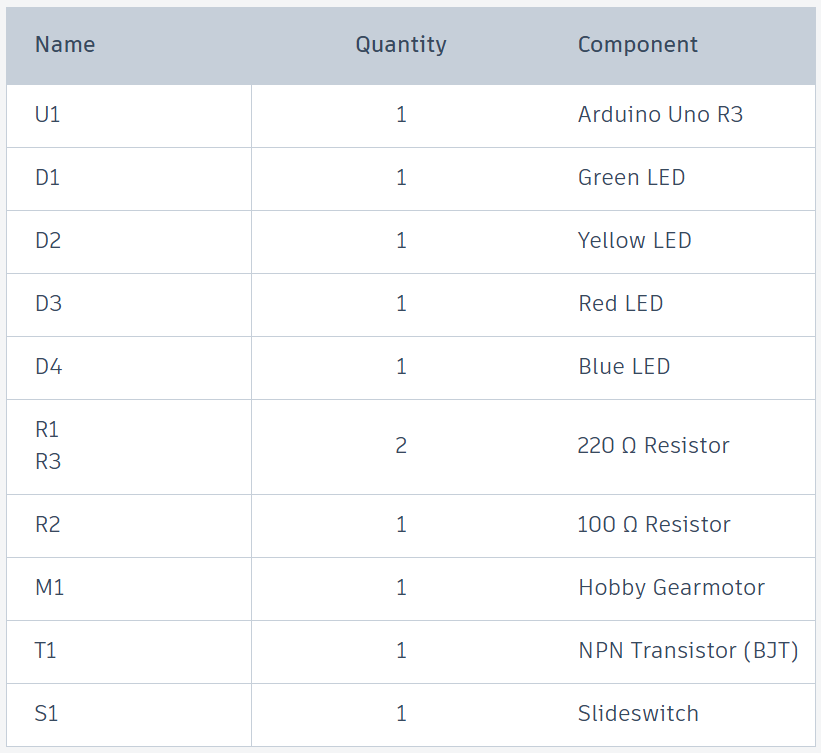
◈ Bill of Materials (BOM)
Auto-Generated TinkerCAD Bill of Materials
I also need many wires and a breadboard to connect these components.
“PINS” is an array that stores which pins are connected to the LEDs.
“RPM” is a constant that stores how many rotations per minute the motor spins.
“DELAYMS” is the number of milliseconds per revolution given the RPM.
The “setup” function runs on start, sets pins 2 through 5 to OUTPUT pin mode, and turns them off.
The “loop” function loops continuously and turns off the previous light and turns on the next light. “loop” will repeat once every revolution.
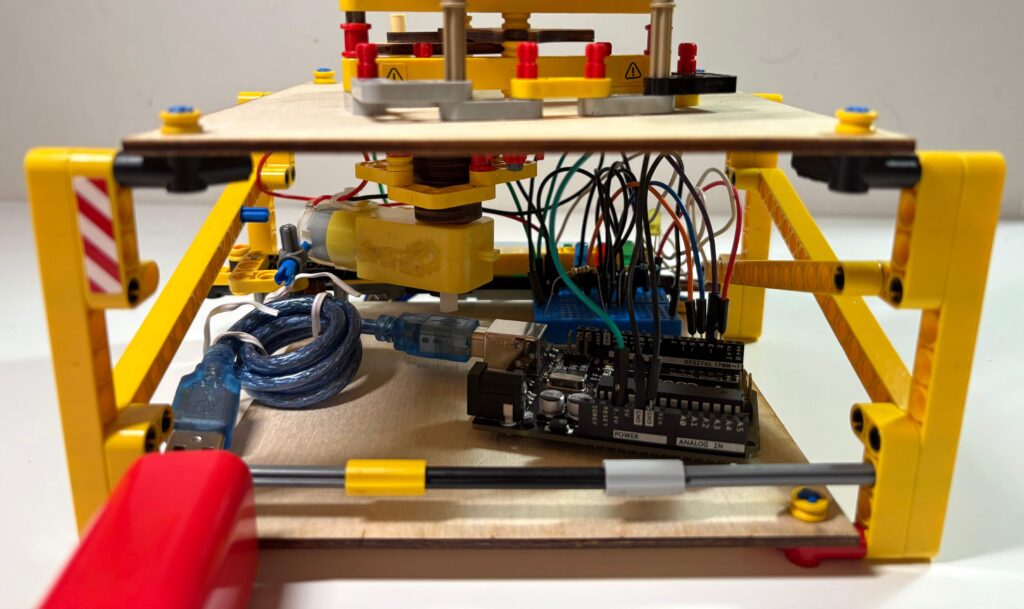
Physical Prototype
◈ From Virtual to Physical
My virtual prototype did not account for gravity. In the physical prototype, many of the axles were wobbling and leaning to the sides. To fix this issue, I added many support structures to stabilize the axles.
To keep the entire Arduino system within the physical base, I used a separate battery source to power the Arduino, rather than connecting to my computer.
My virtual prototype lacked a switch to control the motor. It was annoying to have to take out and put back the wires to control the motor, so I decided to connect a switch between the 3.3V source and motor.
As I had some experience with robotics already, I did not need to use AI to learn robotics.
Revision
This is my revised design of circuit that allows the arduino to control the starting and stopping of the motor that rotates my display.
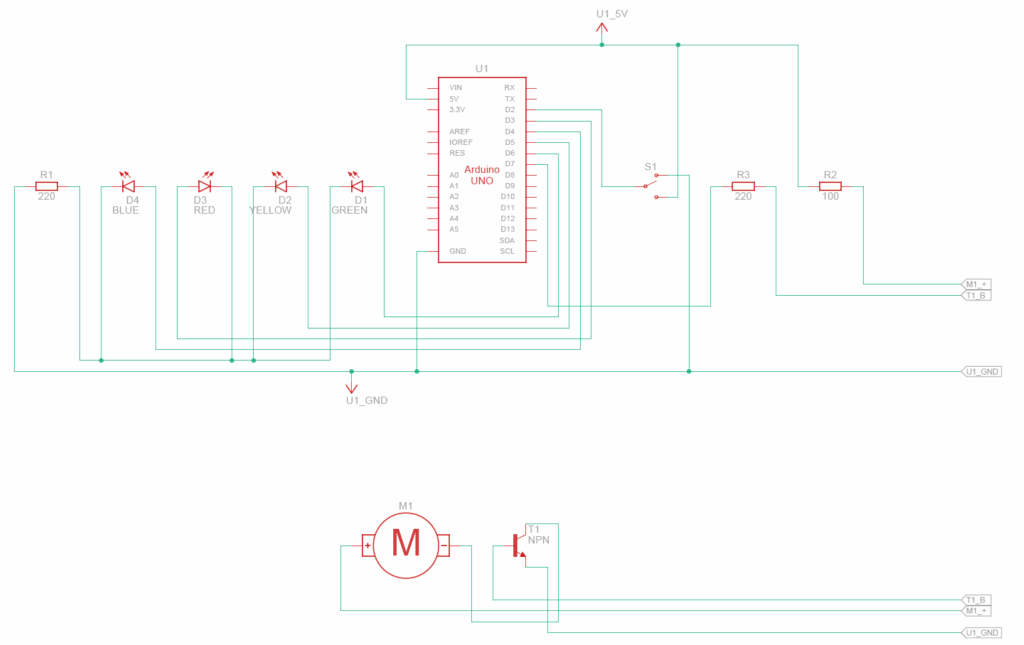
◈ Circuit Schematic
TinkerCAD Circuit
Auto-Generated TinkerCAD Circuit Schematic
I added an NPN transistor to control the motor, and a slideswitch to get user input.
The Motor is connected to the collector pin of the NPN transistor and a 5V power source through a resistor.
The NPN transistor’s emitter pin is connected to ground and its base pin is connected to Arduino Pin 7 through a 220Ω resistor. This allows the Arduino to control when the motor is “on” or “off” through Arduion Pin 7.
The slideswitch is connected to power, ground, and Arduino Pin 2, which is in “input_pullup” mode to read the user’s slideswitch input.
◈ Bill of Materials (BOM)
Auto-Generated TinkerCAD Bill of Materials
I also need many wires and a breadboard to connect these components.
I added 3 new constants in my code to control the motor:
“PIN_M” is a constant that stores which pin controls the motor.
“PIN_S” is a constant that stores which pin reads the slideswitch input.
“eps” is a constant that adjusts for rotation error. The motor spins at RPM rotations per minute but turning it off after DELAYMS milliseconds isn’t perfect, so we use “eps” to fix it.
I changed the “setup” function accordingly with the 2 new pins.
I also added slideswitch input handling (if statement) and motor on/off control (digitalWrite(PIN_M)) to the “loop” function.
Additionally, I added a short 1 second delay to increase the pause between each rotation. In turn, this makes each side of the display stop for a longer time.
[end time, start time, step amt, name, desc, finished]
Multiple events will be stored in a master list and sorted by increasing end time.
Part Three: Get Events on a Specific Day
Returns a list of event indices and event times
First Check: Did this group of events already end
Second Check: Did this group of events start yet
Third Check: Is there an event TODAY.
Let k be the smallest integer where
Start + k * Step > Date
The event is TODAY if
Start + k * step < Date + 86400
Calculate the time of the event on that day
Event Time = Start + k * step – Date
Add tuple to a list
(Event Index, Event Time)
Return this list
Part Four: Get and Update Inputs of Mouse and Keyboard
Save Inputs from Previous Frame
Save Inputs from Current Frame
Save Mouse Position
Part Five: Query Inputs of Mouse and Keyboard
Parameters: Mode (String), Key (id)
Key identifies which specific input we are querying.
“down” Mode: Return if the specific input is on
“press” Mode: Return if the specific input was turned on this frame
“release” Mode: Return if the specific input was turned off this frame
Part Six: Add Event
Get Inputs: Start Time, End Time, Step, Name, and Description
Insert Event into Events list while maintaining sorted by end time. (USE LOAD EVENT FORMAT)
Part Seven: Remove Event
Delete event from events list.
Note: All times will be saved using seconds since epoch.
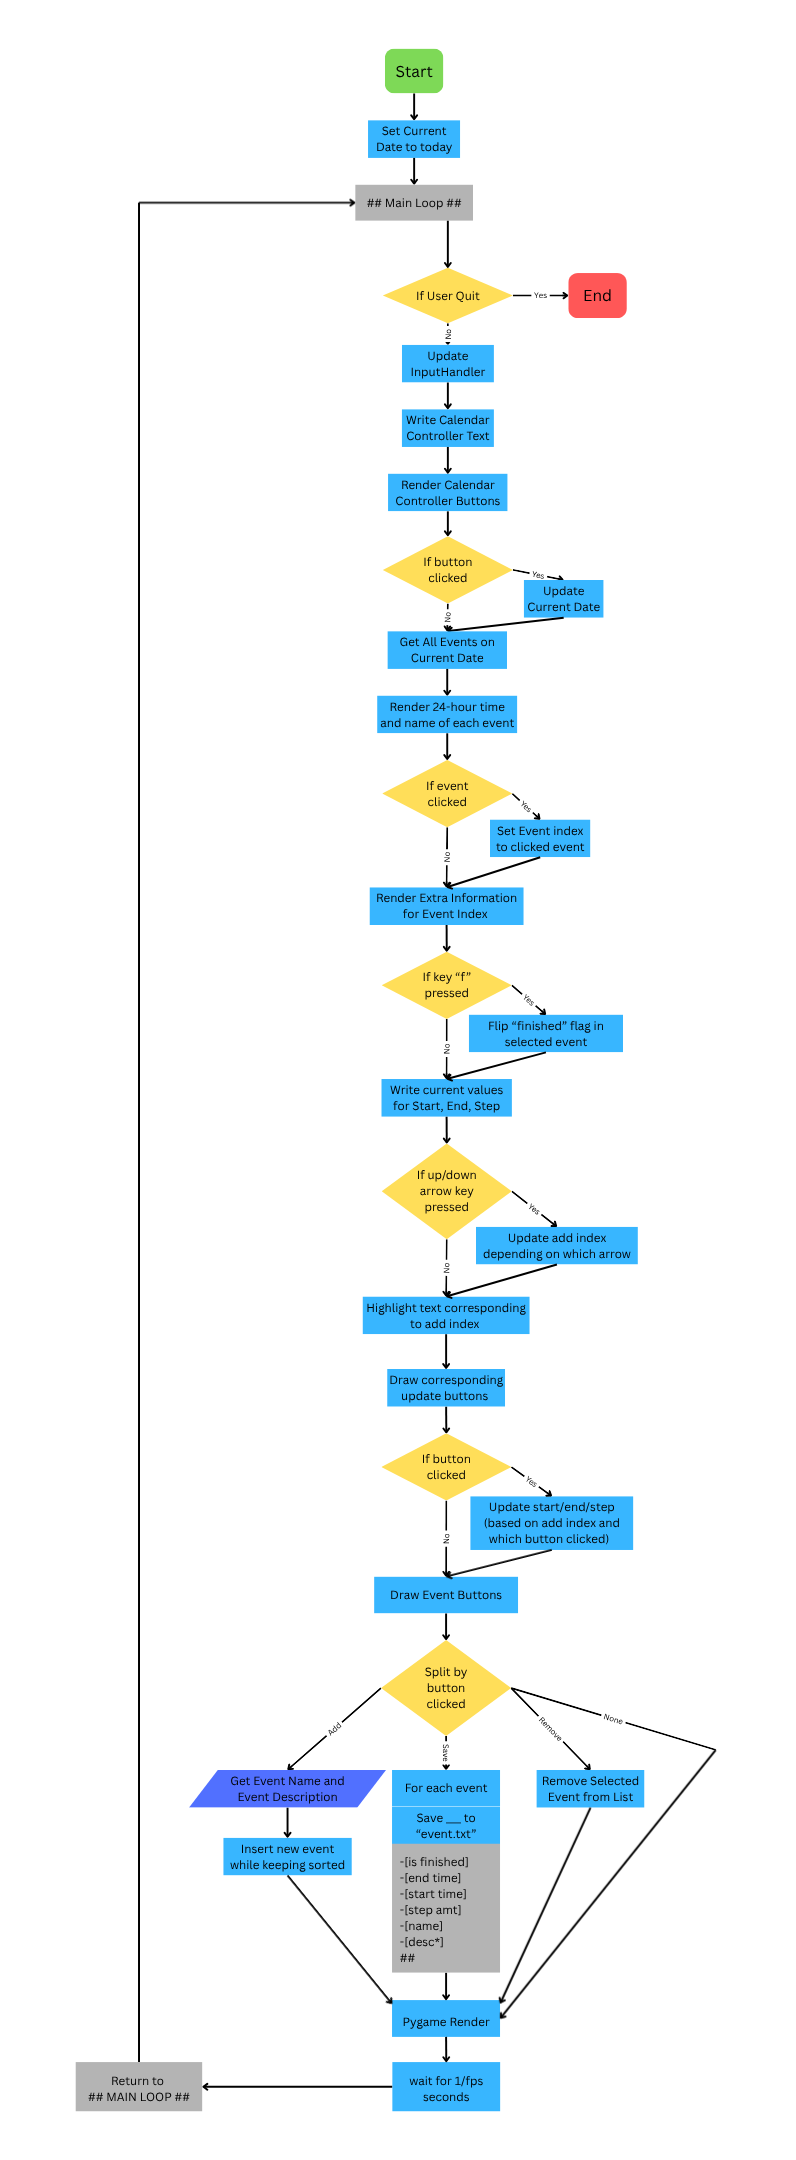
Flowchart
The following flowchart shows the structure and logic of how the above is implemented.
Flowchart
Code
File Loader Class To save and load events and get events on a specific day. (See parts One to Three)
class CalendarLoader:
    def __init__(self, filename):
        self.events = []
        self.filename = filename

    def set_file(self, filename):
        self.filename = filename

    def load_events(self, filepath=None):
        if filepath is None:
            filepath = self.filename
        self.events = []
        infile = open(filepath, "r")
        lines = [] # all the lines between previous and next "#" markings
        for line in infile:
            if line[0] == '#':
                # gets event settings based on above format
                b = int(lines[0])
                end = int(lines[1])
                start = int(lines[2])
                step = int(lines[3])
                name = lines[4]
                desc = "\n".join(lines[5:])
                self.events.append([end, start, step, name, desc, b])
                lines = [] # reset lines
            else:
                # add line to lines list.
                lines.append(line[1:-1])
        infile.close()

    def save_events(self, filepath=None):
        if filepath is None:
            filepath = self.filename
        s = ""
        for event in self.events:
            # Saves each event based on the above format
            s += f"-{int(event[5])}\n"
            s += f"-{int(event[0])}\n"
            s += f"-{int(event[1])}\n"
            s += f"-{int(event[2])}\n"
            s += f"-{event[3]}\n"
            s += f"-{event[4]}\n"
            s += "#\n"
        outfile = open(filepath, "w")
        outfile.write(s)
        outfile.close()

    def search(self, time):
        # Basic Binary Search
        low = -1
        high = len(self.events) - 1
        while low < high:
            mid = low + (high - low + 1) // 2
            if self.events[mid][0] <= time:
                low = mid
            else:
                high = mid - 1
        return low + 1

    def getDay(self, date):
        # Follows the above Instructions to get all the events that happen on that day.
        events = []
        for i in range(len(self.events) - 1, -1, -1):
            event = self.events[i]
            if event[0] < date:
                break
            k = (date - event[1] - 1) // event[2] + 1
            t = event[1] + k * event[2] - date
            if k >= 0 and t < 86400:
                events.append((t, i))
        return events

    def getEvent(self, idx):
        return self.events[idx]
Pygame Input Handler To handle updating and querying inputs from the mouse and keyboard. (See parts Four to Five)
import pygame

class InputHandler:
    # Get Modes: "down", "press", and "release"
    def __init__(self):
        self.keyDown = pygame.key.get_pressed()
        self.prevKeyDown = pygame.key.get_pressed()
        self.mouseDown = pygame.mouse.get_pressed(3)
        self.prevMouseDown = pygame.mouse.get_pressed(3)
        self.mousePos = pygame.mouse.get_pos()

    def update(self):
        # Set Previous Mouse and Key Downs
        self.prevKeyDown = self.keyDown
        self.prevMouseDown = self.mouseDown
        # Set Current Mouse and Key Downs
        self.keyDown = pygame.key.get_pressed()
        self.mouseDown = pygame.mouse.get_pressed(3)
        self.mousePos = pygame.mouse.get_pos()

    def getKey(self, key, mode="down"):
        match mode:
            case "down": # Is Key Down
                return self.keyDown[key]
            case "press": # Was Key Pressed this frame
                return self.keyDown[key] and not self.prevKeyDown[key]
            case "release": Was Key Released this frame
                return self.prevKeyDown[key] and not self.keyDown[key]
            case _:
                print(f"Unknown Mode {mode}")
                return False

    def getMouse(self, mouse, mode="down"):
        match mode:
            case "down": # Is Mouse Button Down
                return self.mouseDown[mouse]
            case "press": # Was Mouse Button Pressed this frame
                return self.mouseDown[mouse] and not self.prevMouseDown[mouse]
            case "release": # Was Mouse Button Release this frame
                return self.prevMouseDown[mouse] and not self.mouseDown[mouse]
            case _:
                print(f"Unknown Mode {mode}")
                return False
Primary Calendar Class To Add and Remove events. (See parts Six to Seven)
import datetime
import time
import pygame
from CalendarLoader import *

utc = datetime.timezone.utc

class Calendar:
    def __init__(self, filename):
        self.loader = CalendarLoader(filename)
        self.loader.load_events()
        # Floor "now" to 00:00 on the same day
        now = (time.time() // 86400) * 86400
        self.line = 20
        self.date = now
        self.start = now
        self.end = now
        self.step = 86400
        self.addIdx = 0
        self.selected = 0

    def set_filename(self, filename):
        self.loader.set_file(filename)

    def render(self, font, inHand, offset):
        # Get all the events on the current date
        events = sorted(self.loader.getDay(self.date))
        relx, rely = inHand.mousePos[0] - offset[0], inHand.mousePos[1] - offset[1]
        idx = -1
        if 20 < relx < 250 and 5 + 1.5 * self.line < rely:
            idx = int((rely - 5) / self.line - 1.5)
        if idx >= len(events):
            idx = -1
        if inHand.getMouse(0, "press") and idx != -1:
            self.selected = idx # Check if any events where clicked
        if inHand.getKey(pygame.K_UP, "press"):
            self.addIdx = (self.addIdx - 1 + 3) % 3 # decrease add index
        if inHand.getKey(pygame.K_DOWN, "press"):
            self.addIdx = (self.addIdx + 1) % 3 # increase add index

        # Calendar Window
        surf = pygame.Surface((600, 400))
        surf.fill((0, 255, 255))
        surf.blit(font.render(datetime.datetime.fromtimestamp(self.date, utc).strftime("%A %B %d, %Y"), True, (0, 0, 0)), (20, 5))
        for i, (t, eventIdx) in enumerate(events):
            event = self.loader.getEvent(eventIdx)
            timing = datetime.datetime.fromtimestamp(t, utc).strftime("%I:%M %p")
            colour = ((0, 0, 0) if event[5] != 1 else (0, 180, 0)) if i != self.selected else (0, 0, 127)
            status = "[]" if event[5] == 1 else "X"
            surf.blit(font.render(f"{status} {timing}: {event[3]}", True, colour), (20, 5 + (i + 1.5) * self.line))
            if i == self.selected:
                surf.blit(font.render(datetime.datetime.fromtimestamp(event[1], utc).strftime("Start: %A %B %d, %Y - %H"), True, (0, 0, 0)), (270, 5 + 9 * self.line))
                surf.blit(font.render(datetime.datetime.fromtimestamp(event[0], utc).strftime("End: %A %B %d, %Y - %H"), True, (0, 0, 0)), (270, 5 + 10 * self.line))
                surf.blit(font.render(datetime.datetime.fromtimestamp(event[2] - 86400, utc).strftime("Step: %d days; %H hours"), True, (0, 0, 0)), (270, 5 + 11 * self.line))
                surf.blit(font.render("=== Description ===", True, (0, 0, 0)), (270, 5 + 12 * self.line))
                surf.blit(font.render(f"{event[4]}", True, (0, 0, 0)), (270, 5 + 13 * self.line))
        if inHand.getKey(pygame.K_f, "press") and 0 <= self.selected < len(events):
            self.loader.events[events[self.selected][1]][5] = 1 - self.loader.events[events[self.selected][1]][5]
        colours = [(0, 0, 0), (0, 0, 0), (0, 0, 0)]
        colours[self.addIdx] = (0, 0, 127)
        surf.blit(font.render(datetime.datetime.fromtimestamp(self.start, utc).strftime("Start: %A %B %d, %Y - %H"), True, colours[0]), (270, 5))
        surf.blit(font.render(datetime.datetime.fromtimestamp(self.end, utc).strftime("End: %A %B %d, %Y - %H"), True, colours[1]), (270, 5 + self.line))
        surf.blit(font.render(datetime.datetime.fromtimestamp(self.step - 86400, utc).strftime("Step: %d days; %H hours"), True, colours[2]), (270, 5 + 2 * self.line))
        surf.blit(font.render(("START", "END", "STEP")[self.addIdx], True, (0, 127, 0)), (300, 5 + 4 * self.line))
        clickIdx = (-1, -1)
        for t in range(2):
            for i in range((4, 4, 2)[self.addIdx]):
                bx = 370 + i * 25
                by = 5 + 4 * self.line + t * 25
                pygame.draw.rect(surf, (0, 0, 0), (bx - 10, by - 10, 20, 20), 2, 4)
                symbol = "+" if t == 0 else "-"
                surf.blit(font.render(symbol, True, (0, 0, 0)), (bx - 3, by - 13))
                if abs(relx - bx) < 10 and abs(rely - by) < 10:
                    clickIdx = (i, t)
        if inHand.getMouse(0, "press") and clickIdx[0] != -1:
            m = (1, -1)[clickIdx[1]]
            i = clickIdx[0]
            match self.addIdx:
                case 0:
                    if i == 1:
                        self.start += m * 86400
                    else:
                        dt = datetime.datetime.fromtimestamp(self.start, utc)
                        para = [dt.month, dt.day, dt.year, dt.hour]
                        if i == 0:
                            para[i] = (para[i] + m + 11) % 12 + 1
                        elif i == 3:
                            para[i] = (para[i] + m + 24) % 24
                        else:
                            para[i] += m
                        self.start = datetime.datetime(para[2], para[0], para[1], para[3], tzinfo=utc).timestamp()
                case 1:
                    if i == 1:
                        self.end += m * 86400
                    else:
                        dt = datetime.datetime.fromtimestamp(self.end, utc)
                        para = [dt.month, dt.day, dt.year, dt.hour]
                        if i == 0:
                            para[i] = (para[i] + m + 11) % 12 + 1
                        elif i == 3:
                            para[i] = (para[i] + m + 24) % 24
                        else:
                            para[i] += m
                        self.end = datetime.datetime(para[2], para[0], para[1], para[3], tzinfo=utc).timestamp()
                case 2:
                    self.step += m * (86400, 3600)[i]
            self.start = max(self.start, 0)
            self.step = max(self.step, 86400)
            self.end = max(self.end, 0)

        clickIdx = -1
        surf.blit(font.render("Events: Add    Remove    Save", True, (0, 0, 0)), (270, 7 * self.line - 8))
        for t in range(3):
            bx = 340 + t * 55
            by = 5 + 8 * self.line
            pygame.draw.rect(surf, (0, 0, 0), (bx - 10, by - 10, 20, 20), 2, 4)
            symbol = "+-S"[t]
            o = 2 if t == 2 else 0
            surf.blit(font.render(symbol, True, (0, 0, 0)), (bx - 3 - o, by - 13 + o))
            if abs(relx - bx) < 10 and abs(rely - by) < 10:
                clickIdx = t
        if inHand.getMouse(0, "press") and clickIdx != -1:
            if clickIdx == 0:
                print("Name Of Event: ")
                name = input()
                desc = ""
                print("Description: ")
                while True:
                    add = input()
                    if add == "":
                        break
                    desc += add + '\n'
                index = self.loader.search(time.time() - 2073600)
                self.loader.events = self.loader.events[index:]
                self.loader.events.insert(self.loader.search(self.end), [self.end, self.start, self.step, name, desc[:-1], 0])
            elif clickIdx == 1:
                if 0 <= self.selected < len(events):
                    self.loader.events.pop(events[self.selected][1])
            elif clickIdx == 2:
                self.loader.save_events()

        return surf
Pygame Main Loop To integrate all parts.
import pygame
from InputHandler import *
from Calendar import *

# Basic Pygame Setup
pygame.init()
pygame.font.init()
high_score = 0
score = 0
fps = 60
fpsClock = pygame.time.Clock()

width, height = 840, 480
screen = pygame.display.set_mode((width, height))
pygame.display.set_caption("Calendar App")

font = pygame.font.SysFont("comicsans", 25)
inHand = InputHandler()
calendar = Calendar("event.txt")

# print(calendar.loader.events)

# Main Game Loop
running = True
while running:
    for event in pygame.event.get():
        if event.type == pygame.QUIT:
            pygame.quit()
            running = False

    if not running:
        break
    inHand.update()

    # White Background
    screen.fill((255, 255, 255))

    # Handles Click Detection for the Calendar Date Controller
    clickIdx = (-1, -1)
    screen.blit(font.render("Calendar Date Controller", True, (0, 0, 0)), (630, 18))
    for i in range(3):
        by = 55 + i * 25
        label = ("Year", "Month", "Day")[i]
        screen.blit(font.render(f"{label}: ", True, (0, 0, 0)), (630, by - 12))
        for t in range(2):
            bx = 700 + t * 25
            pygame.draw.rect(screen, (0, 0, 0), (bx - 10, by - 10, 20, 20), 2, 4)
            symbol = "+" if t == 0 else "-"
            screen.blit(font.render(symbol, True, (0, 0, 0)), (bx - 3, by - 13))
            if abs(inHand.mousePos[0] - bx) < 10 and abs(inHand.mousePos[1] - by) < 10:
                clickIdx = (i, t)
    if inHand.getMouse(0, "press") and clickIdx[0] != -1:
        m = (1, -1)[clickIdx[1]]
        i = clickIdx[0]
        if i == 2:
            calendar.date += m * 86400
        else:
            dt = datetime.datetime.fromtimestamp(calendar.date, utc)
            para = [dt.year, dt.month, dt.day]
            if i == 1:
                para[i] = (para[i] + m + 11) % 12 + 1
            else:
                para[i] += m
            calendar.date = datetime.datetime(para[0], para[1], para[2], tzinfo=utc).timestamp()
        calendar.date = max(calendar.date, 0)

    screen.blit(calendar.render(font, inHand, (20, 20)), (20, 20))

    pygame.display.flip()
    fpsClock.tick(fps)

# Closed the game
print("App Closed Successfully")
Single-File Full Code
import time
import pygame
import datetime

# ============ FILE LOADER ============

class CalendarLoader:
    def __init__(self, filename):
        self.events = []
        self.filename = filename

    def set_file(self, filename):
        self.filename = filename

    def load_events(self, filepath=None):
        if filepath is None:
            filepath = self.filename
        self.events = []
        infile = open(filepath, "r")
        lines = []
        for line in infile:
            if line[0] == '#':
                b = int(lines[0])
                end = int(lines[1])
                start = int(lines[2])
                step = int(lines[3])
                name = lines[4]
                desc = "\n".join(lines[5:])
                self.events.append([end, start, step, name, desc, b])
                lines = []
            else:
                lines.append(line[1:-1])
        infile.close()

    def save_events(self, filepath=None):
        if filepath is None:
            filepath = self.filename
        s = ""
        for event in self.events:
            s += f"-{int(event[5])}\n"
            s += f"-{int(event[0])}\n"
            s += f"-{int(event[1])}\n"
            s += f"-{int(event[2])}\n"
            s += f"-{event[3]}\n"
            s += f"-{event[4]}\n"
            s += "#\n"
        outfile = open(filepath, "w")
        outfile.write(s)
        outfile.close()

    def search(self, time):
        # Basic Binary Search
        low = -1
        high = len(self.events) - 1
        while low < high:
            mid = low + (high - low + 1) // 2
            if self.events[mid][0] <= time:
                low = mid
            else:
                high = mid - 1
        return low + 1

    def getDay(self, date):
        # Follows the above Instructions to get all the events that happen on that day.
        events = []
        for i in range(len(self.events) - 1, -1, -1):
            event = self.events[i]
            if event[0] < date:
                break
            k = (date - event[1] - 1) // event[2] + 1
            t = event[1] + k * event[2] - date
            if k >= 0 and t < 86400:
                events.append((t, i))
        return events

    def getEvent(self, idx):
        return self.events[idx]

# ============ PYGAME INPUT HANDLER ============

class InputHandler:
    def __init__(self):
        self.keyDown = pygame.key.get_pressed()
        self.prevKeyDown = pygame.key.get_pressed()
        self.mouseDown = pygame.mouse.get_pressed(3)
        self.prevMouseDown = pygame.mouse.get_pressed(3)
        self.mousePos = pygame.mouse.get_pos()

    def update(self):
        self.prevKeyDown = self.keyDown
        self.prevMouseDown = self.mouseDown
        self.keyDown = pygame.key.get_pressed()
        self.mouseDown = pygame.mouse.get_pressed(3)
        self.mousePos = pygame.mouse.get_pos()

    def getKey(self, key, mode="down"):
        match mode:
            case "down":
                return self.keyDown[key]
            case "press":
                return self.keyDown[key] and not self.prevKeyDown[key]
            case "release":
                return self.prevKeyDown[key] and not self.keyDown[key]
            case _:
                print(f"Unknown Mode {mode}")
                return False

    def getMouse(self, mouse, mode="down"):
        match mode:
            case "down":
                return self.mouseDown[mouse]
            case "press":
                return self.mouseDown[mouse] and not self.prevMouseDown[mouse]
            case "release":
                return self.prevMouseDown[mouse] and not self.mouseDown[mouse]
            case _:
                print(f"Unknown Mode {mode}")
                return False

# ============ CALENDAR CLASS ============

utc = datetime.timezone.utc

class Calendar:
    def __init__(self, filename):
        self.loader = CalendarLoader(filename)
        self.loader.load_events()
        now = (time.time() // 86400) * 86400
        self.line = 20
        self.date = now
        self.start = now
        self.end = now
        self.step = 86400
        self.addIdx = 0
        self.selected = 0

    def set_filename(self, filename):
        self.loader.set_file(filename)

    def render(self, font, inHand, offset):
        events = sorted(self.loader.getDay(self.date))
        relx, rely = inHand.mousePos[0] - offset[0], inHand.mousePos[1] - offset[1]
        idx = -1
        if 20 < relx < 250 and 5 + 1.5 * self.line < rely:
            idx = int((rely - 5) / self.line - 1.5)
        if idx >= len(events):
            idx = -1
        if inHand.getMouse(0, "press") and idx != -1:
            self.selected = idx
        if inHand.getKey(pygame.K_UP, "press"):
            self.addIdx = (self.addIdx - 1 + 3) % 3
        if inHand.getKey(pygame.K_DOWN, "press"):
            self.addIdx = (self.addIdx + 1) % 3

        surf = pygame.Surface((600, 400))
        surf.fill((0, 255, 255))
        surf.blit(font.render(datetime.datetime.fromtimestamp(self.date, utc).strftime("%A %B %d, %Y"), True, (0, 0, 0)), (20, 5))
        for i, (t, eventIdx) in enumerate(events):
            event = self.loader.getEvent(eventIdx)
            timing = datetime.datetime.fromtimestamp(t, utc).strftime("%I:%M %p")
            colour = ((0, 0, 0) if event[5] != 1 else (0, 180, 0)) if i != self.selected else (0, 0, 127)
            status = "[]" if event[5] == 1 else "X"
            surf.blit(font.render(f"{status} {timing}: {event[3]}", True, colour), (20, 5 + (i + 1.5) * self.line))
            if i == self.selected:
                surf.blit(font.render(datetime.datetime.fromtimestamp(event[1], utc).strftime("Start: %A %B %d, %Y - %H"), True, (0, 0, 0)), (270, 5 + 9 * self.line))
                surf.blit(font.render(datetime.datetime.fromtimestamp(event[0], utc).strftime("End: %A %B %d, %Y - %H"), True, (0, 0, 0)), (270, 5 + 10 * self.line))
                surf.blit(font.render(datetime.datetime.fromtimestamp(event[2] - 86400, utc).strftime("Step: %d days; %H hours"), True, (0, 0, 0)), (270, 5 + 11 * self.line))
                surf.blit(font.render("=== Description ===", True, (0, 0, 0)), (270, 5 + 12 * self.line))
                surf.blit(font.render(f"{event[4]}", True, (0, 0, 0)), (270, 5 + 13 * self.line))
        if inHand.getKey(pygame.K_f, "press"):
            self.loader.events[events[self.selected][1]][5] = 1 - self.loader.events[events[self.selected][1]][5]
        colours = [(0, 0, 0), (0, 0, 0), (0, 0, 0)]
        colours[self.addIdx] = (0, 0, 127)
        surf.blit(font.render(datetime.datetime.fromtimestamp(self.start, utc).strftime("Start: %A %B %d, %Y - %H"), True, colours[0]), (270, 5))
        surf.blit(font.render(datetime.datetime.fromtimestamp(self.end, utc).strftime("End: %A %B %d, %Y - %H"), True, colours[1]), (270, 5 + self.line))
        surf.blit(font.render(datetime.datetime.fromtimestamp(self.step - 86400, utc).strftime("Step: %d days; %H hours"), True, colours[2]), (270, 5 + 2 * self.line))
        surf.blit(font.render(("START", "END", "STEP")[self.addIdx], True, (0, 127, 0)), (300, 5 + 4 * self.line))
        clickIdx = (-1, -1)
        for t in range(2):
            for i in range((4, 4, 2)[self.addIdx]):
                bx = 370 + i * 25
                by = 5 + 4 * self.line + t * 25
                pygame.draw.rect(surf, (0, 0, 0), (bx - 10, by - 10, 20, 20), 2, 4)
                symbol = "+" if t == 0 else "-"
                surf.blit(font.render(symbol, True, (0, 0, 0)), (bx - 3, by - 13))
                if abs(relx - bx) < 10 and abs(rely - by) < 10:
                    clickIdx = (i, t)
        if inHand.getMouse(0, "press") and clickIdx[0] != -1:
            m = (1, -1)[clickIdx[1]]
            i = clickIdx[0]
            match self.addIdx:
                case 0:
                    if i == 1:
                        self.start += m * 86400
                    else:
                        dt = datetime.datetime.fromtimestamp(self.start, utc)
                        para = [dt.month, dt.day, dt.year, dt.hour]
                        if i == 0:
                            para[i] = (para[i] + m + 11) % 12 + 1
                        elif i == 3:
                            para[i] = (para[i] + m + 24) % 24
                        else:
                            para[i] += m
                        self.start = datetime.datetime(para[2], para[0], para[1], para[3], tzinfo=utc).timestamp()
                case 1:
                    if i == 1:
                        self.end += m * 86400
                    else:
                        dt = datetime.datetime.fromtimestamp(self.end, utc)
                        para = [dt.month, dt.day, dt.year, dt.hour]
                        if i == 0:
                            para[i] = (para[i] + m + 11) % 12 + 1
                        elif i == 3:
                            para[i] = (para[i] + m + 24) % 24
                        else:
                            para[i] += m
                        self.end = datetime.datetime(para[2], para[0], para[1], para[3], tzinfo=utc).timestamp()
                case 2:
                    self.step += m * (86400, 3600)[i]
            self.start = max(self.start, 0)
            self.step = max(self.step, 86400)
            self.end = max(self.end, 0)

        clickIdx = -1
        surf.blit(font.render("Events: Add    Remove    Save", True, (0, 0, 0)), (270, 7 * self.line - 8))
        for t in range(3):
            bx = 340 + t * 55
            by = 5 + 8 * self.line
            pygame.draw.rect(surf, (0, 0, 0), (bx - 10, by - 10, 20, 20), 2, 4)
            symbol = "+-S"[t]
            o = 2 if t == 2 else 0
            surf.blit(font.render(symbol, True, (0, 0, 0)), (bx - 3 - o, by - 13 + o))
            if abs(relx - bx) < 10 and abs(rely - by) < 10:
                clickIdx = t
        if inHand.getMouse(0, "press") and clickIdx != -1:
            if clickIdx == 0:
                print("Name Of Event: ")
                name = input()
                desc = ""
                print("Description: ")
                while True:
                    add = input()
                    if add == "":
                        break
                    desc += add + '\n'
                index = self.loader.search(time.time() - 2073600)
                self.loader.events = self.loader.events[index:]
                self.loader.events.insert(self.loader.search(self.end), [self.end, self.start, self.step, name, desc[:-1], 0])
            elif clickIdx == 1:
                if 0 <= self.selected < len(events):
                    self.loader.events.pop(events[self.selected][1])
            elif clickIdx == 2:
                self.loader.save_events()

        return surf

# ============ PRIMARY PYGAME LOOP ============

pygame.init()
pygame.font.init()
high_score = 0
score = 0
fps = 60
fpsClock = pygame.time.Clock()

width, height = 840, 480
screen = pygame.display.set_mode((width, height))
pygame.display.set_caption("Calendar App")

font = pygame.font.SysFont("comicsans", 25)
inHand = InputHandler()
calendar = Calendar("event.txt")

# print(calendar.loader.events)

# Main Game Loop
running = True
while running:
    for event in pygame.event.get():
        if event.type == pygame.QUIT:
            pygame.quit()
            running = False

    if not running:
        break
    inHand.update()

    screen.fill((255, 255, 255))

    clickIdx = (-1, -1)
    screen.blit(font.render("Calendar Date Controller", True, (0, 0, 0)), (630, 18))
    for i in range(3):
        by = 55 + i * 25
        label = ("Year", "Month", "Day")[i]
        screen.blit(font.render(f"{label}: ", True, (0, 0, 0)), (630, by - 12))
        for t in range(2):
            bx = 700 + t * 25
            pygame.draw.rect(screen, (0, 0, 0), (bx - 10, by - 10, 20, 20), 2, 4)
            symbol = "+" if t == 0 else "-"
            screen.blit(font.render(symbol, True, (0, 0, 0)), (bx - 3, by - 13))
            if abs(inHand.mousePos[0] - bx) < 10 and abs(inHand.mousePos[1] - by) < 10:
                clickIdx = (i, t)
    if inHand.getMouse(0, "press") and clickIdx[0] != -1:
        m = (1, -1)[clickIdx[1]]
        i = clickIdx[0]
        if i == 2:
            calendar.date += m * 86400
        else:
            dt = datetime.datetime.fromtimestamp(calendar.date, utc)
            para = [dt.year, dt.month, dt.day]
            if i == 1:
                para[i] = (para[i] + m + 11) % 12 + 1
            else:
                para[i] += m
            calendar.date = datetime.datetime(para[0], para[1], para[2], tzinfo=utc).timestamp()
        calendar.date = max(calendar.date, 0)

    screen.blit(calendar.render(font, inHand, (20, 20)), (20, 20))

    pygame.display.flip()
    fpsClock.tick(fps)

# Closed the game
print("App Closed Successfully")